5.5" HDMI OLED Display V1 (Legacy)
This document describes the V1 (legacy) version of the 5.5" HDMI OLED Display and is provided for reference only.
Introduction
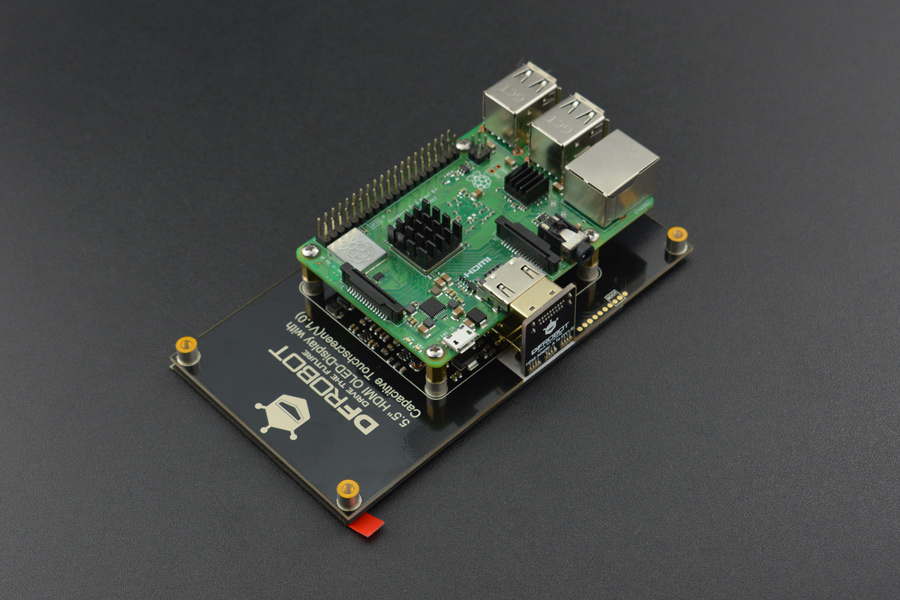
This is a 5.5" HDMI OLED-Display with Capacitive Touchscreen. It has 1920×1080 HDMI high-definition output and comes with a capacitive touch panel on its screen. The touch panel supports multi-touch which can simultaneously identify 5 touch points at most. Besides, the USB touchscreen adopts DFRobot driver-free technology. So without the special requirement of installing drivers, the touchscreen can be used as easy as a keyboard or a mouse. It can be directly plugged into a computer for touching control, which is able to replace the mouse. In combination with an HDMI display screen, the display device turns into a tablet PC in seconds!
The screen supports three mainstream operating system: Windows, Linux, and MACOS. It can work with Lattepanda, Raspberry Pi and other devices with HDMI output, which can truly be totally compatible with all platforms. The design of the special hole on the back of the screen is convenient for the direct installation of the product in Raspberry PI's controller. There is no need to provide an external power supply for the screen as it can be powered by USB port. In addition, the display brigtness is set by host systems, no need for hardware adjustment and convenient to use.
 NOTE: Please guarantee the external power supply current is above 1.5A@5V when it is driven by raspberry Pi. The lower current will darken the screen and reduce the touching sensitivity.
Features
- Capacitive Touchscreen, Support 5 Touch Points
- HDMI Interface
- USB Power Supply, Driver-free Installation
- Software Backlight Adjustment
Specification
- Operating Voltage: 5V
- Operating Current: 700mA
- Refresh Frequency: 60Hz
- Screen Resolution: 1920 x 1080
- Viewing Angle: 160°
- Video Interface: MINI-HDMI
- Touch Interface: Micro-USB
- Dimension: 130mm x 71mm
- Mounting Hole Size: M2.5
- Outside Mounting Hole Position: 123mm x 64mm
- Inside Mounting Hole Position: 58mm x 49mm
- Weight: 150g
Board Overview

- Standard MINI-HDMI
- Standard Micro USB (Touch&Power Supply)
Tutorial
The screen supports Windows, Linux and MACOS. You can configure the output resolution through setup on Windows and MAC, and through command on Linux.
Touchscreen with Raspberry Pi
- The adapter included in the package is only suitable for Raspberry Pi. For other systems, you need to buy yourself the corresponding adapter.
You need to reset resolution to avoid touch deviation caused by resolution difference between Raspberry Pi and the Touchscreen when you use 5.5" FHD touchscreen. (Insufficient power supply will affect the touching sensitivity.)
- Screen display resolution configuration
In the terminal, enter /boot/config.txt, add the following code to the end:
hdmi_ignore_edid=0xa5000080
config_hdmi_boost=4
#hdmi_timings=1080 0 1 2 2 1920 0 32 2 28 0 0 0 48 0 99532800 3
hdmi_cvt=1080 1920 48 3 0 0 0
hdmi_driver=2
hdmi_group=2
hdmi_mode=87
max_framebuffer_width=1080
max_framebuffer_height=1920
display_rotate=1
The parameters in Raspberry Pi 4B is as below:
NOTE:
- Now it only supports HDMI0 port.
- If the original comfig.txt contains the parameter “dtoverlay=vc4-fkms-v3d”, please comment it, which means add the “***#***” to the forehead, so that is changes to “***#dtoverlay=vc4-fkms-v3d***”
hdmi_cvt=1080 1920 48 3 0 0 0
hdmi_driver=2
hdmi_group=2
hdmi_mode=87
max_framebuffer_width=1080
max_framebuffer_height=1920
display_rotate=0
display_rotate=0, 1, 2, 3 (representing to rotate the screen 0°, 90°, 180°, 270° respectively)
- Touchscreen Configuration
Download DFRobot_RaspberryPi_TouchScreen_Firmware to the host, default to the file Downloads. Press Ctrl Alt T simultaneously to open the terminal as shown below:

Enter /home/pi/Downloads, then input the command unzip DFRobot_RaspberryPi_TouchScreen_Firmware-master.zip to extract the file as shown below:

Enter the folder DFRobot_RaspberryPi_TouchScreen_Firmware-master/5.5 HDMI_DISPLAY, then input sudo python touch_rotate.py and the value of display-rotate in config.txt. Now you just need to wait for the restart of the Raspberry Pi.
The firmware update method of 5.5” FHD touchscreen is same as 7” touchscreen.
Dfu-util (Device Firmware Upgrade Utilities) is a free, open-source, and cross-platform firmware update program. Without platform limitations, it is easy to update firmware for devices with microcontrollers.
Please visit the official web at http://dfu-util.sourceforge.net for more details.
In Windows
-
1. Download USB driver installation tools zadig.exe
Address:http://zadig.akeo.ie/downloads/zadig_2.2.exe -
2. Enter dfu mode
Short-circuit the boot’s two pins, and then connect it to the computer via USB (Short-circuit first and connect).
-
3. Install winUSB driver in Zadig


-
Click Options, select List All Devices (1)
-
Select “STM32 DFU” in the drop-down box (2)
-
Select “WinUSB” in Driver (3)
-
Click Install Driver (4)
-
Click continue to install if a dialog box pops-up.
When it fails to install winUSB driver with zadig , the following interface will appear, which prompts that the file msvcr100d.dll is missing. (Win10 systems already has the file msvcr100d.dll and won't report error)

-
Win7(32 bit/64 bit)
Download msvcr100d.dll, place it in the C:\Windows\System32 directory, and re-install the driver, then it won't report errors. -
Win8
-
32 bit
Download msvcr100d.dll, place it in the C:\Windows\System32 directory, and re-install the driver, then it won't report errors. -
64 bit
Download msvcr100d.dll, place it in the same level directory of zadig.exe.(if you place it in the C:\Windows\System32 directory, there will be a new error report. )

-
4. Download dfu-uti tool
Click to download dfu-util for 32bit
Click to download dfu-util for 64bit -
5. Unzip the file to you computer, such as “desktop>dfu-util-0.9-win64”, and it can be used without installation.
-
6. Click to download files for a firmware update, then unzip the file and copy the xxxx.dfu, erase.bin, upload.py in the /5.5"HMDI_DISPLY/windows directory to the directory ”desktop>dfu-util-0.9-win64”.
-
7. Run upload.py (Windows user needs to install python first. Click to download python)
-
8. The following interface indicates that the program is being burned. When the progress bar goes to 100%, the program burning is done.

- 9. After the burning is finished, re-plug USB device.
In Linux
- 1. Enter dfu mode
Short-circuit the boot’s two pins, and then connect it to the computer via USB (Short-circuit first and connect).
-
2. Use apt-get to install dfu-util
apt-get install dfu-util -
3. Upgrade firmware through upload.py(root privileges are required)
-
4. Click to download files for firmware update.
Open the terminal to enter the newly downloaded firmware directory DFRobot_RaspberryPi_TouchScreen_Firmware/5.5"HMDI_DISPLY/linux
Use the command: sudo python upload.py to run the program -
5. Re-plug USB device
In Mac
- 1. Enter dfu mode
Short-circuit the boot’s two pins, and then connect it to the computer via USB (Short-circuit first and connect).
- 2. Open the command terminal
Open launcpad

Search for “terminal” on the top of the screen.

Open the terminal

-
3. Install dfu-util
brew install dfu-util -
4. Use upload.py for firmware upgrade (root privileges are required.
-
5. Click to download files for a firmware update.
Open the terminal to enter the newly downloaded directory DFRobot_RaspberryPi_TouchScreen_Firmware/5.5"HMDI_DISPLY/linux
Use the command: sudo python upload.py to run the program. -
6. Re-plug USB device
Dimension Diagram

FAQ
Q: After I connected Raspberry Pi, the sensitivity of the touchscreen became very poor and the response became lower. How to solve it?
A:
1. Please check the power supply of Raspberry Pi. When using the touchscreen, the minimum power supply should be 1.5A.
2. Check the resolution configuration. You can refer to the Raspberry Pi tutorial.
For any questions, advice or cool ideas to share, please visit the DFRobot Forum.
More Documents
Was this article helpful?