Example Code for Arduino-Icon Display
This is an example of commonly-used icons. 1. We use [GIMP2](https://www.gimp.org/downloads/ "GIMP2") to convert these icons into codes for better display. 2. We provide some icons for you, [Click here to find more](https://dfimg.dfrobot.com/nobody/wiki/743870c9f4874a47534c979884a03360.zip "DFRobot_Icon-master.zip")"Click here to find more").
Hardware Preparation
- DFRduino UNO R3 (or similar) x 1
- 2.0" 320x240 IPS TFT LCD Display with MicroSD Card Breakout x1
- Wires
Software Preparation
- Arduino IDE
- Download and install the DFRobot GDL Library. (About how to install the library?)
- DFRobot_GDL API Function, click to find more detailed information
Wiring Diagram

Other Preparation Work
- All the demo files of this product are stored in file DFRobot_GDL->example->basic.
- Please open the corresponding constructed functions (DFRobot_ST7789_240x240_HW_SPI) before burning demo into your device.
Sample Code
/*!
 * @file icon.ino
 * @brief Display some small icons on the screen
 * @n The demo supports Arduino Uno, Leonardo, Mega2560, FireBeetle-ESP32, FireBeetle-ESP8266, FireBeetle-M0
 * @copyright Copyright (c) 2010 DFRobot Co. Ltd (http://www.dfrobot.com)
 * @licence The MIT License (MIT)
 * @author [YeHangYu] ([email protected])
 * @version V0.1
 * @date 2020-01-07
 * @url https://github.com/DFRobot/DFRobot_GDL
 */
#include "DFRobot_GDL.h"
#include "Icon.h"
//Custom communication pins
/*M0*/
#if defined ARDUINO_SAM_ZERO
#define TFT_DC  7
#define TFT_CS  5
#define TFT_RST 6
/*ESP32 and ESP8266*/
#elif defined(ESP32) || defined(ESP8266)
#define TFT_DC  D2
#define TFT_CS  D6
#define TFT_RST D3
/* AVR series mainboard */
#else
#define TFT_DC  2
#define TFT_CS  3
#define TFT_RST 4
#endif

/**
 * @brief Constructor Constructor of hardware SPI communication
 * @param dc Command/data line pin for SPI communication
 * @param cs Chip select pin for SPI communication
 * @param rst Reset pin of the screen
 */
//DFRobot_ST7789_240x240_HW_SPI screen(/*dc=*/TFT_DC,/*cs=*/TFT_CS,/*rst=*/TFT_RST);
DFRobot_ST7789_240x320_HW_SPI screen(/*dc=*/TFT_DC,/*cs=*/TFT_CS,/*rst=*/TFT_RST);
//DFRobot_ILI9341_240x320_HW_SPI  screen(/*dc=*/TFT_DC,/*cs=*/TFT_CS,/*rst=*/TFT_RST);
//DFRobot_ILI9488_320x480_HW_SPI screen(/*dc=*/TFT_DC,/*cs=*/TFT_CS,/*rst=*/TFT_RST);
/* M0 mainboard DMA transfer */
//DFRobot_ST7789_240x240_DMA_SPI screen(/*dc=*/TFT_DC,/*cs=*/TFT_CS,/*rst=*/TFT_RST);
//DFRobot_ST7789_240x320_DMA_SPI screen(/*dc=*/TFT_DC,/*cs=*/TFT_CS,/*rst=*/TFT_RST);
//DFRobot_ILI9341_240x320_DMA_SPI screen(/*dc=*/TFT_DC,/*cs=*/TFT_CS,/*rst=*/TFT_RST);
//DFRobot_ILI9488_320x480_DMA_SPI screen(/*dc=*/TFT_DC,/*cs=*/TFT_CS,/*rst=*/TFT_RST);


void setup() {
  Serial.begin(115200);
  screen.begin();
}

void loop() {
  int w = screen.width();
  int h = screen.height();
  int a = millis()/1000;//Get Time
     //0x00FF is color data in the format RGB565
  uint16_t color = 0x00FF;

  screen.fillScreen(COLOR_RGB565_WHITE);

  while(1) {
    for(int i = 0;i < 12; i++){
      //Display time with font, program execution time in second
      screen.fillRect(16,16,w-16*2,35, COLOR_RGB565_WHITE);
      screen.setTextWrap(false);
	   //0x30FF is the color data in the format of RGB565
      screen.setTextColor(0x30FF);
      screen.setTextSize(3);
      screen.setCursor(30, 30);
      screen.println("Time:");
	   //0x00FF is color data in RGB565 format
      screen.setTextColor(0x00FF);
      screen.setTextSize(3);
      screen.setCursor(120, 30);
      a = millis()/1000;
      screen.println(a, 1);
      /**
       * @brief Fill a rounded rectangle
       * @param x The x-coordinates of the starting point of the rectangle
       * @param y The y-coordinates of the starting point of the rectangle
       * @param w Rectangle width
       * @param h Rectangle height
       * @param r Fillet radius
       * @param color Rectangle color
       */
       screen.fillRoundRect(w/2-48-12, h/2-16-8, 32*3+12*2, 32+8*2, 20, 0x0000);
      /**
       * @brief Draw horizontal and vertical lines to draw frame
       * @param x The x-coordinate of the starting point of the line
       * @param y The y-coordinate of the starting point of the line
       * @param h Line length
       * @param color Line color
       */
      for(int x = 0; x<16 ;x++)
      screen.drawFastVLine(/*x=*/x,/*y=*/0,/*h=*/h,/*color=*/color);
      for(int y = 0; y<16 ;y++)
      screen.drawFastHLine(/*x=*/16,/*y=*/y,/*w=*/w-16*2,/*color=*/color);
      for(int x = w-1; x>=w-16 ;x--)
      screen.drawFastVLine(x,0,h, color);
      for(int y = h-1; y>=h-16 ;y--)
      screen.drawFastHLine(16,y,w-16*2,color);
      /**
       * @brief Draw monochrome pictures with different drawing orders
       * @param x 0 Set the starting point to be at the upper left of the screen, near the left side
       * @param y 0 Near the upper side
       * @param bitmap gImage_XBitmap The array in the header file XBitmap, the array elements are single bytes
       * @param w 240 Picture width
       * @param h 240 Picture height
       * @param color Set color
       */
      screen.drawXBitmap(/*x=*/w/2-48,/*y=*/h/2-16,/*bitmap gImage_Bitmap=*/gImage[i],/*w=*/32,/*h=*/32,color+=0x0700);
      //Delay 1 second
      delay(1000);

      screen.drawXBitmap(/*x=*/w/2-16,/*y=*/h/2-16,/*bitmap gImage_Bitmap=*/gImage[i+1],/*w=*/32,/*h=*/32,color+=0x0700);
      delay(1000);

      screen.drawXBitmap(/*x=*/w/2+16,/*y=*/h/2-16,/*bitmap gImage_Bitmap=*/gImage[i+2],/*w=*/32,/*h=*/32,color+=0x0700);
      delay(1000);

    }
  }


}
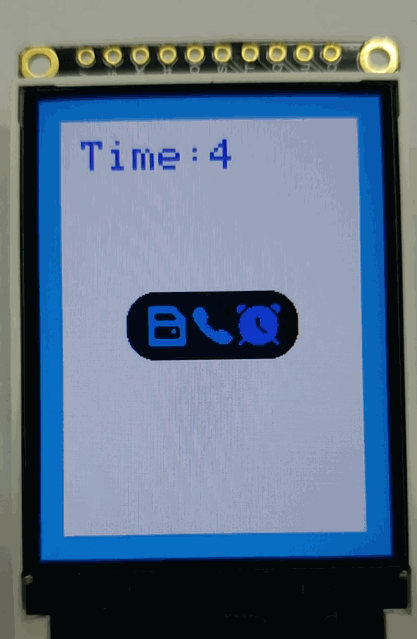
Result
Was this article helpful?