
Example Code for Arduino-Sensor Calibration
Last revision 2025/12/17
How to measure soil moisture with this sensor? — You don't measure directly. First, you must calibrate it to your specific environment. How do I calibrate it? — This guide provides calibration code that reads the sensor's analog output in two extreme conditions: in air (to get the dry boundary, Value 1) and in water (to get the wet boundary, Value 2). These two values become your reference points, allowing you to convert any future analog reading into a meaningful soil moisture percentage. Follow the steps below to complete your hardware setup and calibration.
Hardware Preparation
- DFRduino UNO x1
- Capacitive Soil Moisture Sensor x1
- Jumper Cable x3
Software Preparation
- Arduino IDE V1.6.5 Click to Download Arduino IDE
Wiring Diagram
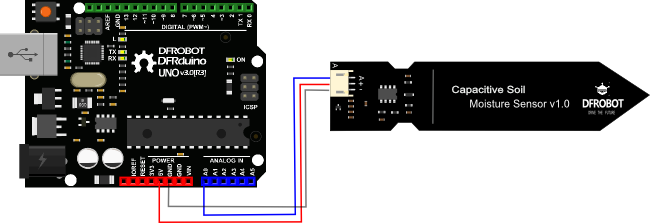
Connect the sensor and the main control board according to the picture below.
| Color | port |
| Red | VCC |
| Black | GND |
| Yellow | Signal |
Calibration Code
Before using the sensor, we need to calibrate to get the measurement range of the sensor.
void setup() {
  Serial.begin(9600); // open serial port, set the baud rate as 9600 bps
}
void loop() {
  int val;
  val = analogRead(0); //connect sensor to Analog 0
  Serial.println(val); //print the value to serial port
  delay(100);
}
Calibration
Calibration Range
-
Open the serial port monitor and set the baud rate to 9600
-
Record the sensor value when the probe is exposed to the air as "Value 1". This is the boundary value of dry soil “Humidity: 0%RH”
-
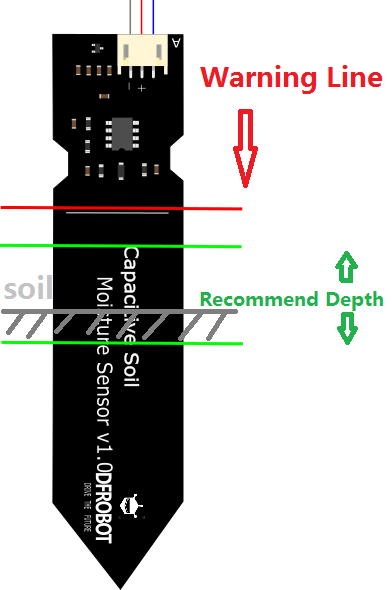
Take a cup of water and insert the probe into it no further than the red line in the diagram
-
Record the sensor value when the probe is exposed to the water as "Value 2". This is the boundary value of moist soil “Humidity: 100%RH”
The components on this board are NOT waterproof, do not expose to moisture further than the red line. (If you want to protect components from the elements, try using a length of wide heat shrink tubing around the upper-section of the board.)
There is an inverse ratio between the sensor output value and soil moisture.
Section Settings
The final output value is affected by probe insertion depth and how tight the soil packed around it is. We regard "value_1" as dry soil and "value_2" as soaked soil. This is the sensor detection range.
For example: Value_1 = 520; Value_2 = 260.
The range will be divided into three sections: dry, wet, water. Their related values are:
- Dry: (520 430]
- Wet: (430 350]
- Water: (350 260]
Was this article helpful?