Introduction
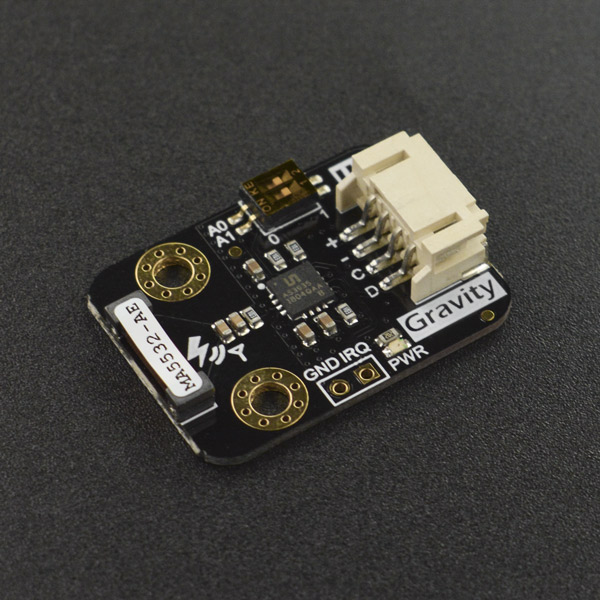
Gravity: Lightning Sensor employs AMS innovative AS3935 Franklin lightning sensor IC and Coilcraft MA5532-AE dedicated antenna to detect lightning distance, intensity, and frequency within a radius of 40km both indoors or outdoors.
The embedded man-made disturber rejection algorithm can effectively avoid the electrical interference generated by various household appliances. In addition to allowing general weather enthusiasts to measure local thunderstorm data simply and efficiently, thanks to its compact size and wide detection range, it can also be embedded in various smart wearable devices for outdoor climber or people who work at heights. This provides early warning of thunderstorms that people can perceive, so that people can take precautions a step ahead. The sensor can also be embedded in the indoor protection device inside lightning-sensitive equipment, and automatically trigger these devices to switch to the backup power to isolate the power grid when lightning strikes. At the moment of lightning, the interrupt pin IRQ generates a pulse. This can be used to trigger the shutter to open, helping photographers to accurately capture the exciting moment of lightning.
Features
- Lightning detection within 40km in 15 steps
- Lighting intensity detection
- Used both indoors or outdoors
- Embedded man-made disturber rejection algorithm
- Embedded man-made disturber rejection algorithm
Specification
- Input Voltage : 3.3V~5.5V
- Maximum Detection Range: 40 km
- Distance Detection Resolution: 1~4 km
- Maximum Detection Range: 40 km
- Intensity Detection Resolution: 21 bits, i.e. 0 ~16777201
- I2C Address: Three options 0x03, 0x02, 0x01
- Interface: Gravity I2C (logic level: 0-VCC)
- Dimension: 30.0mm*22.0mm
- Weight: 10g
Board Overview
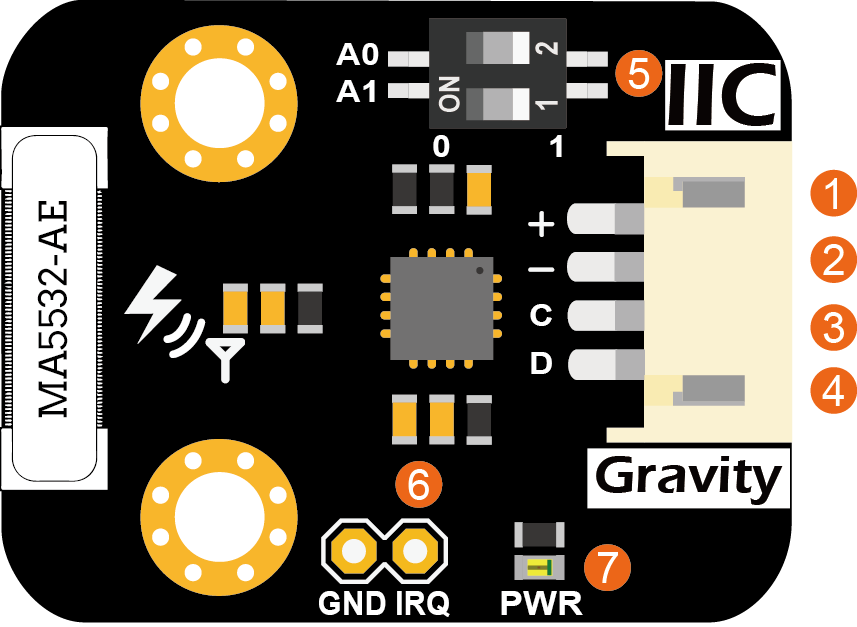
| No. | Label | Description |
|---|---|---|
| 1 | VCC | Power VCC(3.3~5.5V) |
| 2 | GND | Power GND |
| 3 | SCL | I2C clock signal |
| 4 | SDA | I2C data signal |
| 5 | ADDR | I2C address DIP switch |
| 6 | IRQ | Lightning alarm interrupt pin |
| 7 | PWR | Power indicator (red) |
About Lightning Distance and Intensity Estimation
- The maximum estimated distance of lightning strike is 40km. Limited by the inherent measurement method and algorithm, the distance estimation resolution is 1~4km, 40 km in 15 steps. This is shown in the following table:
| No. | Distance (km) |
|---|---|
| 1 | 40 |
| 2 | 37 |
| 3 | 34 |
| 4 | 31 |
| 5 | 27 |
| 6 | 24 |
| 7 | 20 |
| 8 | 17 |
| 9 | 14 |
| 10 | 12 |
| 11 | 10 |
| 12 | 8 |
| 13 | 6 |
| 14 | 5 |
| 15 | Storm is Overhead! |
- The estimated lightning intensity is 21 bits, i.e. 0 ~ 16777201. This value is just a pure number and has no physical meaning, but it can be used to compare the relative strength between different lightnings.
Arduino Tutorial
This tutorial presents a basic usage of the module with Arduino UNO.
Requirements
-
Hardware
- DFRduino UNO R3 (or similar) x 1
- DFRobot Gravity: Lightning Sensor x 1
- Gravity 4P sensor wire (or Dupont wires) x 1
-
Software
- Arduino IDE
- Download and install the DFRobot_AS3935 Library. (About how to install the library?)
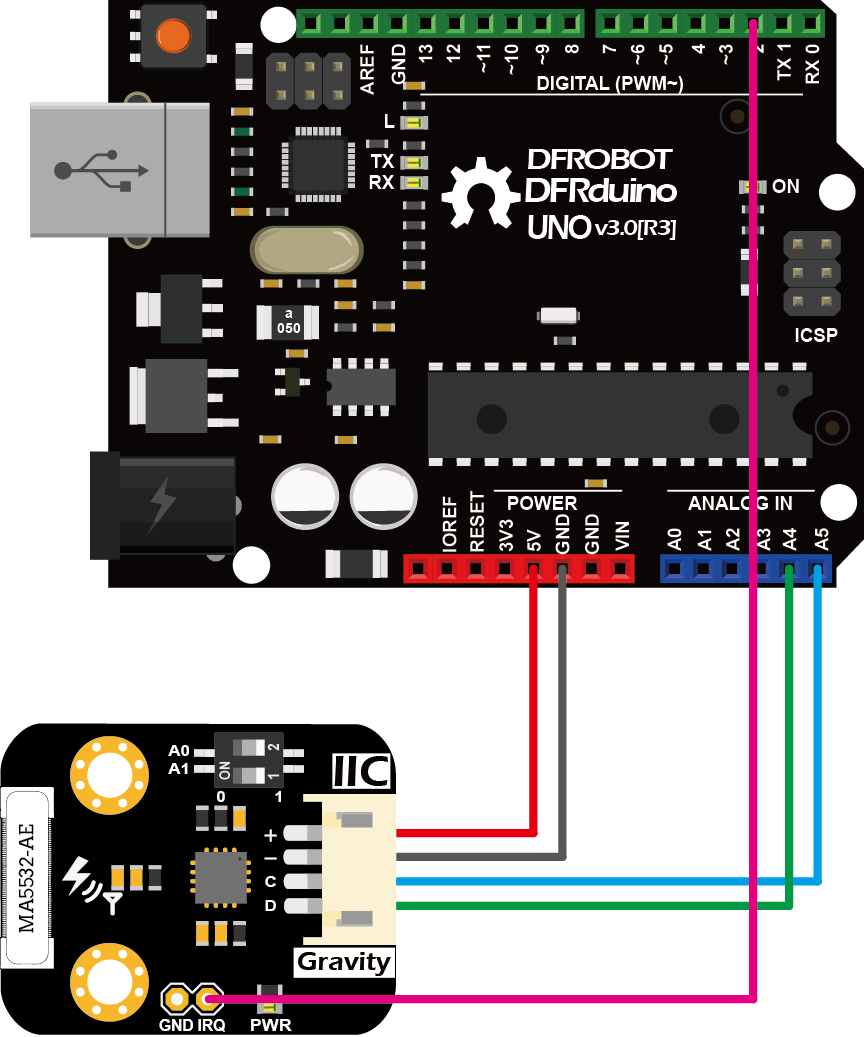
Connection Diagram
Sample Code
- Connect the module to the Arduino according to the connection diagram. The I2C address defaults to 0x03, which corresponds to “AS3935_ADD3” in the code. If you need to modify the I2C address, you can change it to 0x01 or 0x02 through the DIP switch on the module, and modify the macro definition of the I2C address in the software "#define AS3935_I2C_ADDR AS3935_ADDx", where x can be 1, 2, 3.
- Install DFRobot_AS3935 library.
- Open Arduino IDE, upload the following sample code to the Arduino UNO.
- Open the serial monitor of the Arduino IDE and set the baud rate to 115200.
/*!
 * @file DFRobot_AS3935_lightning_sensor_ordinary.ino
 * @brief SEN0290 Lightning Sensor
 * @n This sensor can detect lightning and display the distance and intensity of the lightning within 40 km
 * @n It can be set as indoor or outdoor mode.
 * @n The module has three I2C, these addresses are:
 * @n  AS3935_ADD1  0x01   A0 = 1  A1 = 0
 * @n  AS3935_ADD2  0x02   A0 = 0  A1 = 1
 * @n  AS3935_ADD3  0x03   A0 = 1  A1 = 1
 * @copyright   Copyright (c) 2010 DFRobot Co.Ltd (http://www.dfrobot.com)
 * @license     The MIT License (MIT)
 * @author [TangJie](jie.tang@dfrobot.com)
 * @version  V1.0.2
 * @date  2019-09-28
 * @url https://github.com/DFRobor/DFRobot_AS3935
 */

#include "DFRobot_AS3935_I2C.h"

volatile int8_t AS3935IsrTrig = 0;

#if defined(ESP32) || defined(ESP8266)
#define IRQ_PIN       0
#else
#define IRQ_PIN       2
#endif

// Antenna tuning capcitance (must be integer multiple of 8, 8 - 120 pf)
#define AS3935_CAPACITANCE   96

// Indoor/outdoor mode selection
#define AS3935_INDOORS       0
#define AS3935_OUTDOORS      1
#define AS3935_MODE          AS3935_INDOORS

// Enable/disable disturber detection
#define AS3935_DIST_DIS      0
#define AS3935_DIST_EN       1
#define AS3935_DIST          AS3935_DIST_EN

// I2C address
#define AS3935_I2C_ADDR       AS3935_ADD3

void AS3935_ISR();

DFRobot_AS3935_I2C  lightning0((uint8_t)IRQ_PIN, (uint8_t)AS3935_I2C_ADDR);

void setup()
{

  Serial.begin(115200);
  Serial.println("DFRobot AS3935 lightning sensor begin!");

  while (lightning0.begin() != 0){
    Serial.print(".");
  }
  lightning0.defInit();

  #if defined(ESP32) || defined(ESP8266)
    attachInterrupt(digitalPinToInterrupt(IRQ_PIN),AS3935_ISR,RISING);
  #else
    attachInterrupt(/*Interrupt No*/0,AS3935_ISR,RISING);
  #endif

  // Configure sensor
  lightning0.manualCal(AS3935_CAPACITANCE, AS3935_MODE, AS3935_DIST);
  // Enable interrupt (connect IRQ pin IRQ_PIN: 2, default)

//  Connect the IRQ and GND pin to the oscilloscope.
//  uncomment the following sentences to fine tune the antenna for better performance.
//  This will dispaly the antenna's resonance frequency/16 on IRQ pin (The resonance frequency will be divided by 16 on this pin)
//  Tuning AS3935_CAPACITANCE to make the frequency within 500/16 kHz ± 3.5%
//  lightning0.setLcoFdiv(0);
//  lightning0.setIRQOutputSource(3);

}

void loop()
{
  // It does nothing until an interrupt is detected on the IRQ pin.
  while (AS3935IsrTrig == 0) {delay(1);}
  delay(5);

  // Reset interrupt flag
  AS3935IsrTrig = 0;

  // Get interrupt source
  uint8_t intSrc = lightning0.getInterruptSrc();
  if (intSrc == 1){
    // Get rid of non-distance data
    uint8_t lightningDistKm = lightning0.getLightningDistKm();
    Serial.println("Lightning occurs!");
    Serial.print("Distance: ");
    Serial.print(lightningDistKm);
    Serial.println(" km");

    // Get lightning energy intensity
    uint32_t lightningEnergyVal = lightning0.getStrikeEnergyRaw();
    Serial.print("Intensity: ");
    Serial.print(lightningEnergyVal);
    Serial.println("");
  }else if (intSrc == 2){
    Serial.println("Disturber discovered!");
  }else if (intSrc == 3){
    Serial.println("Noise level too high!");
  }
}
//IRQ handler for AS3935 interrupts
void AS3935_ISR()
{
  AS3935IsrTrig = 1;
}
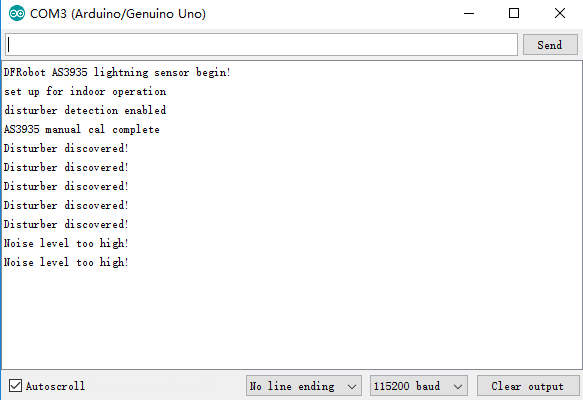
Results
- When lightning occurs, the interrupt alarm pin IRQ triggers the controller to display the lightning alarm "Lightning occurs!", and shows the estimated lightning distance and intensity.
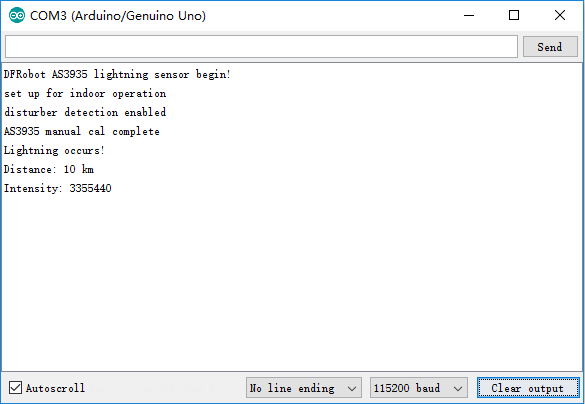
- When there is electromagnetic interference near the module, the module will issue an alarm “Disturber discovered!”. If the interference noise is too large, the module will issue the alarm “Noise level too high!” .
Raspberry Pi Tutorial
This tutorial presents a basic usage of the module with Raspberry Pi.
Requirements
-
Hardware
- Raspberry Pi 3 Model B (or similar) x 1
- DFRobot Gravity: Lightning Sensor x 1
- Gravity 4P sensor wire (or Dupont wires) x 1
-
Software
- RASPBIAN
- Download and install the DFRobot_AS3935 RaspberryPi library.
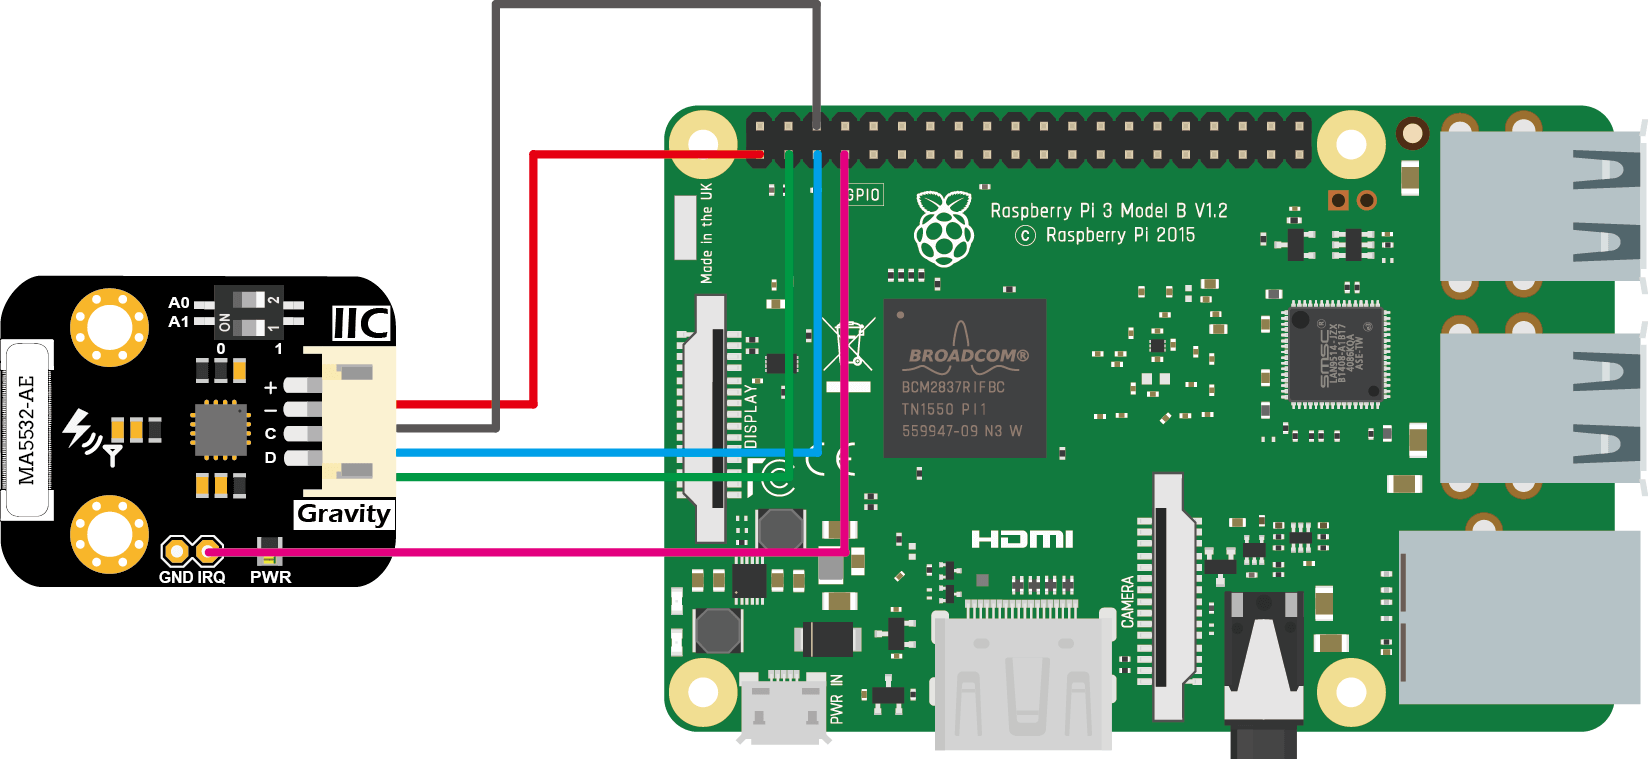
Connection Diagram
Installation
- Start the I2C interface of the Raspberry Pi. If it is already open, skip this step. Open Terminal, type the following command, and press Enter:
pi@raspberrypi:~ $ sudo raspi-config
- Then use the up and down keys to select “5 Interfacing Options” -> “P5 I2C” and press Enter to confirm “YES”. Reboot the Raspberry Pi.
- Installing Python libraries and git (networking required). If it is already installed, skip this step. In the Terminal, type the following commands, and press Enter:
pi@raspberrypi:~ $ sudo apt-get update
pi@raspberrypi:~ $ sudo apt-get install build-essential python-dev python-smbus git
- Download the driver library and run it. In Terminal, type the following commands, and press Enter:
pi@raspberrypi:~ $ git clone https://github.com/DFRobot/DFRobot_AS3935.git
pi@raspberrypi:~ $ cd ~/DFRobot_AS3935/RaspberryPi/Python
pi@raspberrypi:~/DFRobot_AS3935/RaspberryPi/Python $ python DFRobot_AS3935_Lib.py
Run Sample Code
- Connect the module to the Arduino according to the connection diagram. The I2C address defaults to 0x03, which corresponds to “AS3935_ADD3” in the code. If you need to modify the I2C address, you can change it to 0x01 or 0x02 through the DIP switch on the module, and modify the macro definition of the I2C address in the software "#define AS3935_I2C_ADDR AS3935_ADDx", where x can be 1, 2, 3.
- Install DFRobot_AS3935 Raspberry Pi library.
- In the Terminal, type in the following commands and press Enter to run the sample code:
pi@raspberrypi:~/DFRobot_AS3935/RaspberryPi/Python $ cd example
pi@raspberrypi:~/DFRobot_AS3935/RaspberryPi/Python/example $ python DFRobot_AS3935_ordinary.py
Results
- When lightning occurs, the interrupt alarm pin IRQ triggers the controller to display the lightning alarm "Lightning occurs!", and shows the estimated lightning distance and intensity.
- When there is electromagnetic interference near the module, the module will issue an alarm “Disturber discovered!”. If the interference noise is too large, the module will issue the alarm “Noise level too high!” .

FAQ
- Q1: How will I verify that the sensor is working properly if there is no thunderstorm in my area for an extended period of time?
- A1:You can test the sensor by placing it around a large number of computers or RF transmitters, or next to a running microwave oven.
This way you may get Noise level too high/Distruber discovered!
That is, the getInterruptSrc() function may return 2 or 3.
You can also adjust the sensitivity of the sensor to other EMI devices by adjusting the setNoiseFloorLvl() function.