LattePanda Iota 51W PoE Expansion Board
📌 Overview
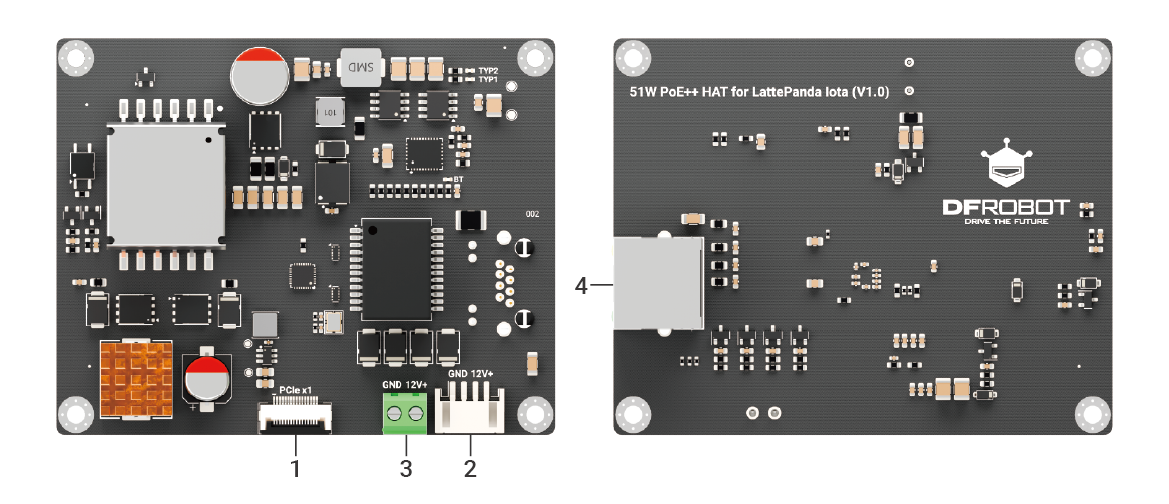
The LattePanda Iota 51W PoE Expansion Board is a high-performance power and network expansion module specifically designed for the LattePanda Iota. Compliant with the IEEE 802.3bt standard, it delivers up to 51W of power output, capable of reliably powering the LattePanda Iota as well as external devices or sensors.
By connecting to an IEEE 802.3bt-compliant PoE switch or router, this board enables both 12V DC power delivery and Gigabit network connectivity over a single Ethernet cable. Additionally, the expansion board integrates an independent Gigabit Ethernet port, enabling dual Ethernet functionality alongside the LattePanda Iota—ideal for industrial automation, edge computing, and remote deployment scenarios.
⚠️ Safety Warning: When powered via PoE, certain circuits on the board may carry up to 50V DC. Avoid touching any exposed circuitry while powered!
🔧 Key Features
Parameter | Specification |
---|---|
PoE Standard | IEEE 802.3af / at / bt |
Input Voltage (PoE) | 37–57V DC |
Output Voltage | 12V DC |
Maximum Output Power | 51W |
Network Port Speed | 1.0 Gbps (Gigabit) |
Onboard Chip | Realtek RTL8111H |
Board Dimensions | 88 × 70 mm |
❗ Important Notes
Notice | Description |
---|---|
✅ Must use IEEE 802.3bt equipment | Using lower-standard PoE sources (e.g., 802.3af/at) may result in insufficient power, causing reboots or shutdowns |
🔥 Inductor heating is normal | The silver inductor labeled "100" may get slightly warm under light loads due to SSR FPWM mode; this is normal, not a fault |
⚠️ Only expansion board port supports PoE | The native Ethernet port on the LattePanda Iota does not support PoE input—do not confuse the two |
🔌 External power output | The 12V terminal block can power external devices (up to 51W); ensure proper load matching |
Compatible Only With: ✔️ LattePanda Iota
🔌 Interface Description

Label | Interface | Function Description |
---|---|---|
1 | PCIe 3.0 x1 FPC Connector | Connects to LattePanda Iota's 16-pin FPC interface for communication with the RTL8111H network chip |
2 | 4-pin Power Output Interface | Supplies 12V DC power to the LattePanda Iota |
3 | 12V DC Power Terminal Block | Output terminal for powering external devices |
4 | RJ45 Port | Gigabit Ethernet port supporting PoE input |
Installation Guide
📦 Hardware Included
Before use, ensure you have the following components:
- 1x 51W PoE Expansion Board
- 1x 16-Pin FPC Cable
- 1x 4-Pin Power Cable
- 4x M3 Double-ended Hex Standoff (for side-by-side mounting)
- 4x M3 Single-ended Hex Standoff (for stacking on top)
- 4x M3 Screws
- PoE Switch/Router (must support IEEE 802.3bt standard, not included)
- Gigabit Ethernet Cable (not included)
⚙️ Hardware Installation Steps
⚠️ Always disconnect all power from the LattePanda Iota before starting!
1. Power Off
Disconnect all power from LattePanda Iota.
2. Install Hex Standoff
- Remove the four M3 screws securing the heatsink/fan on the LattePanda Iota.
- Install four M3 single-ended hex standoffs in their place.
💡 For side-by-side mounting, use M3 Double-ended Hex Standoff instead.
3. Connect FPC Cable
- Insert FPC cable end into LattePanda's 16-pin FPC connector(Gold contacts FACING DOWN)
- Lock connector latch firmly
- Repeat the above steps, insert the other end of the FPC cable into the expansion board's 16-pin FPC connector(Gold contacts FACING DOWN)
4. Connect 4-pin Power Cable
- Use the 4-pin power cable to connect the expansion board's 4-pin power output to the LattePanda's PH2.0 4-pin power port.
- Check the silkscreen markings at the connector to ensure correct polarity.
5. Mount the Expansion Board
- Align the expansion board (RJ45 port facing down) with the standoffs, ensuring the Ethernet port positions above the TF card slot.
- Secure the board using 4 M3 screws.
6. Final Check
- Confirm all screws are tightened.
- Ensure the FPC cable is fully latched and secure.
- Double-check power cable polarity.
- Connect PoE power and verify the PWR LED lights up, indicating normal power delivery.
💾 Driver Installation
1. Automatic Detection
- Most operating systems (e.g., Windows, Linux) will automatically detect the new RTL8111H network adapter.
- If the system shows an "Unknown Device", please visit Realtek's official website to manually install the driver.
2. Network Connection Verification
After successful installation:
- A new wired network adapter should appear in Device Manager.
- Two wired connections should be visible in the system’s network settings (original port + expansion port).
- When connected to a live PoE switch, the LattePanda will automatically establish a network connection.