Example Code for Arduino-Position Control
Position/angle motion control example. Steps: 1) Configure the motor and magnetic sensor 2) Run the code 3) Set the target angle (in radians) from serial terminal. Users can learn how to use the SimpleFOCmini board with Arduino for closed-loop position control of a BLDC motor, including configuring the magnetic sensor, initializing the motor and driver, and sending target angles via the serial terminal.
Hardware Preparation
- DFRduino UNO R3 (or similar) x 1
- SimpleFOCmini Brushless DC Motor Driver Board x1
- 4015 brushless DC motor (FIT1036) or FIT1034 or FIT1035 x1
- single-pin DuPont cables x5
Software Preparation
- Arduino IDE
- Download the Arduino_FOC library. This library includes open- and closed-loop control of the position, speed, and torque of a BLDC motor. It supports both the Arduino and ESP32 development boards. You need to adjust the parameters in the code based on the motor parameters.
Wiring Diagram
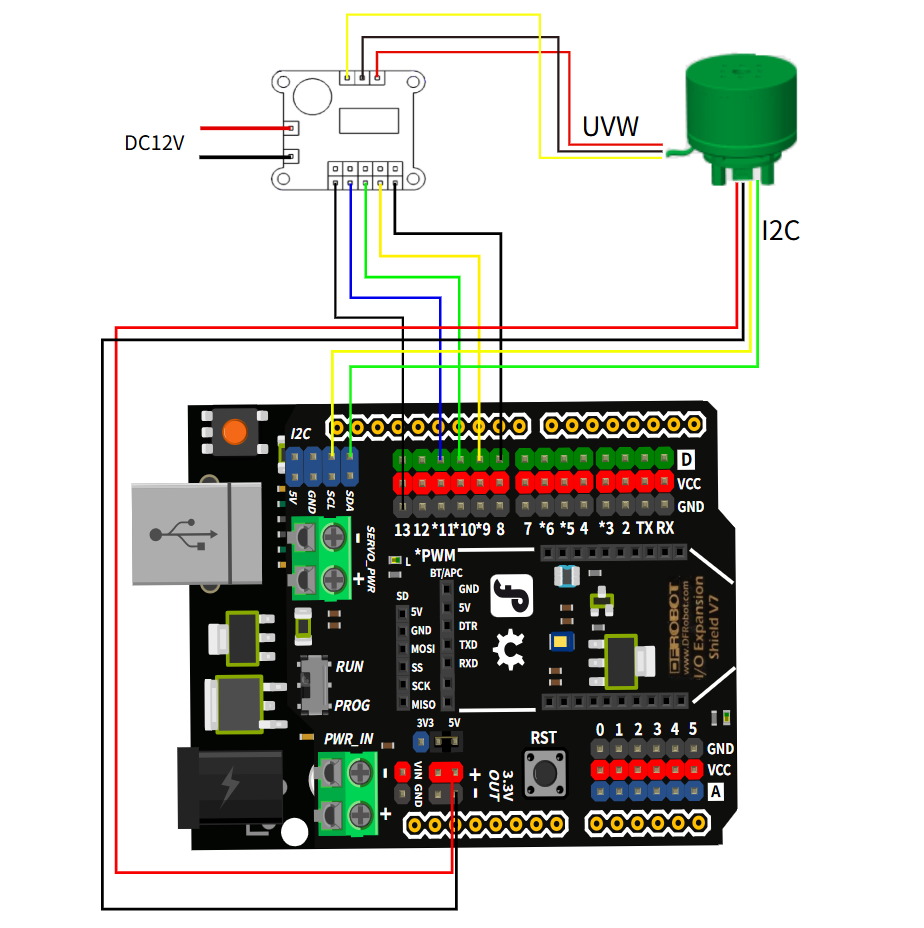
Other Preparation Work
- Using I2C communication, connect the SDA and SCL pins of AS5600 to the corresponding SDA and SCL pins of the Arduino board. There is no need to define the pins by default, but if you want to use other pins, you need to redefine them in the code.
- Adjust the parameters in the code based on your motor's specifications (e.g., number of pole pairs).
Sample Code
/**
*
* Position/angle motion control example
* Steps:
* 1) Configure the motor and magnetic sensor
* 2) Run the code
* 3) Set the target angle (in radians) from serial terminal
*
*/
#include <SimpleFOC.h> // Be sure to load this library

MagneticSensorI2C sensor = MagneticSensorI2C(AS5600_I2C); // Using I2C communication, connect the SDA and SCL pins of AS5600 to the corresponding SDA and SCL pins of ESP32. There is no need to define the pins. If you want to use other pins, you can do so, but you need to redefine them.

// BLDC motor & driver instance
BLDCMotor motor = BLDCMotor(11); // The number of pole pairs of 2804 and 2208 motors is 7, and the number of pole pairs of 4015 motors is 11
BLDCDriver3PWM driver = BLDCDriver3PWM(9,10,11,8); //PWM pins are 9, 10, and 11, and the enable pin is 8. The wiring of the FOC board and the development board must correspond.

float target_angle = 0; //Define the angle variable, which can also be torque or speed.
//Instantiate the commander
Commander command = Commander(Serial); //Send command via the serial port
void doTarget(char* cmd) { command.scalar(&target_angle, cmd); }

void setup() { //Initialization

// Initialize magnetic sensor hardware
sensor.init(); //Sensor initialization
// Link the motor to the sensor
motor.linkSensor(&sensor); //Motor to sensor connection

// Driver configuration
// Power supply voltage [V]
driver.voltage_power_supply = 12; //Power supply voltage connected to the driver
driver.init(); //Driver initialization
// Link the motor and the driver
motor.linkDriver(&driver); // Connect the motor to the driver

// Choose FOC modulation (optional)
motor.foc_modulation = FOCModulationType::SpaceVectorPWM; // Use PWM drive

// Set the motion control loop to be used
motor.controller = MotionControlType::angle; // Angle mode

// Velocity PI controller parameters
motor.PID_velocity.P = 0.05f; // Velocity P value. This value should not be too large, otherwise it will cause jitter.
motor.PID_velocity.I = 0.02; // A larger value will slow down the response.
motor.PID_velocity.D = 0;
// Maximum voltage to be set to the motor
motor.voltage_limit = 6; // Limit the maximum voltage. This value is generally half the supply voltage.

// Velocity low-pass filtering time constant
// The lower the less filtered value
motor.LPF_velocity.Tf = 0.01f; // Filtering

// Angle P controller
motor.P_angle.P = 20; // P value for position PID control
// Maximum velocity of the position control
motor.velocity_limit = 15; // Maximum velocity limit, radians/second

// Use monitoring with serial
Serial.begin(115200); // Open the serial port
// Comment out if not needed
motor.useMonitoring(Serial); //

// Initialize motor
motor.init(); // Initialize the motor
// Align sensor and start FOC
motor.initFOC(); // Align sensor and start FOC

// Add target command T
command.add('T', doTarget, "target angle"); // Send the position via the serial port T command. For example, T6.28 means the motor rotates 6.28 radians, or 1 revolution.

Serial.println(F("Motor ready."));
Serial.println(F("Set the target angle using serial terminal:"));
_delay(1000);
}

void loop() {
motor.loopFOC(); // Start, apply power

move(target_angle); // Move to target position

command.run(); // Monitor input commands
}
Result
Press the reset button on the development board, the motor will calibrate its position, then input "T6.28" through the serial monitor, the motor will rotate one circle.
Additional Information
Ensure that the wiring between the SimpleFOCmini board, Arduino, and motor is correct, especially the power supply connections (input power 8-30V). Adjust the voltage_power_supply and voltage_limit in the code according to your actual power supply.
Was this article helpful?