Introduction
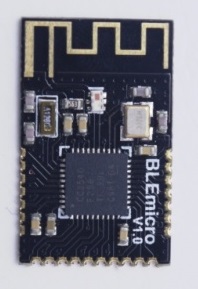
Bluno is great but I want small size for my product, Ble-link does well in its work but I don't an adapter to be inserted. Now, these can never trouble your idea, we provide a new kind of bluetooth 4.0 device---BLE micro. With a small size of 24*15mm, can be easily put on your PCB board, so just ignore the problem of how to designe an antenna, how to make a bluetooth chip work and so on. Just look back your idea, did the problem of the size always distrub your idea of wearable? Now we solve this for you! You can use Andriod or IOS devices to communicate with your colth! And for developers, this can be used for transparent transmission, or remote programmer uploading,and even build an HID connection with PC. It can be configurated by AT command and you can also update its framware by USB. And what's more, it supplies IBeacon. The last version V1.8, you can change the mode between AT command and transparent transmission by serial port.
 STABLE POWER Please make sure to provide the BLE module with a reliable and stable 3.3V power supply whose noise should be less than 10mV, or its bootloader and the BT service will get lost.
Specification
- Bluetooth Chip: TI CC2540
- Communication Frequency: 2.4G Hz
- Communication Velocity:1Mbps GFSK as Maximum
- Sensitivity:-93dBm
- Power Supply:3.3V
- Operating Temperature: -40℃~+85℃
- Communication Distance: nearly 60m at open field
- Size: 24*15mm
- Support AT command for CENTRAL-PERIPHERAL configuration
- Support transparently transports
- Support upload Arduino program remotely(Bluetooth 4.0 remote uploading)
- Update firmware through USB
- Support Bluetooth HID,can be convenient to update BLE firmware to fit Android or IOS Apps, open source, suit for developers
- Support iBeacon
- And be careful that it needs IOS7+ or Android 4.3+
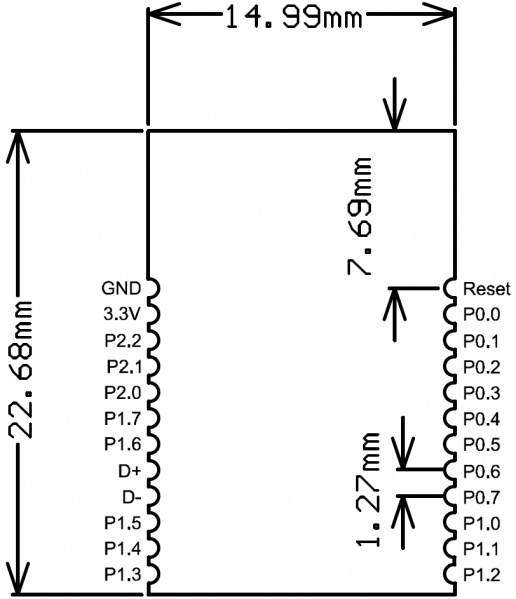
Pinout

AT Command List
<CR+LF> means Carriage-Return and Line-Feed, which is the same meaning with "Both NL & CR" in Arduino Serial monitor
Do not include the string "<CR+LF>" itself
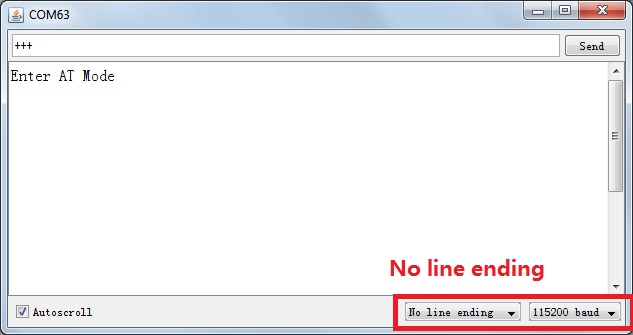
The AT Mode Switch is not work at Firmware version V1.8 or later.you can enter the command "+++" in serial port monitor with "No line ending" to enter the AT CMD Mode.

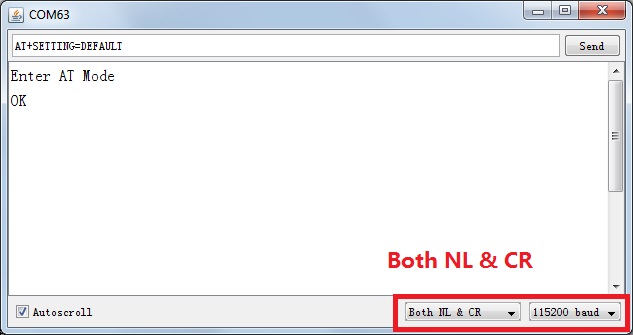
1. Select the "Both NL & CR" and 115200 baud in the two pull-down menu
2. Type or copy the AT command in the dialog like this and press send button

3. If the BLE is successfully configured , you will receive "OK" from it
4. If received "ERROR CMD" instead, try sending it again or you should check whether the command is correct or not.
5. reset the Bluno nano or enter the “AT+EXIT” can exit the AT CMD Mode.
1. "AT+FSM" change the working mode
| AT+FSM=FSM_TRANS_USB_COM_BLE<CR+LF> | USB-UART BLE transparent mode |
| AT+FSM=FSM_HID_USB_COM_BLE_AT<CR+LF> | USB-UART BLE HID mode |
| AT+FSM=?<CR+LF> | Request the working mode (default: FSM_TRANS_USB_COM_BLE) |
2. "AT+ROLE" change the CENTRAL-PERIPHERAL configuration
| AT+ROLE=ROLE_CENTRAL<CR+LF> | BLE CENTRAL mode |
| AT+ROLE=ROLE_PERIPHERAL<CR+LF> | BLE PERIPHERAL mode |
| AT+ROLE=?<CR+LF> | Request the CENTRAL-PERIPHERAL configuration (default: ROLE_PERIPHERAL) |
3. "AT+MIN_INTERVAL" change the minimum connection interval
| AT+MIN_INTERVAL=10<CR+LF> | Recommended minimum connection interval (10ms) for PC and Android |
| AT+MIN_INTERVAL=20<CR+LF> | Recommended minimum connection interval (20ms) for IOS |
| AT+MIN_INTERVAL=?<CR+LF> | Request the minimum connection interval (default: 10) |
4. "AT+MAX_INTERVAL" change the maximum connection interval
| AT+MAX_INTERVAL=10<CR+LF> | Recommended maximum connection interval (10ms) for PC and Android |
| AT+MAX_INTERVAL=40<CR+LF> | Recommended maximum connection interval (40ms) for IOS |
| AT+MAX_INTERVAL=?<CR+LF> | Request the maximum connection interval (default: 10) |
5. "AT+UART" change the baud rate of UART
| AT+UART=115200<CR+LF> | Set the baud rate to 115200 |
| AT+UART=?<CR+LF> | Request the baud rate of UART (default: 115200,8,N,1) |
6. "AT+BIND" bind another BLE chip. BLE can only connect to the BLE chip with this MAC address
| AT+BIND=0x0017ea9397e1<CR+LF> | Set the BLE binding (destination) MAC address to 0x0017ea9397e1 |
| AT+BIND=?<CR+LF> | Request the binding (destination) MAC address (default: 0x000000000000) |
7. "AT+CMODE" set whether the connection of BLE is binding or arbitrary
| AT+CMODE=UNIQUE<CR+LF> | BLE can only connect to the BLE chip with binding(destination) MAC address (see "AT+BIND" command) |
| AT+CMODE=ANYONE<CR+LF> | BLE can connect to any other BLE chips |
| AT+CMODE=?<CR+LF> | Request the binding connection mode(default:ANYONE) |
8. "AT+MAC" Request MAC address
| AT+MAC=?<CR+LF> | Request MAC address of the BLE |
9. "AT+NAME" Set the name
| AT+NAME=DFBLEduinoV1.0<CR+LF> | Set the name of BLE to "DFBLEduinoV1.0".The length is limited to 13 Bytes or below |
| AT+NAME=?<CR+LF> | Request the name of the BLE (default: DFBLEduinoV1.0) |
10. "AT+RESTART" restart the BLE
| AT+RESTART<CR+LF> | Restart the BLE chip |
11. "AT+SETTING" change the default setting (new in BLE firmware 1.6)
| AT+SETTING=DEFAULT<CR+LF> | Restore the default settings, same as PERIPHERAL mode |
| AT+SETTING=DEFPERIPHERAL<CR+LF> | Restore the default settings for PERIPHERAL mode |
| AT+SETTING=DEFCENTRAL<CR+LF> | Restore the default settings for CENTRAL mode |
| AT+SETTING=?<CR+LF> | Request the setting mode (default: DEFPERIPHERAL). If the settings are changed by AT command, "UNKNOWN" will be replied. |
12. "AT+BLUNODEBUG" When Bluetooth is connected and BLE chip(CC2540) received the UART message from MCU(ATMEGA328), send the UART message not only to the Bluetooth, but also to the USB port. So that when Bluetooth is connected, we can use the serial monitor to get the UART message. (new in BLE firmware 1.6)
| AT+BLUNODEBUG=ON<CR+LF> | Turn on the BLUNO DEBUG so that when Bluetooth is connected, we can use the serial monitor to get the UART message. |
| AT+BLUNODEBUG=OFF<CR+LF> | Turn off the BLUNO DEBUG so that wireless programming will be more stable. |
| AT+BLUNODEBUG=?<CR+LF> | Request the BLUNO DEBUG state (default: ON) |
13. "AT+USBDEBUG" When Bluetooth is connected and BLE chip(CC2540) received the Bluetooth message from IOS or Android device, send the data not only to the UART, but also to the USB port. So that when Bluetooth is connected, we can use the serial monitor to directly get the Bluetooth message. (new in BLE firmware 1.6)
| AT+USBDEBUG=ON<CR+LF> | Turn on the BLUNO DEBUG So that when Bluetooth is connected, we can use the serial monitor to directly get the Bluetooth message from IOS or Android device. |
| AT+USBDEBUG=OFF<CR+LF> | Turn off the USB DEBUG so that wireless programming will be more stable. |
| AT+USBDEBUG=?<CR+LF> | Request the USB DEBUG state (default: OFF) |
14. "AT+TXPOWER" Change the Transmitted Power. (new in BLE firmware 1.6)
| AT+TXPOWER=0<CR+LF> | Change the Transmitted Power to fit the iBeacon calibration. (4, 0, -6 -23 is acceptable) |
| AT+TXPOWER=?<CR+LF> | Request the Transmitted Power (default: 0) |
15. "AT+IBEACONS" Enable the iBeacons feature(new in BLE firmware 1.6)
| AT+IBEACONS=ON<CR+LF> | Enable the iBeacons feature. |
| AT+IBEACONS=OFF<CR+LF> | Disable the iBeacons feature. |
| AT+IBEACONS=?<CR+LF> | Request whether the iBeacons feature is enabled. (default: ON) |
16. "AT+VERSION" the version of the firmware(new in BLE firmware 1.6)
| AT+VERSION=?<CR+LF> | Request the version of the firmware. |
17. "AT+RSSI" Request the RSSI of the BLE (new in BLE firmware 1.6)
| AT+RSSI=?<CR+LF> | Request the RSSI of the BLE(if there is no connection, "-000" will be returned) |
18. "AT+MAJOR" Set the major number of the iBeacons (new in BLE firmware 1.6)
| AT+MAJOR=0<CR+LF> | Set the major number of the iBeacons to "0". (0 to 65535 is acceptable) |
| AT+MAJOR=?<CR+LF> | Request the major number of the iBeacons.(default "0") |
19. "AT+MINOR" Set the minor number of the iBeacons (new in BLE firmware 1.6)
| AT+MINOR=0<CR+LF> | Set the minor number of the iBeacons to "0". (0 to 65535 is acceptable) |
| AT+MINOR=?<CR+LF> | Request the minor number of the iBeacons.(default "0") |
20. "AT+PASSWORD" Set and check the AT command password (new in BLE firmware 1.7 ),
| AT+PASSWORD=?<CR+LF> | Check the AT command password(USB connected) |
| AT+PASSWORD=abc<CR+LF> | Set the AT command password(USB connected) |
Trouble shooting
More question and cool idea,visit DFRobot Forum
More
- How to make your own Bluno board
- Library installation
- BLEmicro V1.1: BLEmicro V1.1
