Example Code for Arduino-Get RTC Time
A comprehensive guide on setting up and retrieving Real-Time Clock (RTC) time using Arduino and various hardware components. It includes detailed instructions on hardware preparation, software setup, and sample code to achieve accurate timekeeping. Essential for anyone seeking to implement precise time tracking in Arduino projects.
Hardware Preparation
Software Preparation
- Arduino IDE
- Download and install DFRobot_GNSS and RTC library
Wiring Diagram

Sample Code
/*!
 * @file getTime.ino
 * @brief Run this routine, set internal clock first, and then circularly get clock, temperature and voltage data
 * @copyright    Copyright (c) 2010 DFRobot Co.Ltd (http://www.dfrobot.com)
 * @license      The MIT License (MIT)
 * @author [qsjhyy]([email protected])
 * @version V1.0
 * @date 2022-08-30
 * @url https://github.com/DFRobot/DFRobot_GNSSAndRTC
 */
#include "DFRobot_GNSSAndRTC.h"

#define I2C_COMMUNICATION  //use I2C for communication, but use the serial port for communication if the line of codes were masked

#ifdef  I2C_COMMUNICATION
DFRobot_GNSSAndRTC_I2C rtc(&Wire, MODULE_I2C_ADDRESS);
#else
/* ---------------------------------------------------------------------------------------------------------------------
      *    board   |             MCU                | Leonardo/Mega2560/M0 |    UNO    | ESP8266 | ESP32 |  microbit  |   m0  |
      *     VCC    |            3.3V/5V             |        VCC           |    VCC    |   VCC   |  VCC  |     X      |  vcc  |
      *     GND    |              GND               |        GND           |    GND    |   GND   |  GND  |     X      |  gnd  |
      *     RX     |              TX                |     Serial1 TX1      |     5     |   5/D6  |  D2   |     X      |  tx1  |
      *     TX     |              RX                |     Serial1 RX1      |     4     |   4/D7  |  D3   |     X      |  rx1  |
      * ----------------------------------------------------------------------------------------------------------------------*/
/* Baud rate cannot be changed  */
#if defined(ARDUINO_AVR_UNO) || defined(ESP8266)
SoftwareSerial mySerial(4, 5);
DFRobot_GNSSAndRTC_UART rtc(&mySerial, UART_BAUDRATE);
#elif defined(ESP32)
DFRobot_GNSSAndRTC_UART rtc(&Serial1, UART_BAUDRATE,/*rx*/D2,/*tx*/D3);
#else
DFRobot_GNSSAndRTC_UART rtc(&Serial1, UART_BAUDRATE);
#endif
#endif

void setup()
{
	Serial.begin(115200);
	/*Wait for the chip to be initialized completely, and then exit*/
	while(!rtc.begin()){
		Serial.println("Failed to init chip, please check if the chip connection is fine. ");
		delay(1000);
	}
	rtc.setHourSystem(rtc.e24hours);//Set display format
	rtc.setTime(2021,7,27,14,59,0);//Initialize time
	// //Get internal temperature
	// Serial.print(rtc.getTemperatureC());
	// Serial.println(" C");
	// //Get battery voltage
	// Serial.print(rtc.getVoltage());
	// Serial.println(" V");
}

void loop()
{
	DFRobot_GNSSAndRTC::sTimeData_t sTime;
	sTime = rtc.getRTCTime();
	Serial.print(sTime.year, DEC);//year
	Serial.print('/');
	Serial.print(sTime.month, DEC);//month
	Serial.print('/');
	Serial.print(sTime.day, DEC);//day
	Serial.print(" (");
	Serial.print(sTime.week);//week
	Serial.print(") ");
	Serial.print(sTime.hour, DEC);//hour
	Serial.print(':');
	Serial.print(sTime.minute, DEC);//minute
	Serial.print(':');
	Serial.print(sTime.second, DEC);//second
	Serial.println(' ');
	/*Enable 12-hour time format*/
	// Serial.print(rtc.getAMorPM());
	// Serial.println();
	delay(1000);
}
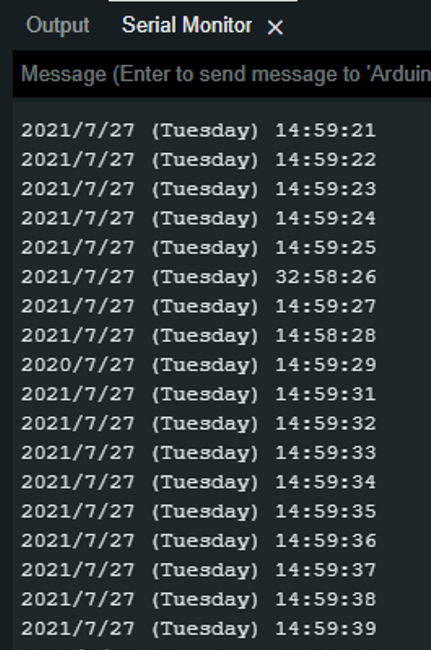
Result
Was this article helpful?