Example Code for Arduino-Register one-dimensional face (UART)
Last revision 2025/12/17
Burn the code, the red LED lights up, aim the face module at the face to register the face, and only register one face at a time. If you need to register multiple faces, you can press the RST button to register other faces again.
Hardware Preparation
- DFRduino UNO R3 (or similar) x 1
- Gravity: 3D Face Recognition Module - UART&I2C x1
Software Preparation
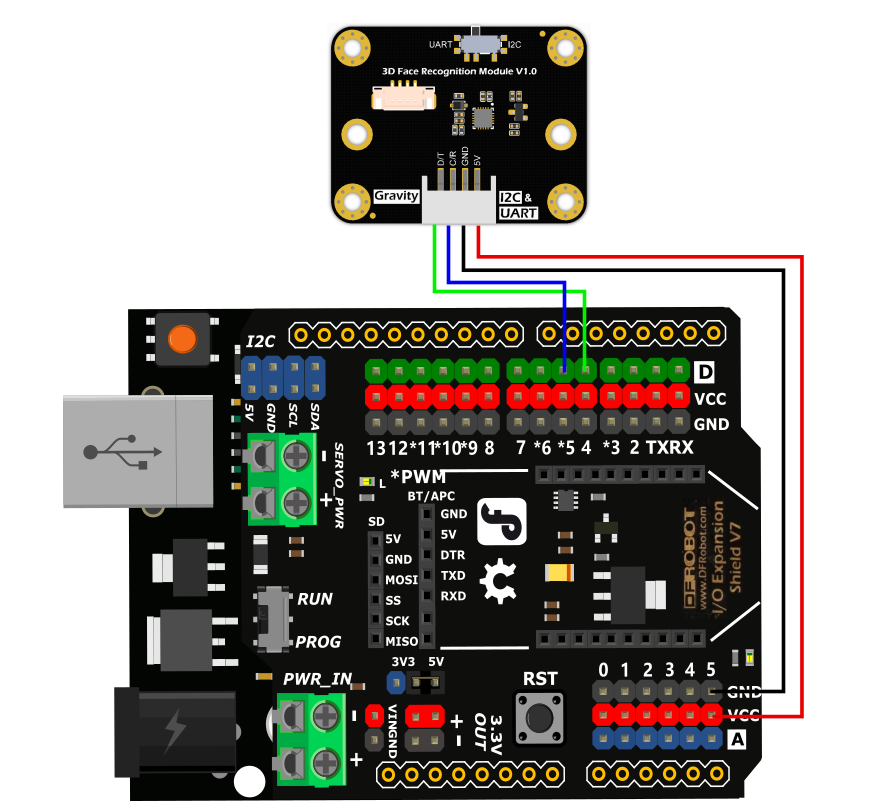
Wiring Diagram
Due to the high power consumption of the face recognition module, the working current is ≤400mA, and the maximum is about 2W. The VCC power supply of the Arduino digital interface cannot meet the demand. The VCC power supply of the analog port and IC2 interface can be used.
Switch the communication mode dial switch to the UART end
Other Preparation Work
Switch the communication mode dial switch to the UART end. Ensure the power supply meets the module's requirements (use Arduino's analog port or I2C interface VCC).
Sample Code
 /*!
  * @file  faceRecognition.ino
  * @brief  face recognition demo
  * @copyright Copyright (c) 2010 DFRobot Co.Ltd (http://www.dfrobot.com)
  * @license The MIT License (MIT)
  * @author ZhixinLiu([email protected])
  * @version V1.0
  * @date 2023-12-07
  * @url https://github.com/DFRobot/DFRobot_3DFace
  */

#include "DFRobot_3DFace.h"

//#define I2C_COMMUNICATION  //use I2C for communication, but use the serial port for communication if the line of codes were masked

#ifdef  I2C_COMMUNICATION
  DFRobot_3DFace_I2C face(&Wire ,DEVICE_ADDR);
#else
/* ---------------------------------------------------------------------------------------------------------------------
 *    board   |             MCU                | Leonardo/Mega2560/M0 |    UNO    | ESP8266 | ESP32 |  microbit  |   m0  |
 *     VCC    |            3.3V/5V             |        VCC           |    VCC    |   VCC   |  VCC  |     X      |  vcc  |
 *     GND    |              GND               |        GND           |    GND    |   GND   |  GND  |     X      |  gnd  |
 *     RX     |              TX                |     Serial1 TX1      |     5     |   5/D6  |  D2   |     X      |  tx1  |
 *     TX     |              RX                |     Serial1 RX1      |     4     |   4/D7  |  D3   |     X      |  rx1  |
 * ----------------------------------------------------------------------------------------------------------------------*/
/* Baud rate cannot be changed */
  #if defined(ARDUINO_AVR_UNO) || defined(ESP8266)
    SoftwareSerial mySerial(4, 5);
    DFRobot_3DFace_UART face(&mySerial ,57600);
  #elif defined(ESP32)
    DFRobot_3DFace_UART face(&Serial1 ,57600 ,/*rx*/D2 ,/*tx*/D3);
  #else
    DFRobot_3DFace_UART face(&Serial1 ,57600);
  #endif
#endif

void setup()
{
  Serial.begin(115200);
  while(!Serial);
  randomSeed(analogRead(A0));
  while(!face.begin()){
    Serial.println("NO Deivces !");
    delay(1000);
  } Serial.println("Device connected!");

  sUserData_t data = face.getFaceMessage();
  if(data.result == true){
    Serial.print("user number = ");
    Serial.println(data.user_count);
  }

  Serial.println("face resgistering !");
  char rName[40] = {0};
  uint16_t randNumber = random(analogRead(A0));
  sprintf(rName, "rName%d", randNumber);
  sFaceReg_t faceReg = face.faceRegistration(rName);
  if(faceReg.result){
    Serial.println("face resgistering success!");
    Serial.print("regiseter     user name = ");
    Serial.println(rName);
    Serial.print("regiseter     user id = ");
    Serial.println(faceReg.userID);
    Serial.print("register      direction = ");
    Serial.println(faceReg.direction);
    Serial.println();
  }else{
    Serial.print("face resgistering faild cause = ");
    Serial.println(face.anaysisCode((eResponseCode_t)faceReg.errorCode));
  }
}

void loop()
{
  delay(1000);
}
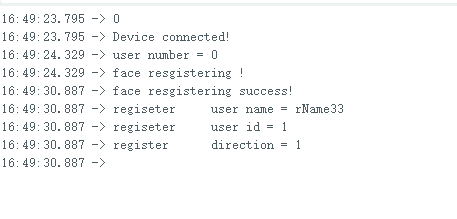
Result
Register one-dimensional face once, and print the corresponding data on the serial port
Due to the high power consumption of the face recognition module, the working current is ≤400mA, and the maximum is about 2W. The VCC power supply of the Arduino digital interface cannot meet the demand. The VCC power supply of the analog port and IC2 interface can be used.
Was this article helpful?