Getting Started
This guide provides step-by-step instructions for flashing Jetson devices with NVIDIA SDK Manager, installing JetPack components, and completing the initial system setup, including troubleshooting and optional USB boot configuration.
NVIDIA SDK Manager
NVIDIA Software Development Kit (SDK) Manager is an all-in-one tool that bundles developer software and provides an end-to-end development environment setup solution for NVIDIA SDKs.
SDK Manager provides you with:
- Support for different NVIDIA hardware development platforms.
- Ability to flash different operating systems.
- A central hub for all your software development needs.
- Fast, easy, and straightforward setup of your development environment.
- Coordination of SDK, library, and driver combinations, as well as any required compatibility or dependencies.
- Software update notifications to keep your system up to date.
Download and Run SDK Manager
The latest version of the NVIDIA SDK Manager can be downloaded from the following URL:
https://developer.nvidia.com/nvidia-sdk-manager
Offline
Download SDK Manager via NVONLINE using one of the following two methods:
- Open the activity filter by enabling the Show Groups Only option, then click the hyperlink for NVIDIA SDK Manager.
- In the search field, type "SDK Manager" and click "Search". Locate and click the hyperlink for NVIDIA SDK Manager.
Install SDK Manager
-
From the terminal, install SDK Manager using one of the following methods.
-
Ubuntu Host: Install the Debian package.
Ubuntu 16.04, 18.04, 20.04, or 22.04:
sudo apt install ./sdkmanager_[version]-[build#]_amd64.deb -
CentOS / Red Hat Enterprise Linux Host: Install the RPM package.
CentOS / Red Hat Enterprise Linux 8.0 or 8.2:
sudo dnf install ./sdkmanager_[version]-[build#].x86_64.rpmCentOS / Red Hat Enterprise Linux 7.6:
sudo yum install ./sdkmanager_[version]-[build#].x86_64.rpmNote: On CentOS 8.0 and 8.2, you may encounter the following installation error:Failed to download metadata for repo 'AppStream'In this case, check the functionality of the repository and switch to another mirror if necessary.
-
-
You can launch SDK Manager using one of the following two methods
-
Launch SDK Manager from the Ubuntu launcher.
-
Open a terminal and launch SDK Manager with the following command:
sdkmanager
-
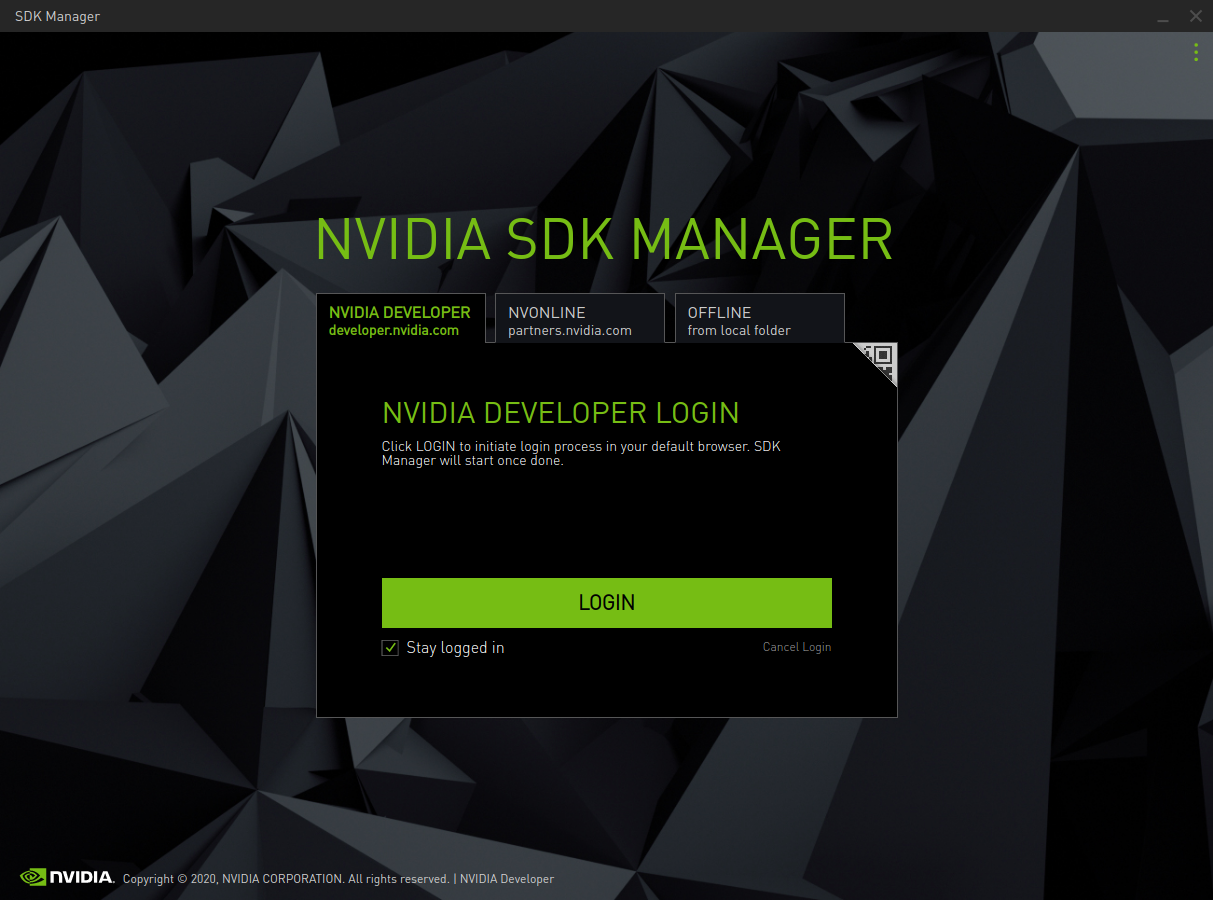
Log in to SDK Manager
-
Select the appropriate login tab for your account type and installation.
-
NVIDIA Developer — developer.nvidia.com
a. In your browser, enter your email address and click Sign In.
b. On the SDK Manager login page, enter the password for your NVIDIA Developer account and click Login.
c. Once completed, SDK Manager will launch.
-
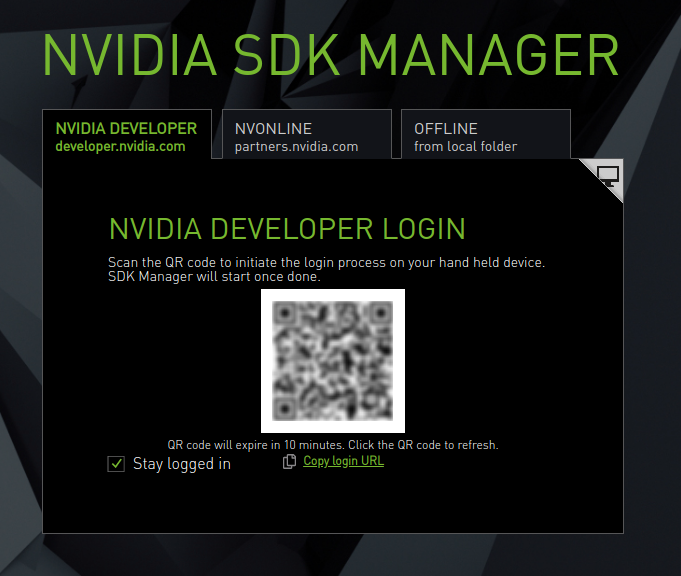
QR Code Login Option:
a. Click the QR code icon in the login panel.
b. When the QR code image appears, scan the code with a camera app on another device.
c. Enter the credentials for your NVIDIA Developer account on that device.
d. Once completed, SDK Manager will launch.
-
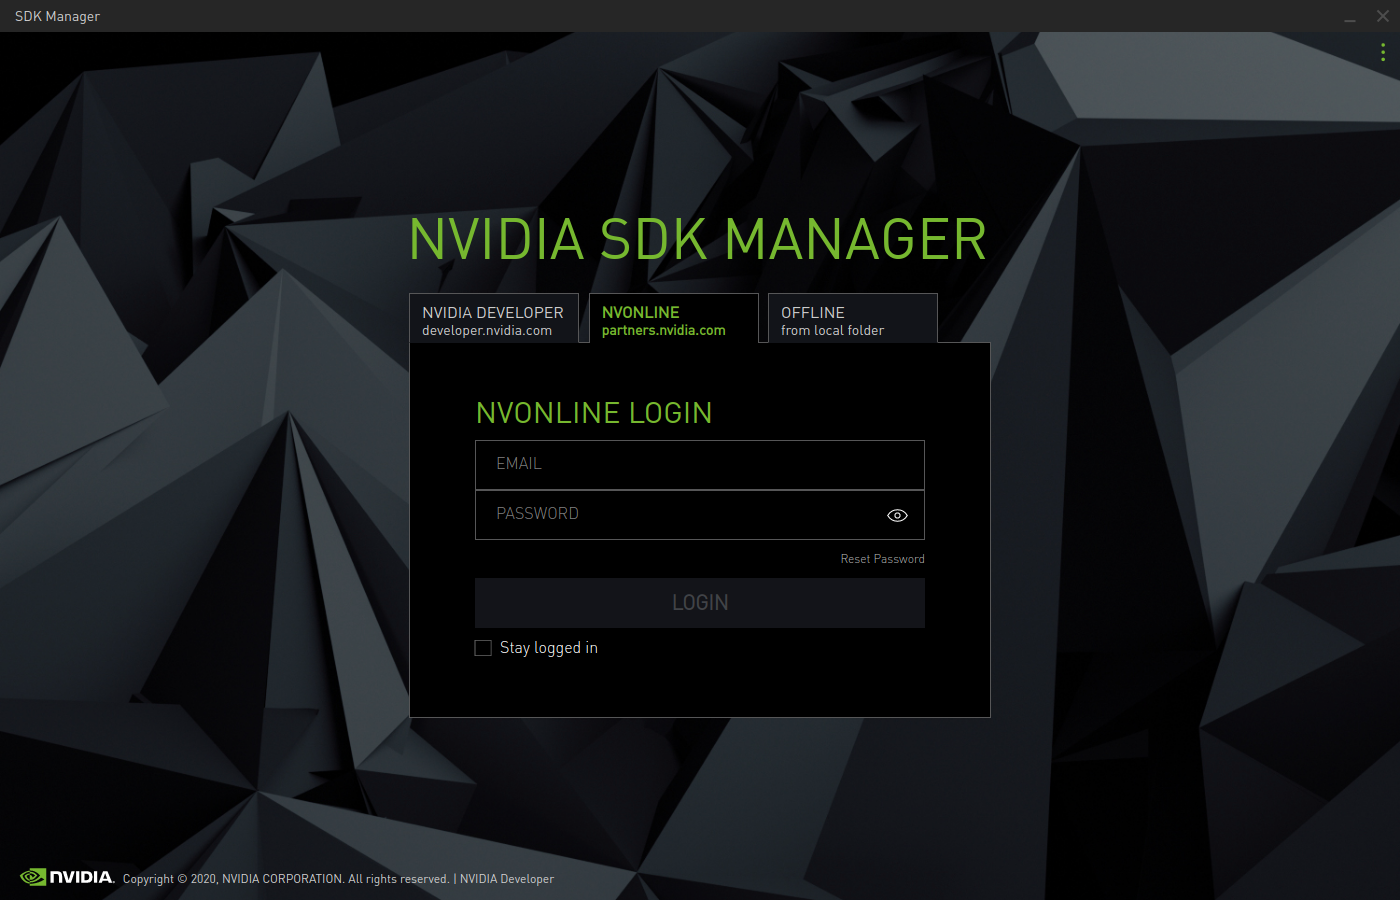
NVONLINE — partners.nvidia.com
Enter the credentials for your NVONLINE account and click LOGIN.
-
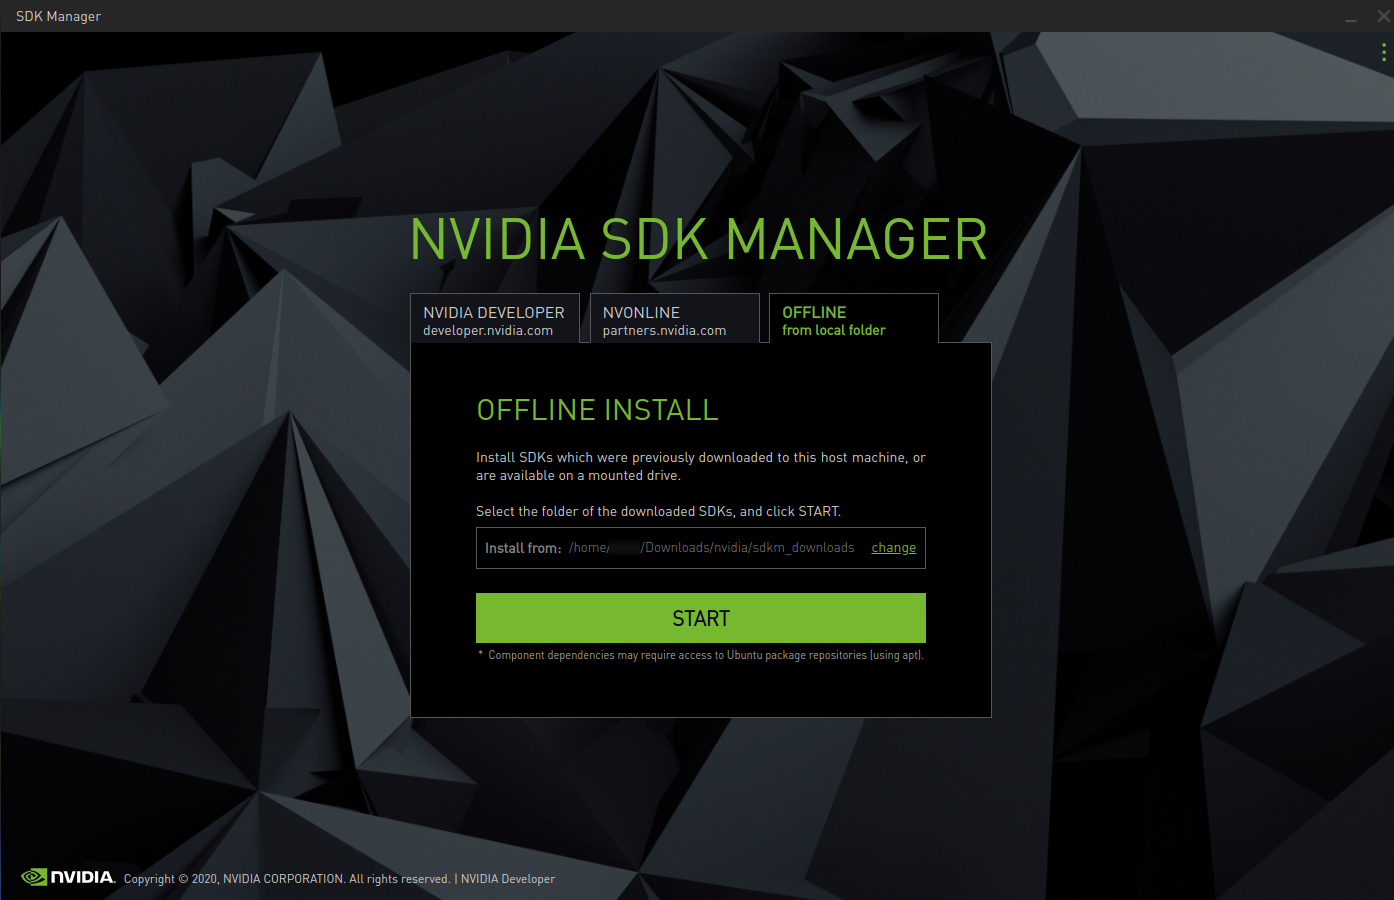
Offline — Install an SDK that was previously downloaded and available from a local folder or installed drive. For details, refer to
-
-
Before proceeding, select whether to enable data collection.
Install Jetson Software Using SDK Manager
This section is designed to help you successfully configure your development environment using the NVIDIA SDK Manager GUI
Step 1: Equipment Preparation
- Jetson Carrier motherboard.
- Ubuntu 18.04 virtual machine (or computer host).
- 5V 4A power adapter.
- USB data cable (Micro USB interface, capable of data transmission).
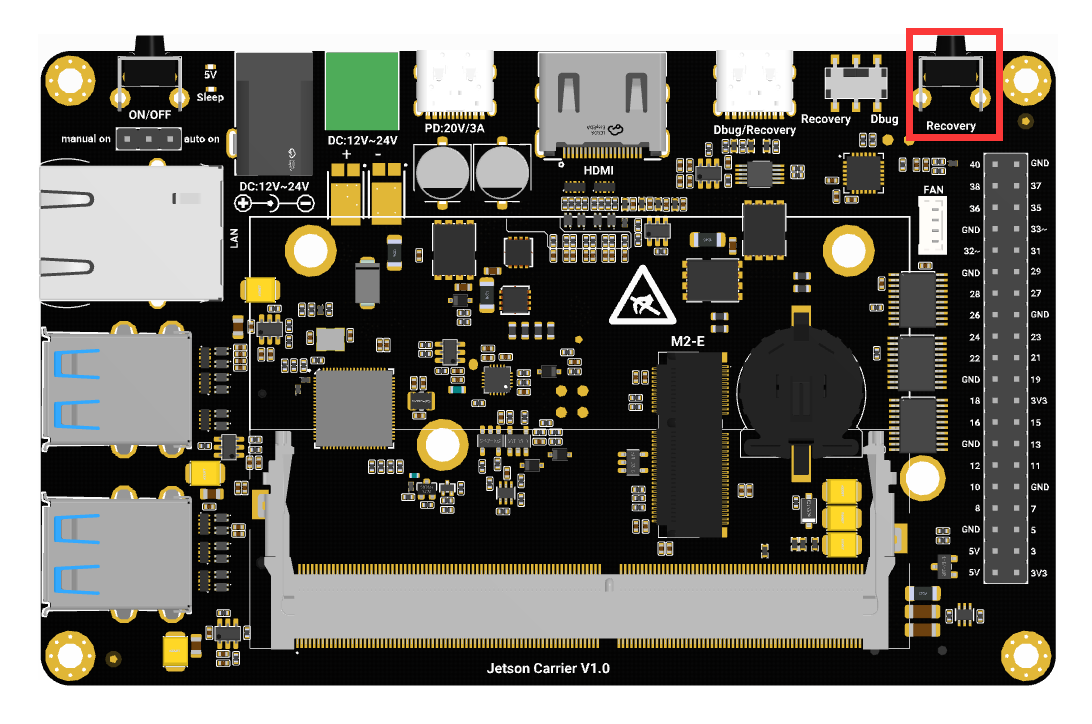
Step 2: Hardware Configuration (Enter Recovery Mode)
-
Connect the "DBUG&Recovery" interface of the motherboard with a Type-C data cable (note: it must be a data cable)
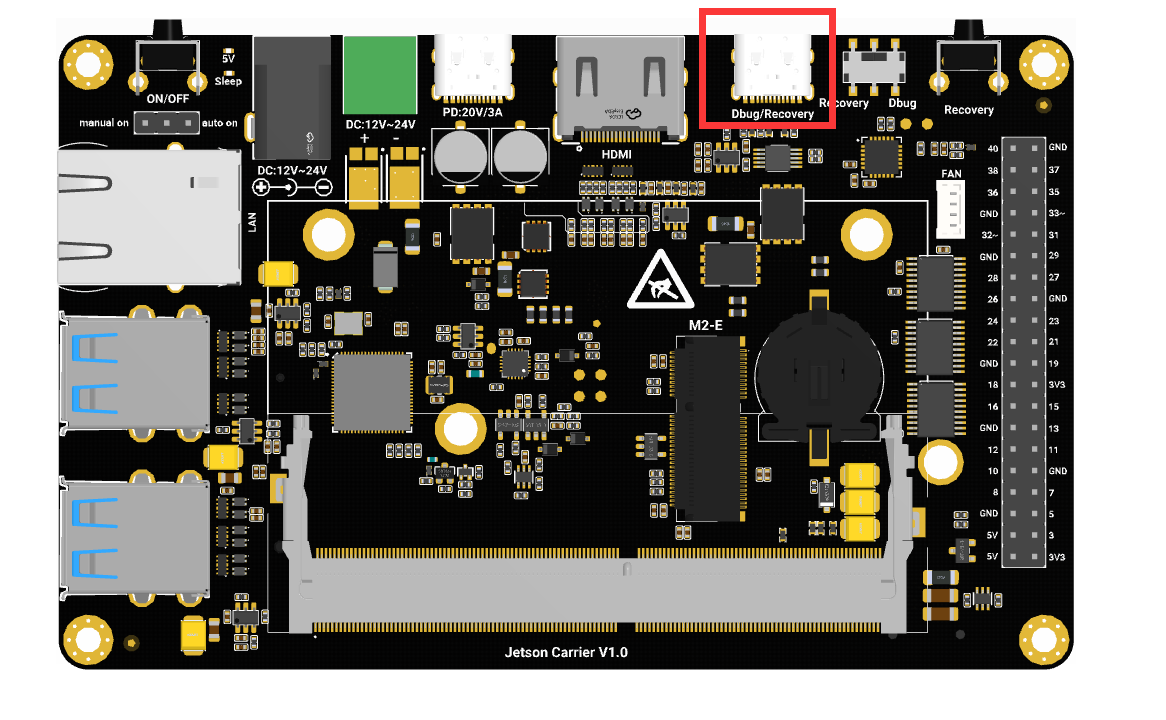
-
Move the switch to the Recovery end
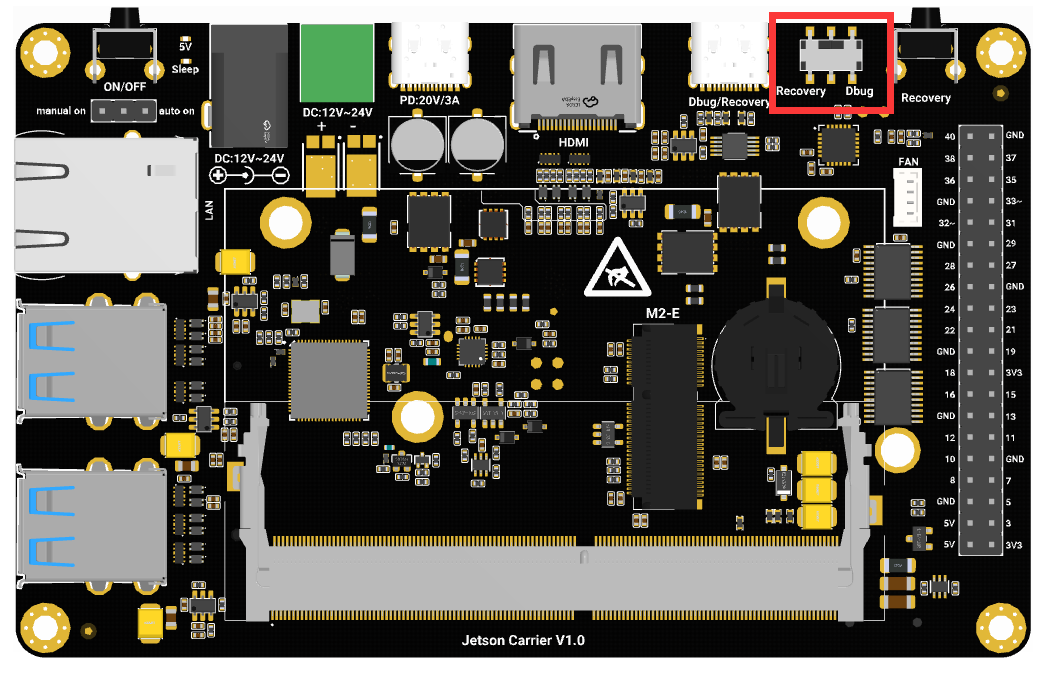
-
Press and hold the REC button, then connect the power supply to power on the board
Step 3: Set Up the Development Environment
-
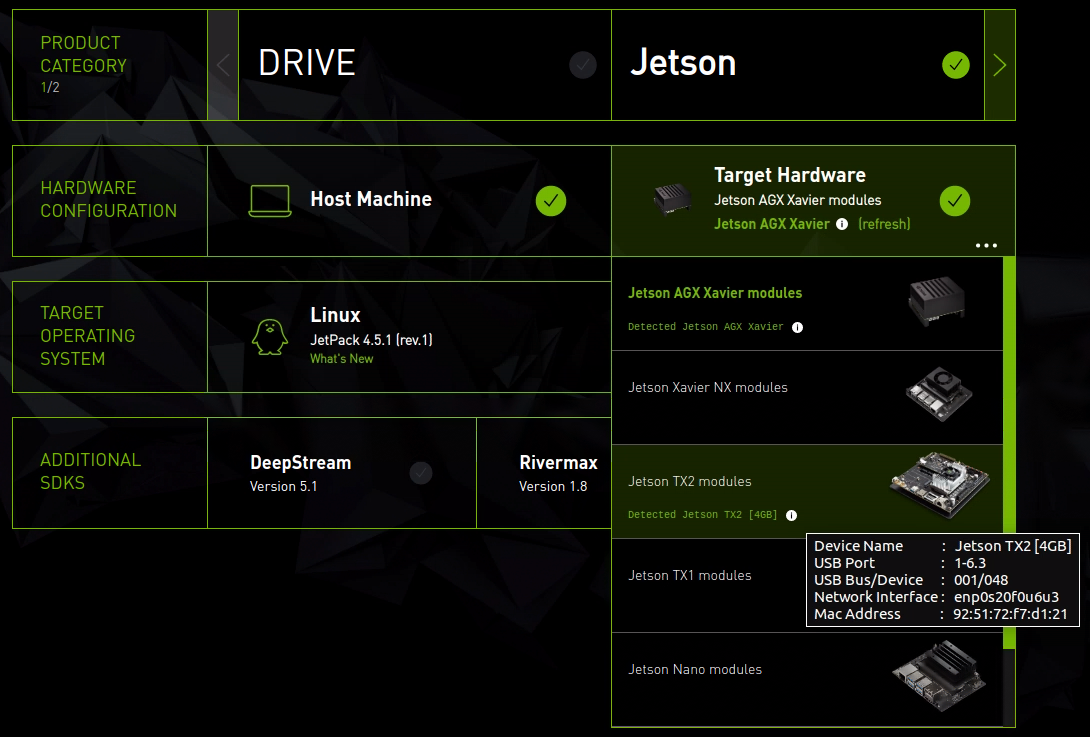
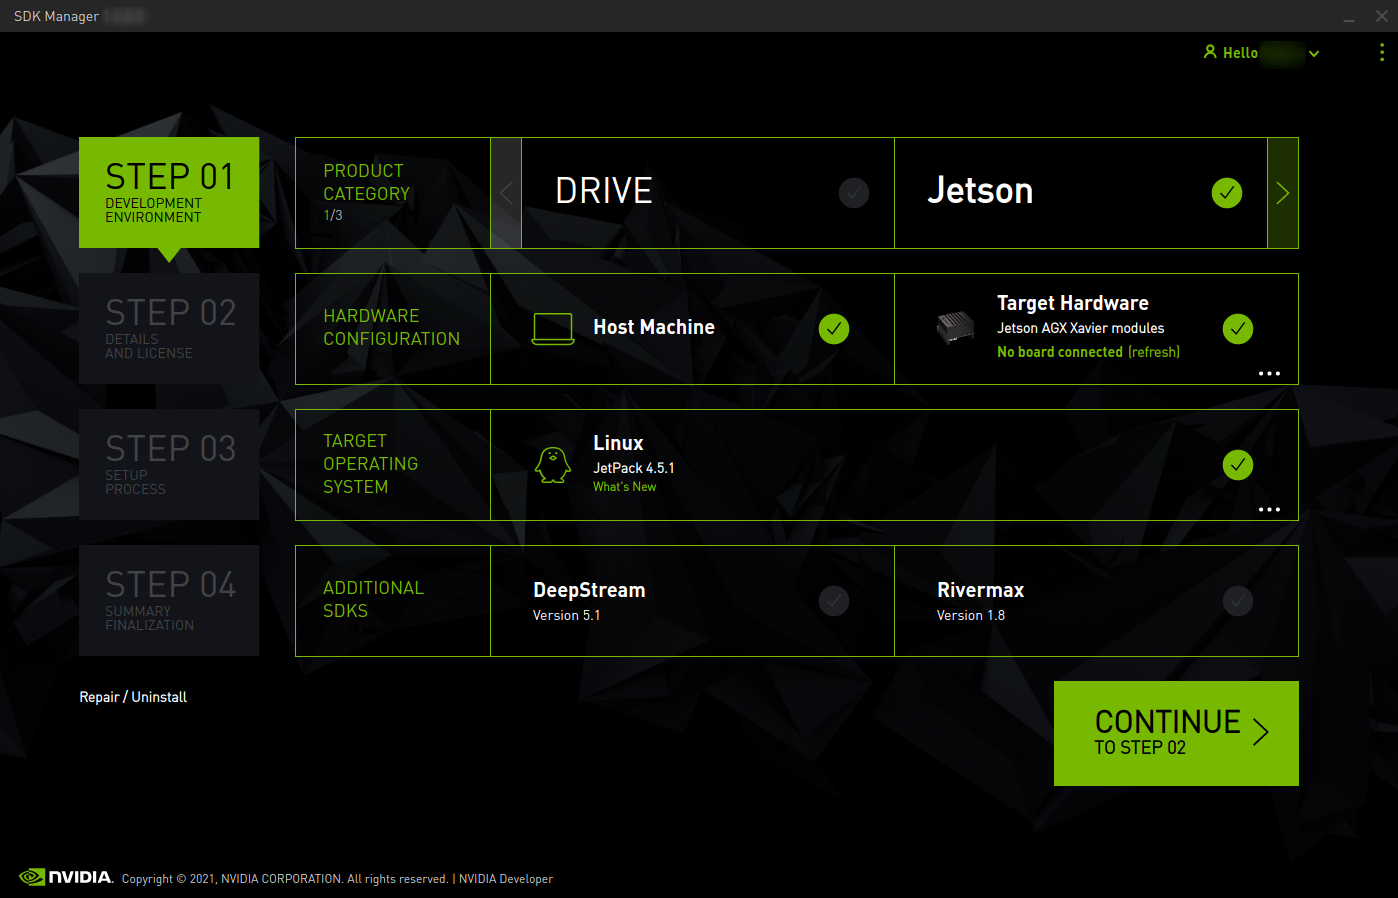
From the Step 01 Development Environment window, select the following:
-
From the Product Category panel, select Jetson.
-
From the Hardware Configuration panel, select the host and target hardware.
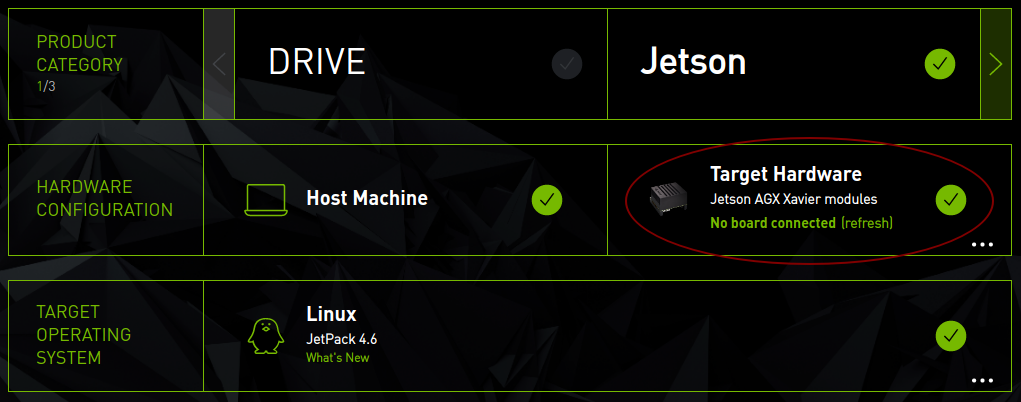
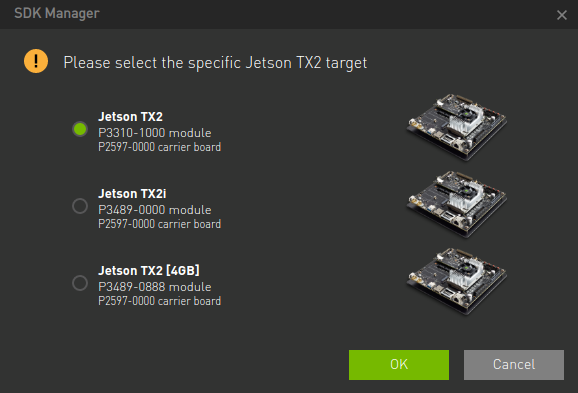
If one Jetson device is connected (or multiple Jetson devices are connected), SDK Manager will automatically select it in the target hardware drop-down list. If your device is not detected automatically, click Refresh. You can hover your mouse over the message to display detailed information about the detected hardware.
-
From the Target Operating System panel, select the operating system and JetPack version.
-
If applicable, select any Additional SDKs you wish to install.
An ellipsis (...) in the bottom right corner of a category box indicates multiple options are available. Click the ellipsis to display a drop-down menu of available options.
Note: Your display may differ from the one shown here. The information on this screen is populated based on your NVIDIA user account access and permissions. If your product category is not visible in the available options, confirm that your NVIDIA account is registered for the required program.
-
-
Click Continue to proceed to the next step.
Step 4: View Components and Accept the License
-
In Step 02 Details and License, you can expand the Host Components and Target Components panels to view the components that will be installed on your system.
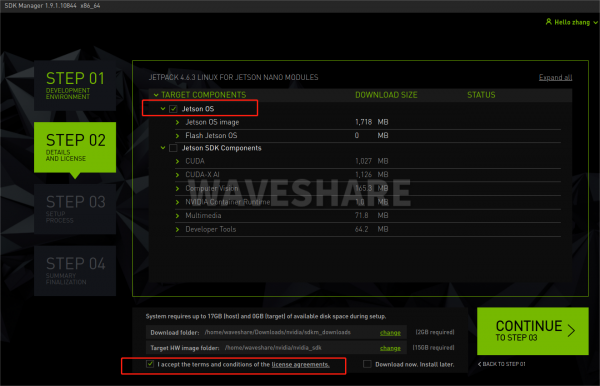
Note: Checking both may result in download failure due to insufficient EMMC space.
-
To view the license, click license agreements at the bottom of the page.
-
Enable the checkbox to accept the terms and conditions of the license agreement.
-
If you want the SDK Manager to download all installation files to a location other than the default path, go to the Download and Install options at the bottom of the screen, then select the path you wish to use.

For more information about the Download and Install options, refer to Offline Installation.
-
Select Continue to proceed to the next step.
Step 5: Installation
-
Before installation starts, the SDK Manager will prompt you to enter your sudo password.

-
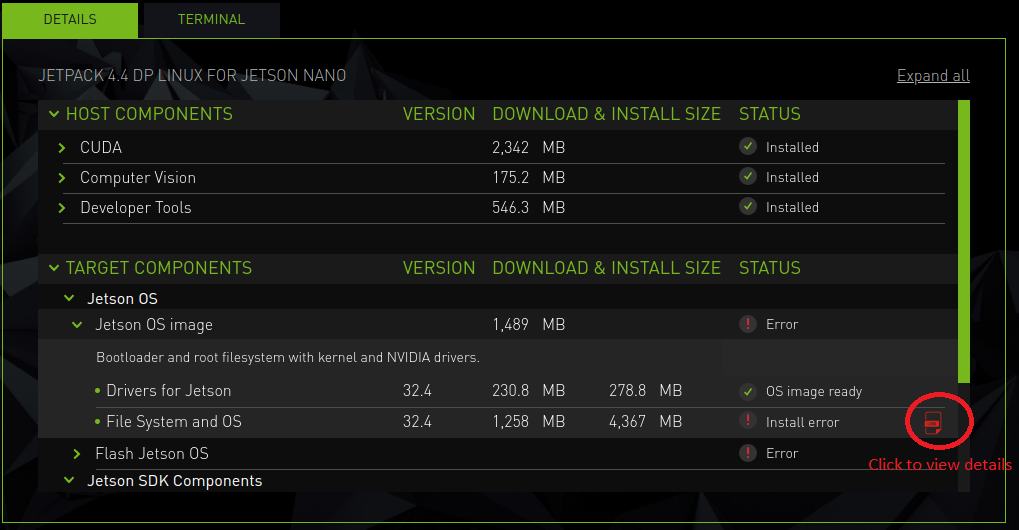
The display shows the progress of software download and installation.
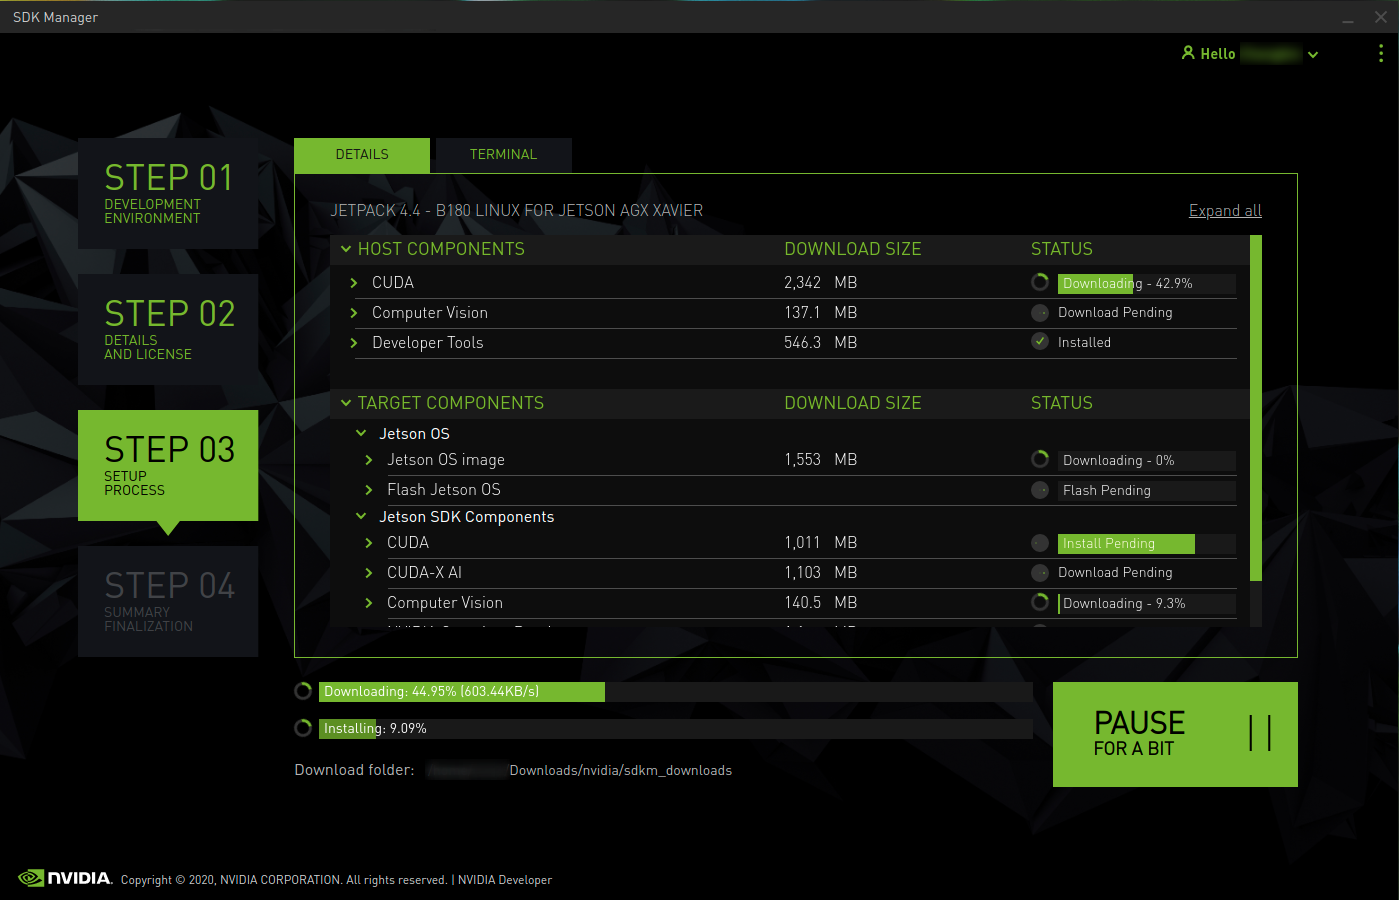
Select Pause / Resume to toggle the download and installation process.
-
At the top, you can switch between the Details and Terminal tabs. The Terminal tab displays detailed information about the download and installation, and highlights any errors.
-
On the Terminal tab, you can use the Filter text field to filter and search for specific information.
-
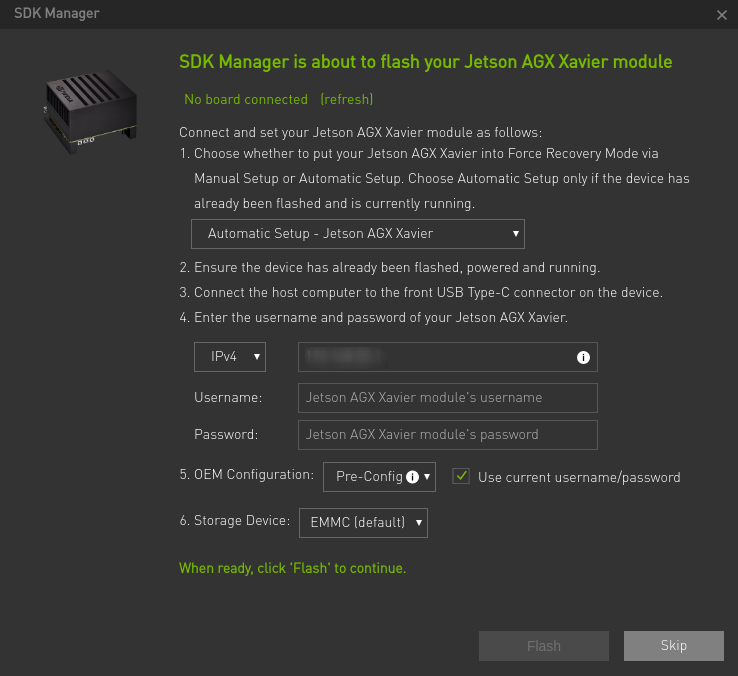
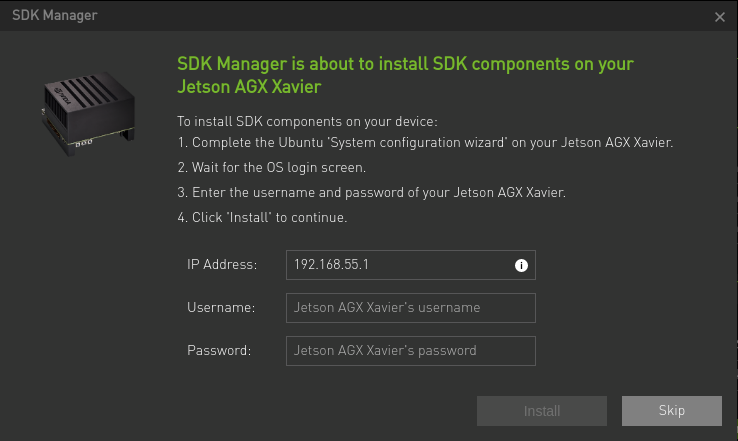
When the SDK Manager is ready to flash your target device, it will open a dialog box. The prompt provides instructions for preparing the device for flashing.
Note: The instructions in the flashing dialog box vary depending on your host and target environment settings. Note: Jetson Nano Developer Kit users need to insert a microSD card into the slot at the bottom of the Jetson Nano module; otherwise, the flashing process will fail. The SDK Manager supports two options for putting the Jetson target into Force Recovery Mode:
-
Automatic setup: Set the target to Force Recovery Mode via remote commands. This requires the device to be flashed and currently running. Follow the instructions in the flashing dialog box.
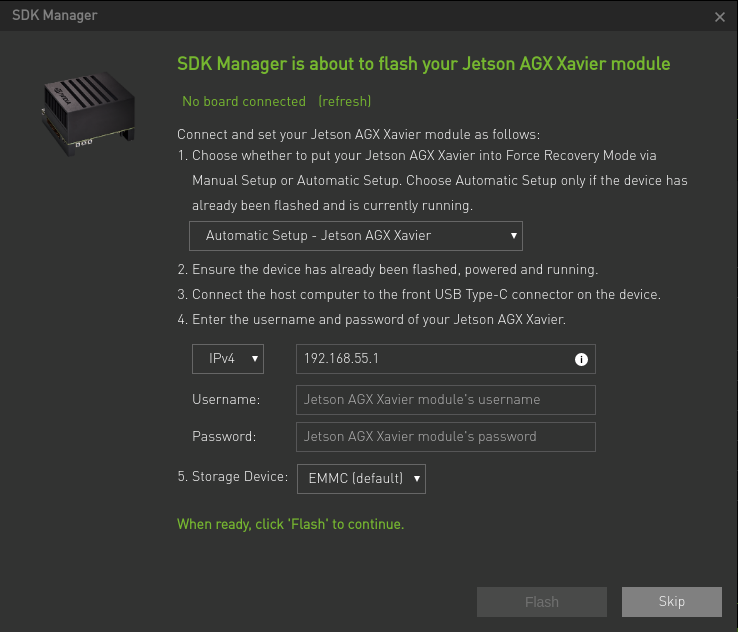
-
Manual setup: Set the target to Force Recovery Mode through manual operation.
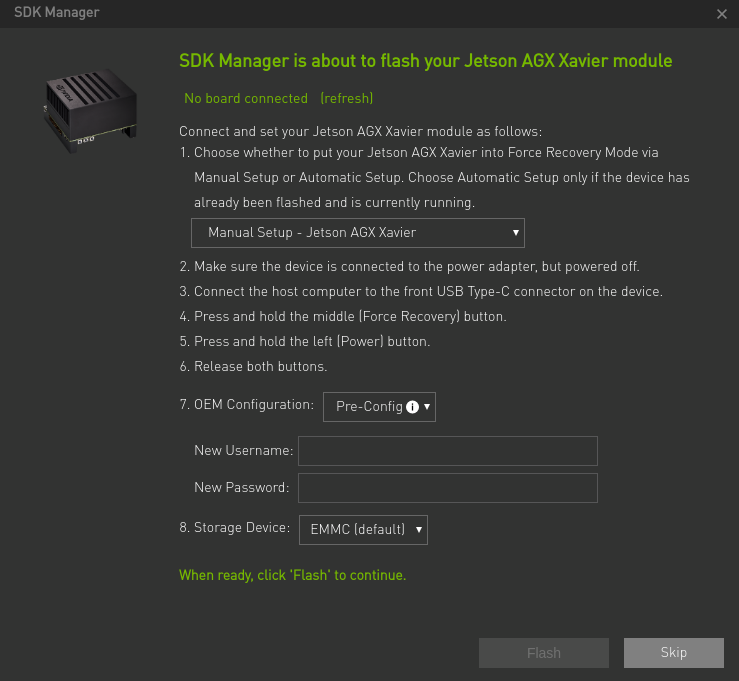
You can also choose whether to preconfigure the OEM configuration.
-
Pre-Config: The SDK Manager will flash the target with predefined configurations, and there is no need to complete the system configuration wizard after flashing.
-
Runtime: No default configuration is set on the target, and you need to manually complete the system configuration wizard after flashing.
Starting from JetPack version 4.6, Jetson AGX Xavier and Orin modules can be flashed to external storage. According to the available options in the flashing dialog box, select the external storage to flash to (EMMC, SDCard, NVMe, USB, or Custom).
-
-
After the SDK Manager completes the flashing process, the display connected to the Jetson system will show initial setup prompts.
-
As part of the initial setup process, set a username and password for the Jetson system.
-
After the initial setup process is completed, the Jetson system boots to the Linux desktop.
-
Enter the same username and password you created during Jetson configuration in the post-flash installation dialog box of the SDK Manager.
The SDK Manager will now complete the installation of software libraries. Skipping this step will not install any SDK components on your target hardware, leaving a clean operating system on your device.
-
Step 6: Complete the Setup
-
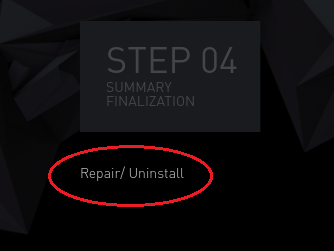
In Step 04 Summary Finalization, there is a summary of the installed components, as well as any warnings or errors encountered.
-
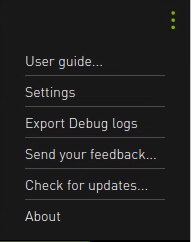
The Export Debug Logs link creates a ZIP file containing all log files generated during installation. This ZIP file is located in the same folder path where the SDK Manager installer downloads all components. Alternatively, click the menu icon ("⋮") in the upper right corner of the window, then select Export Debug Logs from the drop-down menu in the upper right corner.
-
For information about any errors you may encounter, refer to Error Messages.
-
Click Finish and Exit to complete the installation.
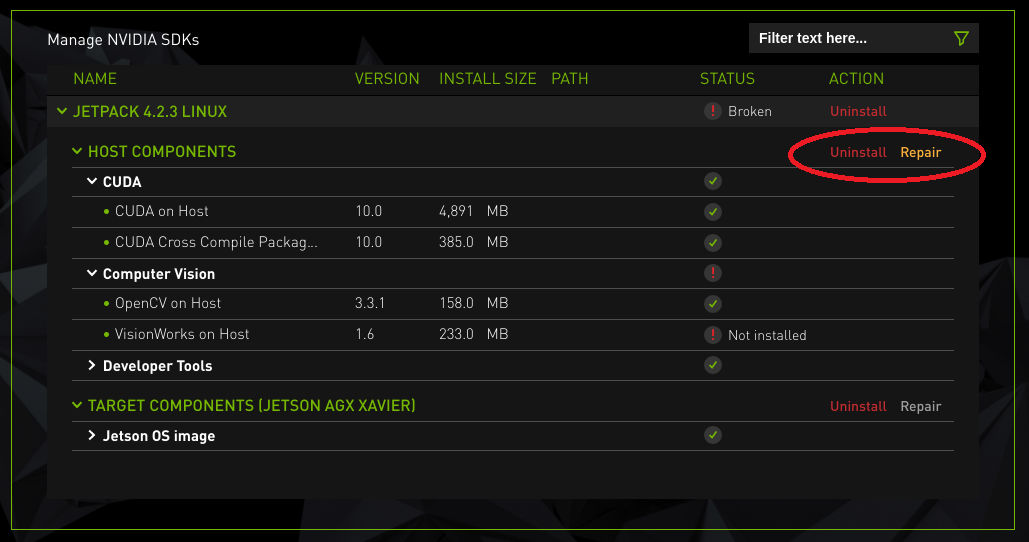
Repair and Uninstallation
To update or uninstall the SDK on your system, launch the SDK Manager again.
-
Under the installation step number in Step 1, click the Repair/Uninstall hyperlink.
-
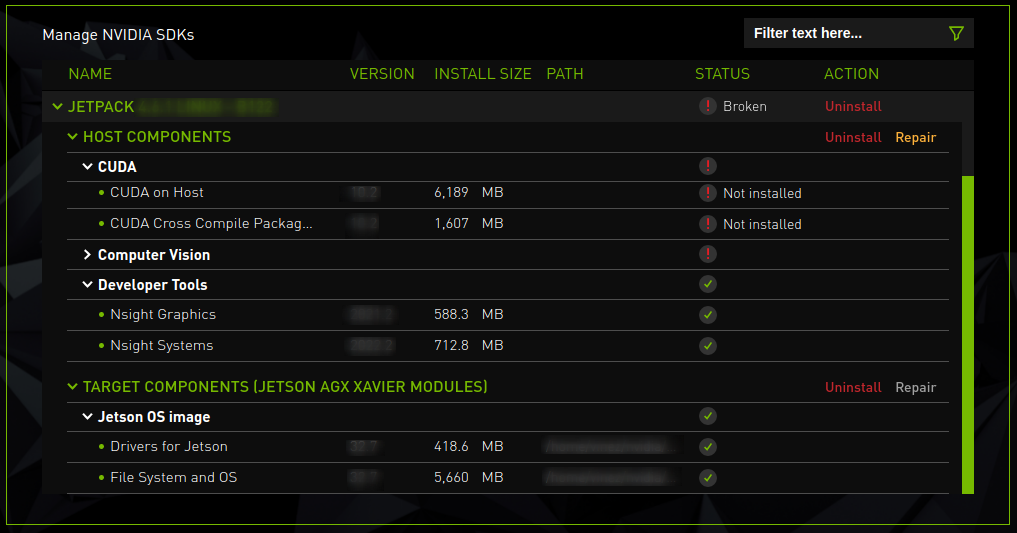
The Manage NVIDIA SDKs screen displays what is installed on your system. You can choose to repair a corrupted installation, update an existing SDK, or uninstall the SDK.
Recommended Recovery Steps
Various installation errors can have many causes. The following is a list of common installation issues to help you recover from a corrupted installation.
-
Check the summary table to identify which component failed.
a. Expand the group with a status of "Error".
b. When you find the failed component, click the details icon to the right of Install Error to redirect to the Terminal tab, which will display the exact error.
-
If the error is related to an environmental issue (e.g., a corrupted apt repository or missing prerequisites), try to fix it manually, then click the Retry Failed Items button.

-
You can also retry the installation in two other ways:
a. Start from Step 1, use the Repair/Uninstall button to access the Manage NVIDIA SDKs page. If needed, expand the SDK with a status of "Broken", then click Repair for the relevant section (Host or Target).
-
In Step 1, select the desired SDK and run the installation again.
-
Finally, try uninstalling and reinstalling the relevant SDK.
USB Boot (Copy the System from eMMC)
Equipment Preparation
- Jetson Nano motherboard.
- USB flash drive or portable hard disk (USB3.0 is recommended).
- Power adapter.
System Installation
-
Connect the USB flash drive to the Jetson Nano and check the device number of the USB flash drive (e.g., sda). Open the Jetson Nano terminal and enter:
ls /dev/sd* -
Format the USB flash drive.
sudo mkfs.ext4 /dev/sdaOnly sda remains, as shown in the figure below:

-
Modify the boot path:
sudo vi /boot/extlinux/extlinux.confLocate the line: APPEND ${cbootargs} quiet root=/dev/mmcblk0p1 rw rootwait rootfstype=ext4 console=ttyS0,115200n8 console=tty0, change mmcblk0p1 to sda and save.
-
Mount the USB flash drive:
sudo mount /dev/sda /mnt -
Copy the system to the USB flash drive (no information will be printed during this process, please wait patiently):
sudo cp -ax / /mnt -
Unmount the USB flash drive after copying (do not unplug the USB flash drive):
sudo umount /mnt/ -
Restart the system:
sudo reboot
Was this article helpful?