Drive the module via USB port (AT command)
Last revision 2026/01/20
The sketch for controlling the GSM/GPRS/GPS module via SMS to turn an LED on/off.
How to drive the GPS Mode via USB port
| NOTE: You have to take the module outdoor to get valid GPS data. If you are only to test its AT command, you can stay inside. |
|---|
Steps:
Code for GPS feature, AT mode
void setup() {
  //Init the driver pins for GSM function
  pinMode(3, OUTPUT);
  pinMode(4, OUTPUT);
  pinMode(5, OUTPUT);
  //Output GSM Timing
  digitalWrite(5, HIGH);
  delay(1500);
  digitalWrite(5, LOW);
}

void loop() {
  digitalWrite(3, HIGH); //disable GSM TX、RX
  digitalWrite(4, HIGH); //disable GPS TX、RX
}
- Stack this GPS/GSM shield onto Arduino UNO (Leonardo is special, you could go to FAQ, Q8 to know how), then connect UNO to computer with a USB cable.
- NOTE: The SIM card & External power source can be omitted here, we don't need that so far. But if you have inserted a SIM card onto the module, you do NEED an external power then, a mere USB power is NOT capable to run it!
- Turn the S1 to Prog
- Upload the sample code "Code for GPS feature, AT mode" in right
- Turn the three switches to: S1: Comm, S2: USB, S3(UART): GSM
- Connect the CoolTerm serial port
- The Serial monitor command format should be set as 9600, CR LF in Option.
- If you found the STAT & NET led turned off, please press RST button (or disconnect and re-connect the serial port) to reboot the module.
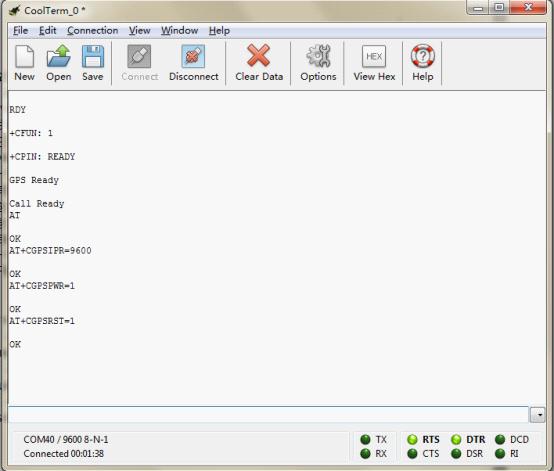
- Send AT commands below, you will receive corresponding OK from the module as showing in the picture
- Send: AT
- Send: AT CGPSIPR=9600 (set the baud rate)
- Send: AT CGPSPWR=1 (turn on GPS power supply)
- Send: AT CGPSRST=1 (reset GPS in autonomy mode)
- Turn the switch S3(Uart) to the GPS, you could receive the GPS data.
- If you want turn GPS off.
- Turn the Uart switch to GSM side
- Send AT CGPSPWR=0(turn off GPS power supply, in code)
- Send AT CPOWD=1 ( turn off GSM/GPS/GPRS module, in code)
- If you want to restart the module, press RST button please.

| NOTE: What is the meaning of GPS data received? Please refer to Location Mapping (GPRMC), you could also go to FAQ>Q2 for more info. |
|---|
How to Send a message
| NOTE: Before you test GSM function using AT command (including Make a call or other function related to GSM). You have to upload the code below to enable GSM. |
|---|
Steps:
Code for GSM feature, AT mode
void setup(){
  //Init the driver pins for GSM function
  pinMode(3, OUTPUT);
  pinMode(4, OUTPUT);
  pinMode(5, OUTPUT);
  //Output GSM Timing
  digitalWrite(5, HIGH);
  delay(1500);
  digitalWrite(5, LOW);
}
void loop(){
  digitalWrite(3, LOW); //enable GSM TX、RX
  digitalWrite(4, HIGH); //disable GPS TX、RX
}
- Repeat the steps in NO.2 How to enter AT mode, sending AT command? to enter AT mode.
- You should upload the code "Code for GSM feature, AT mode" this time in right
- After you entered AT mode, you can:
- Send: AT
- Send: AT CMGF=1 (set the message to text format)
- Send: AT CMGS="XXXXX" (xxxx is the number of receiver)
- After you see ‘>’ then type the message you want to send
- Press 'ctrl Z' to send. (If you want to cancel, you can press ESC)
- NOTE: This step depends on the Serial software you use and its configuration. Arduino Serial Monitor can not accomplish this. Please go to the section below, "Ways to send Ctrl Z in Coolterm", for more details.
- Then you will see "OK". After several seconds, the receiver should get a message from this shield.

Ways to send Ctrl Z in Coolterm
Method 1. After typing the message text, press enter key, it will show:

Then, in the input area, pressing Ctrl Z will send out the single CTRL character successfully as below:
Note: This key shortcut depends on your version and configuration.

Method 2. Ctrl characters can also be sent out in their hexadecimal, Ctrl Z = '1A', this avoids problems with Coolterm version and configurations.
This method can be used with other Serial softwares, e.g. [DF Serial Debugger by Lisper](https://github.com/leffhub/DFRobotSIM808_Leonardo_mainboard/raw/master/Software/DF Serial Debugger.exe)), clike here to know more detals about how.

How to Make a phone call
Steps:
- Send: AT
- Send: ATDXXXXXXX;(xxxxxxx is the number of receiver, please do not forget the semicolon ";")
- Then you will see "OK". And after several seconds, the receiver should get a phone call from this shield.
- If you want to cancel/ hang up the call, send: ATH
- ATA : Answer the phone

Was this article helpful?