HUSKYLENS 2 Object Classification Function Description
The article explains the object classification function of HUSKYLENS 2, detailing its capabilities to classify objects into 1000 predefined categories using built-in AI models, and describing related functionalities such as parameter settings, the process of learning object IDs, and exporting/importing models between devices.
1.Introduction to Object Classification
In Object Classification mode, HUSKYLENS 2 can classify objects into 1000 predefined categories using its built-in model, displaying the possible category names and confidence levels of objects in the current image. Unlike Object Recognition, Object Classification does not provide the position coordinates of objects within the image.

2.Introduction to Object Classification Function
In this section, we'll learn how to use HUSKYLENS 2 to classify objects in the image, display their categories and confidence levels.
2.1 Selecting the Object Classification Function
Power on HUSKYLENS 2, and after startup, locate the "Object Classification" function.

2.2 Observe Classification Results
To classify an object: Align the HUSKYLENS 2 with the object to be classified, ensuring the object is fully within the screen and near to the crosshair. Observe the screen; the crosshair will disappear, and possible category labels for the object will appear on the left. On first use of the Object Classification feature, the 5 most likely categories for the object will be displayed by default.

The object learning: Observe the result, then press Button-A after the object category labels appear. Once learning is completed, the possible category labels of the object and their corresponding IDs and confidence levels will be displayed.

3.Object Classification Parameter Settings
The factory default parameters of HUSKYLENS 2 meet the requirements for basic functionality. For more refined features, individual parameters can be adjusted manually. The following parameters are all based on the "Object Classification" function; therefore, ensure you have first entered the "Object Classification" function, as shown in the figure.To select the parameter you want to modify, slide left or right on the parameter text below the screen.

3.1 Forgetting IDs
To forget all previously learned object categories: Step 1, tap "Forget IDs" on the screen; Step 2, after the pop-up window "Forget All IDs and Names" appears, tap "Yes".At this time, point HUSKYLENS 2 at the object that has been learned but forgotten. If only the category label appears on the left side of the screen without the ID and confidence score, this means the "forget" operation is completed.

3.2 Threshold
In object classification, a threshold is a confidence-related boundary value set during setup. Only when the model's prediction confidence exceeds this threshold will the classification result be output. The default threshold is 0.3.
Setting steps: Click "Threshold", and an adjustment slider will appear above it. Left-sliding reduces the value; right-sliding increases it. The effect is shown in the figure.

3.3 Category Display Threshold
The "Category Display Threshold" controls the number of category labels to display, ranging from 0 to 6 with a default value of 5.
Setup Steps: Click "Recognition Threshold", and a parameter adjustment slider will appear above it. Sliding it to the left decreases the value, while sliding to the right increases it, as shown in the figure.

3.4 Restore Defaults
This parameter restores all settings to their default states and forgets all learned tags and IDs, but does not clear exported models (for information on exporting models, see below).
Setup Steps: Click "Restore Defaults", then click "Yes" in the "Restore Default Configuration" pop-up.

3.5 Export Model
This parameter saves and exports the currently set parameters, learned category labels, and IDs to the local memory of HUSKYLENS 2. It is suitable for scenarios such as migrating parameters to another HUSKYLENS 2. This operation does not require inserting a TF card.
Export Steps: Click "Export Model". When the "Save Configuration To" pop-up appears, slide up and down the number to select the model number (a maximum of 5 models can be saved), then click the "Confirm" button at the bottom-left corner of the pop-up. After confirmation, the export will proceed automatically, as shown in the figure.

To view the exported model: After the "Exporting" pop-up disappears, you can view the exported model file on your computer.
First, connect the HUSKYLENS 2 to your computer's USB port.

To access the memory of HUSKYLENS 2, use your computer to navigate to the path shown in the following figure. Locate the model file named "config"—the numeric suffix of this file is the "Model Number" selected during configuration saving. This file can be copied and pasted to other locations.

3.6 Importing Models
This parameter allows importing a model from HUSKYLENS 2 (referred to as "HUSKYLENS A") to another HUSKYLENS 2 (referred to as "HUSKYLENS B"). This enables HUSKYLENS B to recognize the ID number of the barcodes learned by HUSKYLENS A without re-learning.
Importing Steps:
Step 1: Connect HUSKYLENS A to a computer and copy the exported model file to the computer's desktop.
Step 2: Connect HUSKYLENS B to the computer and paste the file from the previous step into the specified folder of HUSKYLENS B. The path is shown in the figure. (If the "object-classification" folder is not found, please first perform Step 3: If a model has been imported before, this folder will be automatically created. Then return to Step 2.)
Step 3: First, confirm you have entered the "Object Classification" function. Then click "Import Model". Once the "Load Configuration" pop-up appears, slide the number slider up and down to select the model number to load (this should match the model number saved in the previous step). Finally, click "Confirm" to import.

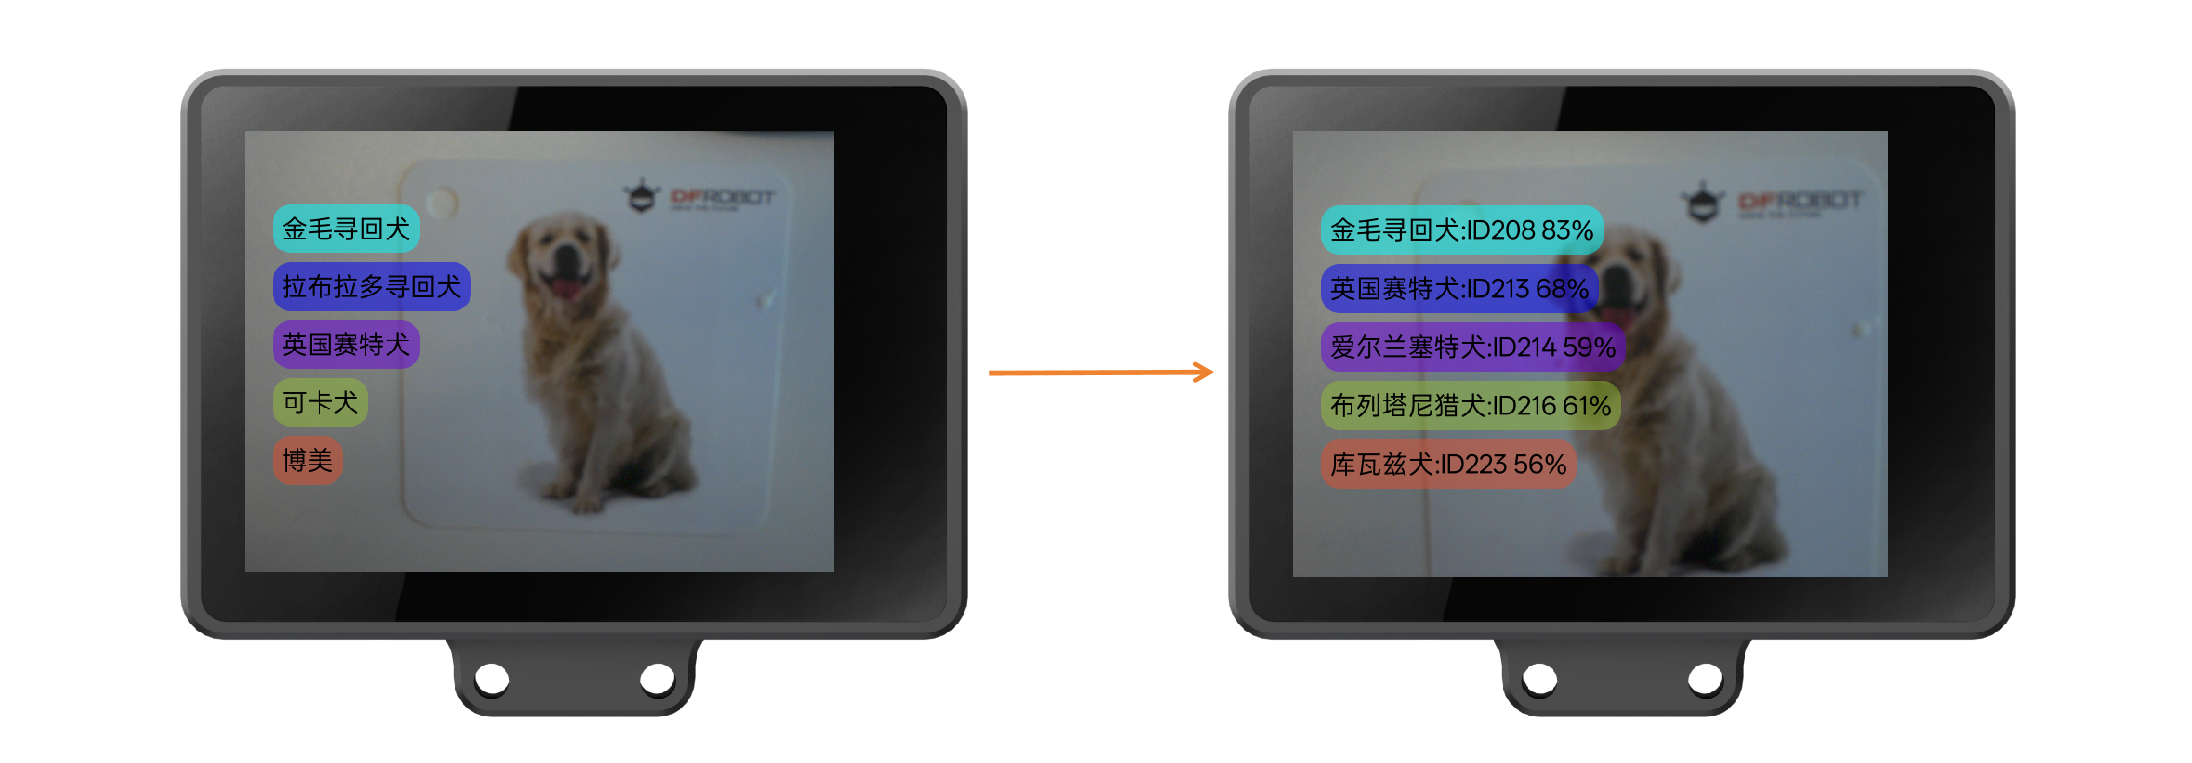
Then you can perform an object classification test. The left image below shows the classification result of HUSKYLENS B before model import, and the right image shows the result after importing the model.
Was this article helpful?