
Introduction
This exquisite little display is a good choice for projects requiring colorful and clear displaying effects!
Based on ST7789V3 driver chip, this 1.47" display has 172×320 pixels with IPS any-angle viewing and SPI interface for communication. It comes with a 1mm frame and rounded corners. The display can be used to display text messages, images, animations or videos. Also, with the supported Arduino GLD and LVGL libraries, more amazing dynamic effects can be achieved.
It is widely suitable for DIY projects like mini game consoles, weather stations, pendants, clocks, video players, etc.
Features
- Curved Edges
- 172×320 pixels
- Narrow frame with a width of 1mm
- HD IPS, adjustable viewing direction
Application
- Mini weather station
- Pendants
- Video players
- DIY gifts
- Mini game consoles
- Clock
Board Overview
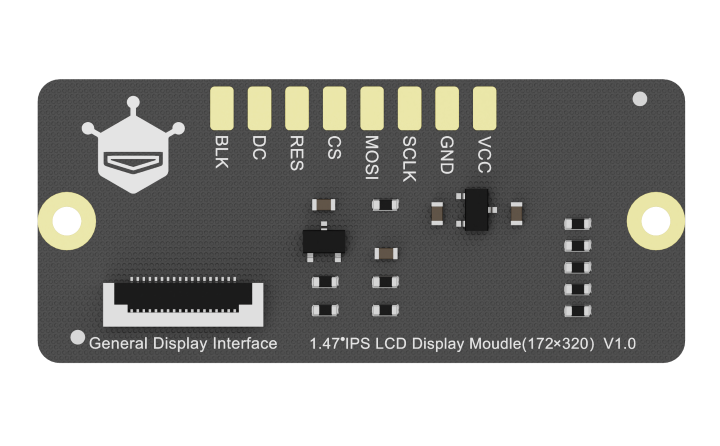
| Name | Function |
|---|---|
| VCC | DC3.3V-5V |
| GND | Ground |
| SCLK | SPI clock signal |
| MOSI | SPI Main signal |
| CS | SPI chip-select signal |
| RES | Reset |
| DC | Command |
| BLK | Backlit |
Specification
- Display Dimension: 1.47"
- Pixels: 172×320
- Interface: SPI
- Brightness: 600(TYP)Cd/m2
- Viewing Direction: full angle
- Operating Temperature: -20℃~+70℃
- Operating Voltage: 3.3V
- Backlit: 3 White LED Parallel
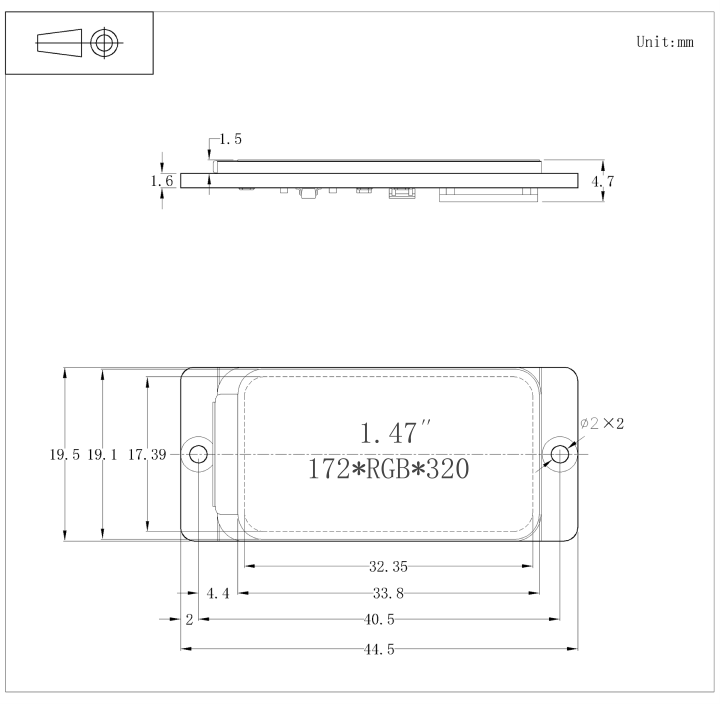
- Display Area: 19.1mm×33.8mm
- Module Dimension: 19.5mm×44.5mm
Dimension
Tutorial
Requirements
-
Hardware
- FireBeetle ESP32-E (SKU: DFR0654) x 1
- 1.47" IPS color Display x1
- FPC Wire x1
- Type-C USB x1
- M-M/F-M/F-F Jumper wires
-
Software
- Arduino IDE
- Download and install the DFRobot GDL Library. (About how to install the library?)
Connection Diagram
The following provides two ways to connect 1.47" display to the FireBeetle ESP32-E: 1. Directly connect to GDI via FPC 2. Connect to SPI function pin.
Connection 1:

Wire Sequence for GDI connection:
| FPC PINS | FireBeetle ESP32 PINS | Description |
|---|---|---|
| VCC | 3V3 | 3.3V |
| BLK | 12/D13 | Backlit |
| GND | GND | GND |
| SCLK | 18/SCK | SPI Clock |
| MOSI | 23/MOSI | Master output, slave input |
| MISO | 19/MISO | Master input, slave output |
| DC | 25/D2 | Data/Command |
| RES | 26/D3 | Reset |
| CS | 14/D6 | TFT Chip-select |
| SDCS | 13/D7 | SD chip-select |
| FCS | 0/D5 | Font library |
| TCS | 4/D12 | Touch |
| SCL | 22/SCL | I2C clock |
| SDA | 21/SDA | I2C data |
| INT | 16/D11 | INT |
| BUSY-TE | 17/D10 | Anti-tear pin |
| X1 | NC | User-defined pin 1 |
| X2 | NC | User-defined pin 2 |
Connection 2:
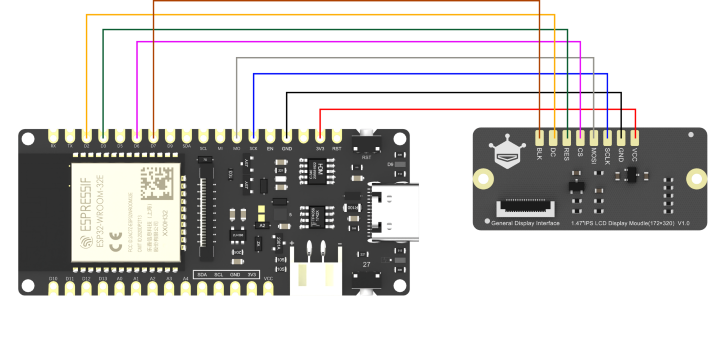
Wire sequence:
| LCD Display | ESP32-E |
|---|---|
| VCC | 3V3 |
| GND | GND |
| SCLK | 18/SCK |
| MOSI | 23/MOSI |
| CS | 14/D6 |
| RES | 26/D3 |
| DC | 25/D2 |
| BLK | 13/D7 |
Sample Code 1 - Chinese Font Display
#include "DFRobot_GDL.h"

#define TFT_DC  D2
#define TFT_CS  D6
#define TFT_RST D3
#define TFT_BL  D7

DFRobot_ST7789_172x320_HW_SPI screen(/*dc=*/TFT_DC,/*cs=*/TFT_CS,/*rst=*/TFT_RST,/*bl=*/TFT_BL);
void setup() {
  screen.begin();
}

void loop() {
  screen.setTextSize(4);
  screen.fillScreen(COLOR_RGB565_BLACK);//Background color
  screen.setFont(&SIMKAIFont72pt);//Font size(12pt 18pt 24pt 36pt 48pt 72pt)
  screen.setCursor(/*x=*/10,/*y=*/120);//Text Position
  screen.setTextColor(COLOR_RGB565_BLUE); //Text color
  screen.setTextWrap(true);
  screen.print("你好");//Chinese Character
  delay(2000);
}
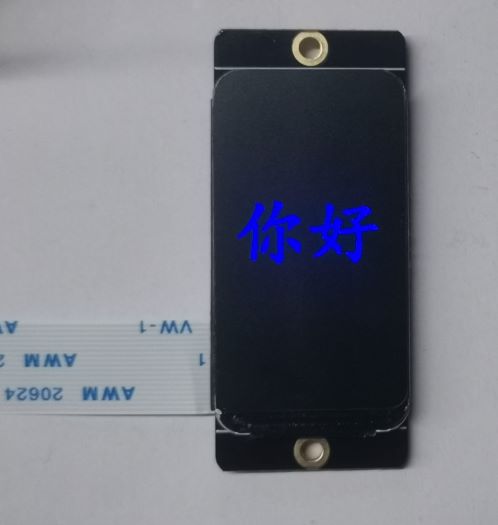
Expected Results
Burn the codes into the ESP32-E, then the screen shows “你好” in blue.
Sample Code 2 - English Font Display
#include "DFRobot_GDL.h"
#define TFT_DC  D2
#define TFT_CS  D6
#define TFT_RST D3
#define TFT_BL  D7

DFRobot_ST7789_172x320_HW_SPI screen(/*dc=*/TFT_DC,/*cs=*/TFT_CS,/*rst=*/TFT_RST,/*bl=*/TFT_BL);
/* M0 mainboard DMA transfer */
//DFRobot_ST7789_172x320_DMA_SPI screen(/*dc=*/TFT_DC,/*cs=*/TFT_CS,/*rst=*/TFT_RST,/*bl=*/TFT_BL);
void setup() {
  screen.begin();
}
void loop() {
  screen.setTextSize(2);
  screen.fillScreen(COLOR_RGB565_BLACK);//Background color
  screen.setFont(&FreeMono24pt7b);//Font size(9 12 18 24)
  screen.setCursor(/*x=*/32,/*y=*/200);//Text position
  screen.setTextColor(COLOR_RGB565_LGRAY);//Text color
  screen.setTextWrap(true);
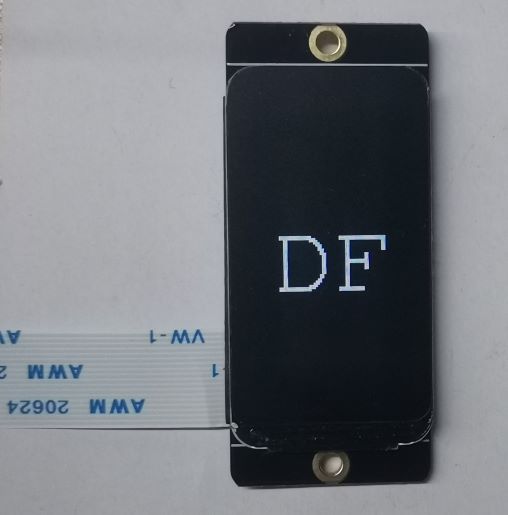
  screen.print("DF");//English char
  delay(1000);
}
Expected Results
Burn the codes into the ESP32-E, then the screen shows "DF" in grey.
Sample Code 3 - Colorful Background
#include "DFRobot_GDL.h"

#define TFT_DC  D2
#define TFT_CS  D6
#define TFT_RST D3
#define TFT_BL  D4

DFRobot_ST7789_172x320_HW_SPI screen(/*dc=*/TFT_DC,/*cs=*/TFT_CS,/*rst=*/TFT_RST,/*bl=*/TFT_BL);
/* M0 mainboard DMA transfer */
//DFRobot_ST7789_172x320_DMA_SPI screen(/*dc=*/TFT_DC,/*cs=*/TFT_CS,/*rst=*/TFT_RST,/*bl=*/TFT_BL);

byte red = 29;
byte green = 0;
byte blue = 0;
byte state = 0;
boolean initial = 1;

void setup() {
  screen.begin();
  screen.fillScreen(COLOR_RGB565_LGRAY);
  for(uint16_t i=0;i<screen.height();i++){
    screen.drawFastHLine(0,i,screen.width(),rainbow());
   }
}

void loop() {
}

unsigned int rainbow()
{
    switch (state) {
      case 0:
        green ++;
        if (green == 64) {
          green = 63;
          state = 1;
        }
        break;
      case 1:
        red--;
        if (red == 255) {
          red = 0;
          state = 2;
        }
        break;
      case 2:
        blue ++;
        if (blue == 32) {
          blue = 31;
          state = 3;
        }
        break;
      case 3:
        green --;
        if (green == 255) {
          green = 0;
          state = 4;
        }
        break;
      case 4:
        red ++;
        if (red == 32) {
          red = 31;
          state = 5;
        }
        break;
      case 5:
        blue --;
        if (blue == 255) {
          blue = 0;
          state = 0;
        }
        break;
    }
    return red << 11 | green << 5 | blue;
}
Expected Results
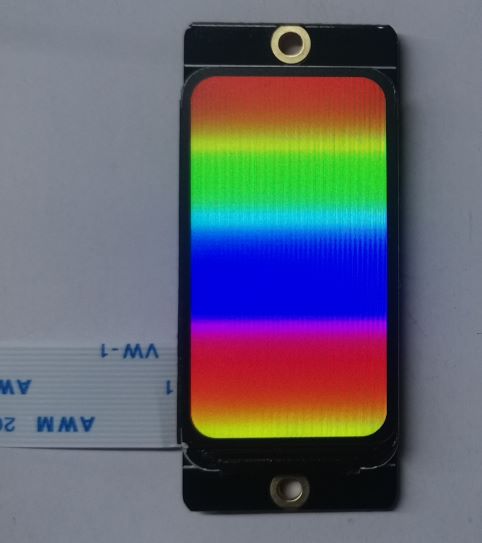
Burn the codes into the ESP32-E, then the screen shows rainbow colors.
Sample Code 4 - Dynamic Image Display
#include "DFRobot_GDL.h"

#define TFT_DC  D2
#define TFT_CS  D6
#define TFT_RST D3
#define TFT_BL  D4


DFRobot_ST7789_172x320_HW_SPI screen(/*dc=*/TFT_DC,/*cs=*/TFT_CS,/*rst=*/TFT_RST,/*bl=*/TFT_BL);
/* M0 mainboard DMA transfer */
//DFRobot_ST7789_172x320_DMA_SPI screen(/*dc=*/TFT_DC,/*cs=*/TFT_CS,/*rst=*/TFT_RST,/*bl=*/TFT_BL);

void setup() {
  screen.begin();
}

void loop(){
    testLine();
    testFastLines(COLOR_RGB565_PURPLE,COLOR_RGB565_YELLOW);
    testRects(COLOR_RGB565_BLACK,COLOR_RGB565_WHITE);
}

void testLine(){
  uint16_t color = 0x00FF;
  screen.fillScreen(COLOR_RGB565_BLACK);
  for (int16_t x=0; x < screen.width(); x+=6) {
    screen.drawLine(/*x0=*/screen.width()/*Screen width*//2, /*y0=*/screen.height()/*Screen height*//2, /*x1=*/x, /*y1=*/0, /*c=*/color+=0x0700);
  }
  for (int16_t y=0; y < screen.height(); y+=6) {
    screen.drawLine(screen.width()/2, screen.height()/2, screen.width(), y, color+=0x0700);
  }
  for (int16_t x = screen.width(); x >= 0; x-=6) {
    screen.drawLine(screen.width()/2, screen.height()/2, x,screen.height(), color+=0x0700);
  }
  for (int16_t y = screen.height(); y >= 0; y-=6) {
    screen.drawLine(screen.width()/2, screen.height()/2, 0, y, color+=0x0700);
  }
}
void testFastLines(uint16_t color1, uint16_t color2) {
  for (int16_t y=0; y < screen.height(); y+=4) {

    screen.drawFastHLine(/*x=*/0, /*y=*/y, /*w=*/screen.width(),/*c=*/color2);
    delay(10);
  }

  for(int16_t x=0; x < screen.width(); x+=3) {

    screen.drawFastVLine(/*x=*/x, /*y=*/0, /*h=*/screen.height(), /*c=*/color1);
    delay(10);
  }
}


void testRects(uint16_t color1, uint16_t color2) {
    screen.fillScreen(COLOR_RGB565_BLACK);
    int16_t x=screen.width()-12;
    for (; x > 100; x-=screen.width()/40) {

      screen.drawRect(/*x=*/screen.width()/2 -x/2, /*y=*/screen.height()/2 -x/2 , /*w=*/x, /*h=*/x, /*color=*/color2+=0x0F00);
      delay(100);
    }

    screen.fillRect(/*x=*/screen.width()/2 -x/2, /*y=*/screen.height()/2 -x/2 , /*w=*/x, /*h=*/x, /*color=*/color2);
    delay(100);
    for(; x > 6; x-=screen.width()/40){
      screen.drawRect(screen.width()/2 -x/2, screen.height()/2 -x/2 , x, x, color1);
      delay(100);
    }
}
Expected Results
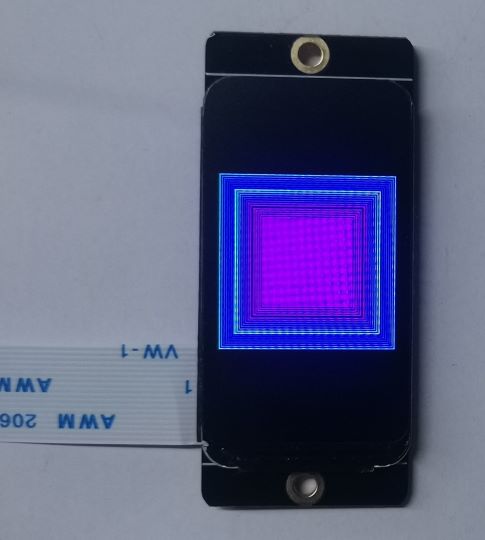
Burn the codes into the ESP32-E, then the screen shows the specifed dynamic effects.
Sample Code 5 - Line Chart Display
#include "DFRobot_UI.h"
#include "Arduino.h"
#include "DFRobot_GDL.h"
#include "DFRobot_Touch.h"

#define TFT_DC  D2
#define TFT_CS  D6
#define TFT_RST D3
#define TFT_BL  D4


DFRobot_ST7789_172x320_HW_SPI screen(/*dc=*/TFT_DC,/*cs=*/TFT_CS,/*rst=*/TFT_RST,/*bl=*/TFT_BL);
/* M0 mainboard DMA transfer */
//DFRobot_ST7789_172x320_DMA_SPI screen(/*dc=*/TFT_DC,/*cs=*/TFT_CS,/*rst=*/TFT_RST,/*bl=*/TFT_BL);

DFRobot_UI ui(&screen, NULL);

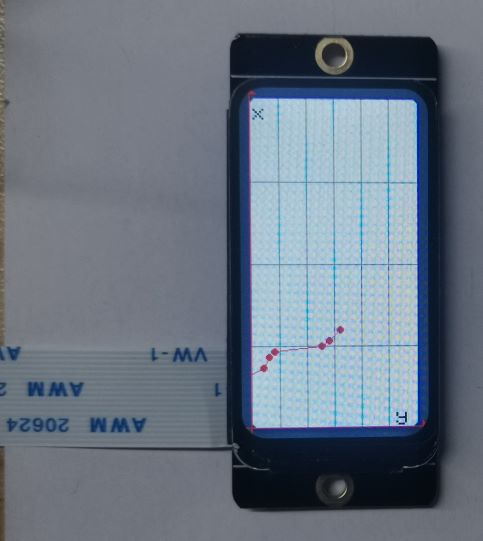
int16_t point3[7][2] ={{0,50},{10,55},{15,65},{20,70},{63,75},{70,80},{80,90}};//Coordinates for line points
void setup()
{
  ui.begin();
  DFRobot_UI::sCoordinate_t &coord = ui.creatCoordinate();
  coord.setPoint(point3,7,COLOR_RGB565_RED);//Line color
  ui.draw(&coord);

}
void loop()
{
  ui.refresh();
}
Expected Results
Burn the codes into the ESP32-E, then the screen shows a line chart.
FAQ
For any questions, advice or cool ideas to share, please visit the DFRobot Forum.