Introduction
There’s an old saying regarding keeping fish, “Good fish deserves good water”. Good water quality is very important to aquatic organisms. Dissolved oxygen is one of the important parameters to reflect the water quality. Low dissolved oxygen in water will lead to difficulty in breathing for aquatic organisms, which may threaten the lives of these animals.
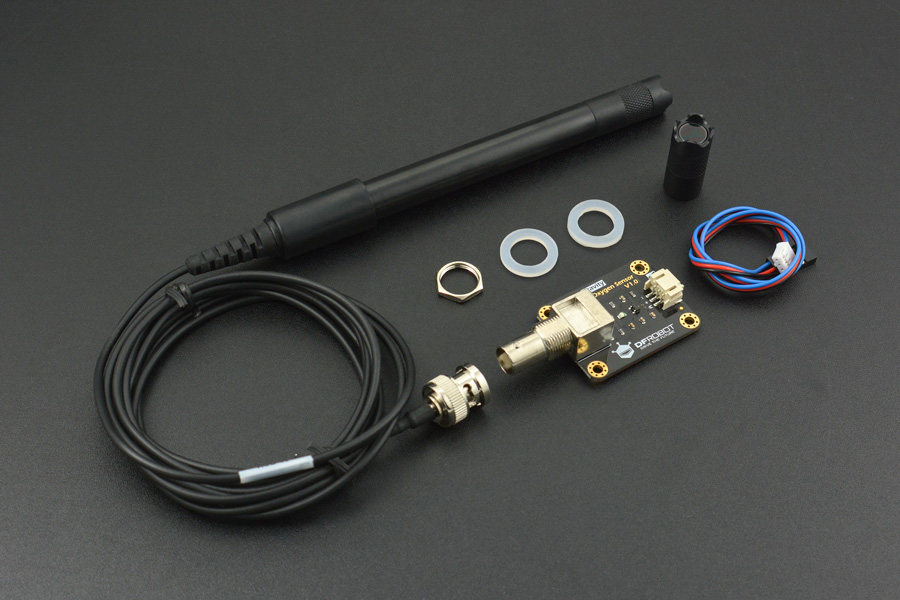
We launched a new opensource dissolved oxygen sensor kit, which is compatible with Arduino. This product is used to measure the dissolved oxygen in water, which in turn reflects the water quality. It is widely applied in many water quality applications, such as aquaculture, environmental monitoring, natural science and so on. This sensor kit helps you quickly to build your own dissolved oxygen detector.
The probe is a galvanic probe, with no need for polarization time and therefore is able to measure at any time. The filling solution and membrane cap is replaceable, leading to the low maintenance cost. The signal converter board is plug and play, and has the good compatibility. It can be easily integrated to any control or detecting system.
This product is easy to use and has great compabilility. With open-source code and detailed tutorial provided, this product is very suitable for your water projects for detecting the dissolved oxygen concentration for aquatic organisms.
 |
The filling solution is 0.5 mol/L NaOH solution. You need to pour it in the membrane cap before use. Please use caution with this operation because the solution is corrosive. Please wear gloves! If the solution accidentally drops onto the skin, wash your skin with plenty of water immediately. The oxygen permeable membrane in the membrane cap is sensitive and fragile. Use caution when handling it. Fingernails and other sharp objects should be avoided. The DO sensor will consume a little oxygen during the measurement. Please gently stir the solution and let the oxygen to be distributed evenly in the water. |
|---|
Specification
- Dissolved Oxygen Probe
- Type: Galvanic Probe
- Detection Range: 0~20 mg/L
- Temperature Range: 0~40 ℃
- Response Time: Up to 98% full response, within 90 seconds (25℃)
- Pressure Range: 0~50 PSI
- Electrode Service Life: 1 year (normal use)
- Maintenance Period:
- Membrane Cap Replacement Period:
- 1~2 months (in muddy water);
- 4~5 months (in clean water)
- Filling Solution Replacement Period: Once every month
- Membrane Cap Replacement Period:
- Cable Length: 2 meters
- Probe Connector: BNC
- Signal Converter Board
- Supply Voltage: 3.3~5.5V
- Output Signal: 0~3.0V
- Cable Connector: BNC
- Signal Connector: Gravity Analog Interface (PH2.0-3P)
- Dimension: 42mm * 32mm/1.65 * 1.26 inches
Board Overview

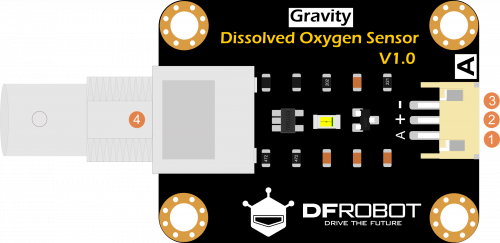
| No. | Label | Description |
|---|---|---|
| 1 | A | Analog Signal Output (0~3.0V) |
| 2 | + | VCC (3.3~5.5V) |
| 3 | - | GND |
| 4 | BNC | Probe Cable Connector |
Tutorial
This tutorial will show how to use this dissolved oxygen sensor kit. The dissolved oxygen probe is a precision electrochemical sensor. Please pay attention to the usage details.
 |
Before using the dissolved oxygen probe, 0.5 mol/L NaOH solution should be added into the membrane cap as the filling solution of the probe. As NaOH solution has strong corrosivity, protective gloves should be put on before handling the solution. If the solution accidentally drops onto the skin, wash your skin with plenty of water immediately. The oxygen permeable membrane in the membrane cap is sensitive and vulnerable. Use caution when handling with it. Fingernail and other sharp objects should be avoided. During the measuring process, the oxygen probe will consume a little oxygen. You need to gently stir the water and let the oxygen to be distributed evenly in water. On the other hand, do not stirring violently to prevent the oxygen in the air from quickly entering into the water. |
|---|
Requirements
-
Hardware
- Dissolved Oxygen Probe (With Membrane Cap) x 1
- 0.5mol/L NaOH Solution x 1
- DFRduino UNO R3 (or similar) x 1
- Dissolved Oxygen Signal Converter Board x 1
- Analog Cable (3Pin) x 1
-
Software
- Arduino IDE (Version requirements: V1.0.x, V1.6.x or V1.8.x), Click to Download Arduino IDE from Arduino®
Prepare the Probe
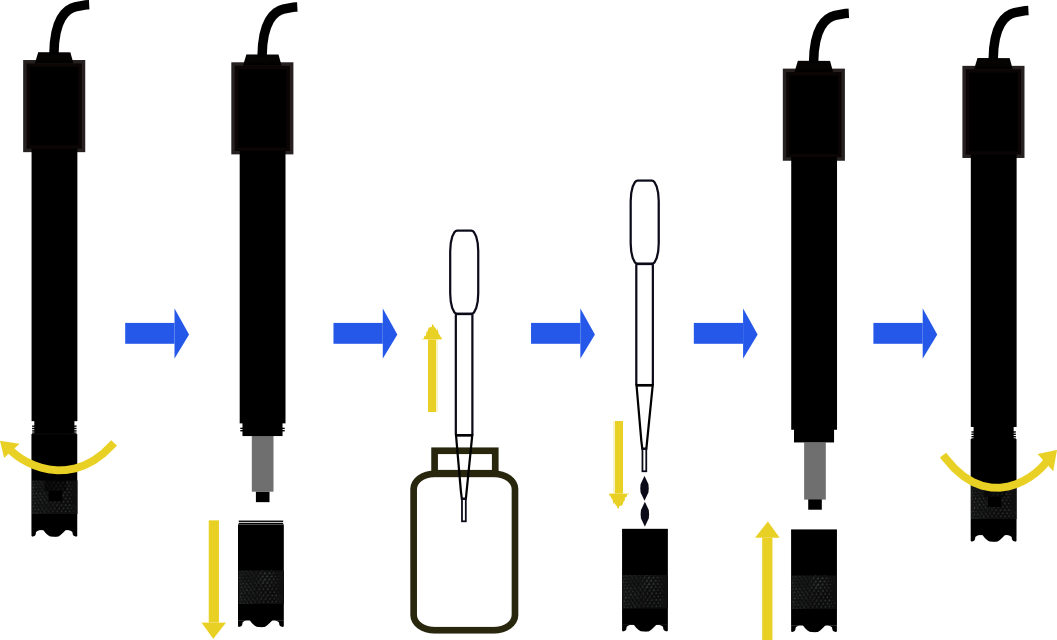
For a new dissolved oxygen probe, 0.5 mol/L NaOH solution should be added into the membrane cap first as the filling solution. If the probe has been used for some time and the error grows greatly, it is time to change the filling solution. The following tutorial details how to fill the probe with the NaOH solution.
Unscrew the membrane cap from the probe and fill about 2/3 volume of the cap with 0.5 mol/L NaOH solution. Make sure the probe is in vertical position with respect to the horizontal plane. Carefully screw the cap back to the probe. It would be nice if a little bit solution overflows out of the cap to ensure the probe is fully filled with NaOH solution.
- When screwing the cap back to the probe, the probe should be in vertical position with respect to the horizontal plane to avoid creating bubbles in the filling solution.
- If the cap is fully filled with NaOH solution, there will be too much solution overflowing when screwing the cap back to the probe. If the filling solution is too little, bubbles may be created inside the cap. In sum, the best way is to fill about 2/3 volume of the cap. A little bit overflow when screwing the cap back to the probe is okay.
- Clean the overflowed solution with tissue.
- Screw the NaOH solution bottle after every use to prevent the CO2 in the air from affecting the solution.

Connection Diagram
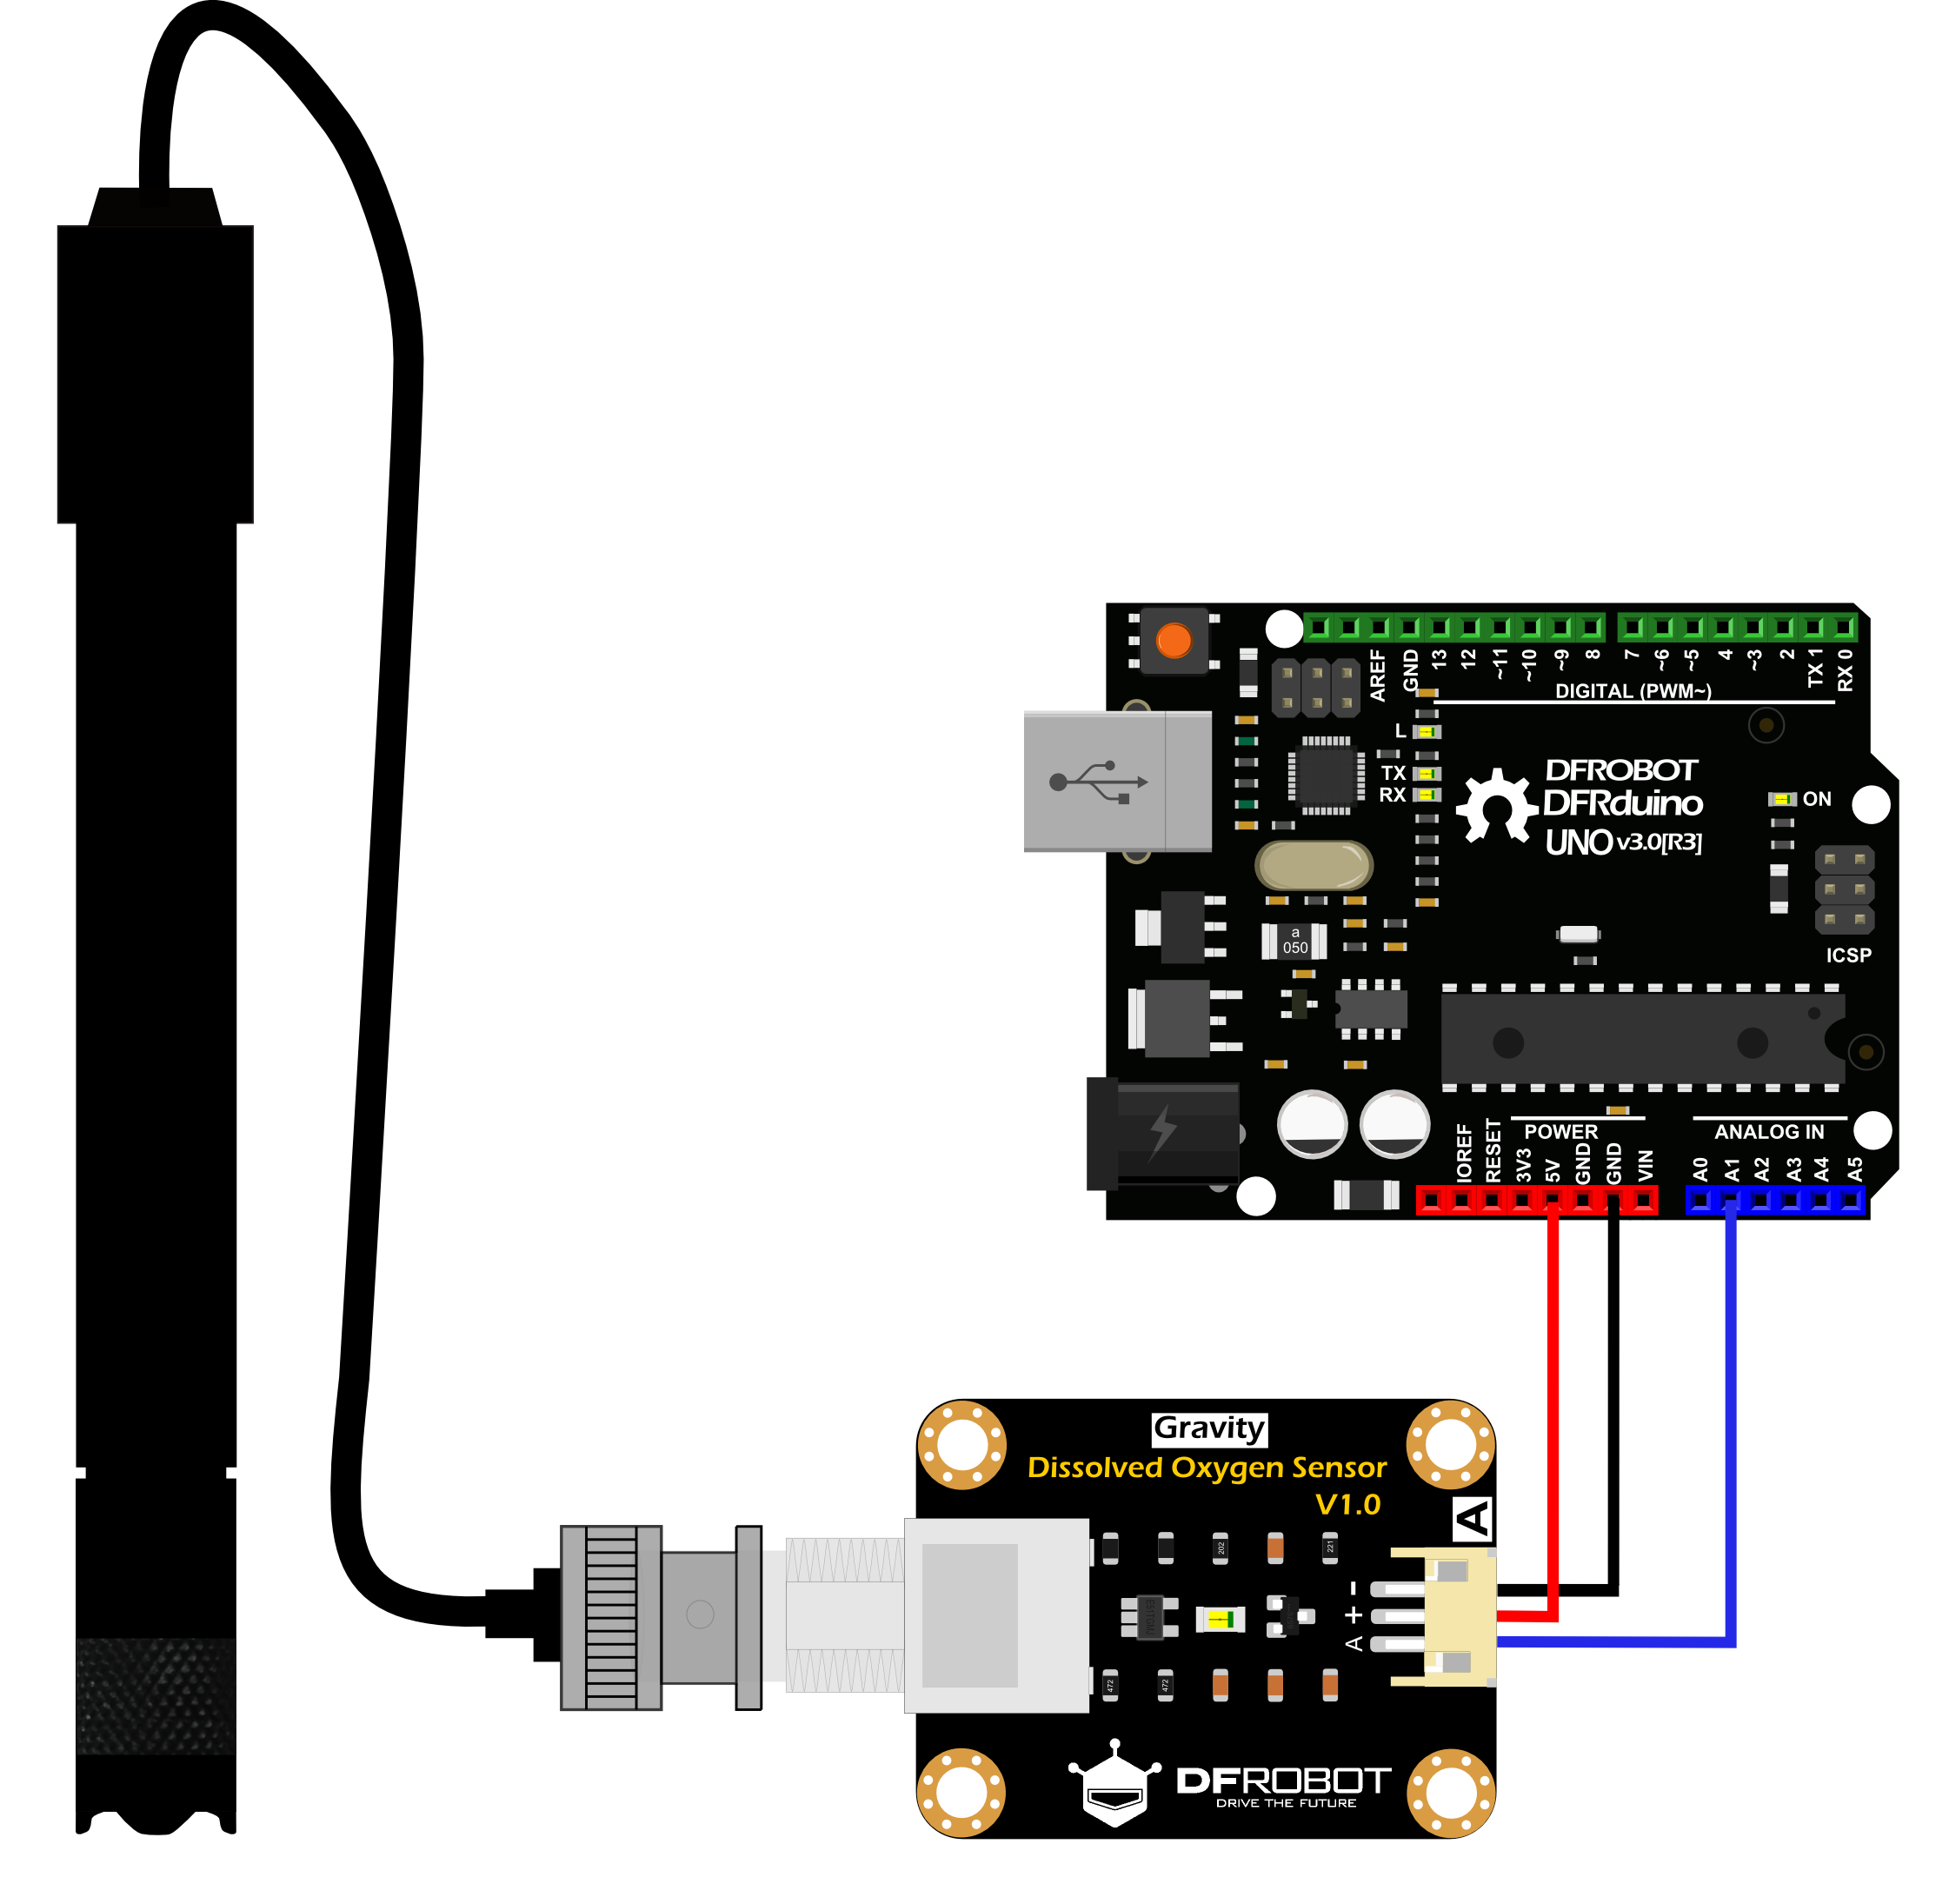
When the probe is filled with NaOH solution, it needs to be calibrated. Before calibration, please connect the probe as shown in the the following diagram. Connect the probe to BNC connector on the signal converter board. Connect the board to the analog input of Arduino main-board.

Probe Calibration
If this is the first time you use the probe or the probe has been used for some time, the probe needs to be calibrated for accuracy.
- Single-point calibration: only calibrate the saturated dissolved oxygen at a fixed temperature, suitable for use when the temperature is stable
- Two-point calibration: calibrate the saturated dissolved oxygen at different temperatures, you can calculate the temperature compensation, used when the temperature changes
Calibration Code
Copy the sample program to the Arduino IDE, select the Arduino board and port to upload
#include <Arduino.h>

#define VREF    5000//VREF(mv)
#define ADC_RES 1024//ADC Resolution

uint32_t raw;

void setup()
{
    Serial.begin(115200);
}

void loop()
{
    raw=analogRead(A1);
    Serial.println("raw:\t"+String(raw)+"\tVoltage(mv)"+String(raw*VREF/ADC_RES));
    delay(1000);
}
Single-point calibration
Only calibrate the saturated dissolved oxygen at a fixed temperature, suitable for use when the temperature is stable.
There are 2 ways to get saturated dissolved oxygen voltage:
- Expose the wet probe to the air. A easy way.
- mmerse the probe in saturated dissolved oxygen water. Troublesome but precise.
Expose the wet probe to the air
- Prepare the probe
- Wet the probe in pure water and shake off excess water drops
- Expose the probe to the air and maintain proper air flow (do not use a fan to blow)
- After the output voltage is stable, record the voltage, which is the saturated dissolved oxygen voltage at the current temperature
Mmerse the probe in saturated dissolved oxygen water
- Probe ready
- Prepare a cup of purified water and use one of the following methods to make saturated oxygen water.
- A: Use a stirrer or an eggbeater to continuously stir for 10 minutes to saturate the dissolved oxygen
- B: Use an air pump to continuously inflate the water for 10 minutes to saturate the dissolved oxygen
- Stop stirring or pumping, and put the probe after the bubbles disappear
- After placing the probe, keep stirring slowly while avoiding any bubbles.
- After the output voltage stable, record the temperature and voltage
Two-point calibration
1 .Prepare two cups of purified water, put one cup in the refrigerator, and one cup to warm up (Do not exceed 40°C, otherwise the probe may be damaged.)
2. Use one of the following methods to make saturated oxygen water.
- A: Use a stirrer or an eggbeater to continuously stir for 10 minutes to saturate the dissolved oxygen.
- B: Use an air pump to continuously inflate the water for 10 minutes to saturate the dissolved oxygen.
- Stop stirring or pumping, and put the probe after the bubbles disappear.
- After placing the probe, keep stirring slowly while avoiding any bubbles.
- After the output voltage stable, record the temperature and voltage.
- Perform the same operation on another glass of water. Measure and record the temperature and voltage.
Sample Code
Please calibrate first, modify the program parameters according to the calibration data before uploading
#include <Arduino.h>

#define DO_PIN A1

#define VREF 5000    //VREF (mv)
#define ADC_RES 1024 //ADC Resolution

//Single-point calibration Mode=0
//Two-point calibration Mode=1
#define TWO_POINT_CALIBRATION 0

#define READ_TEMP (25) //Current water temperature ℃, Or temperature sensor function

//Single point calibration needs to be filled CAL1_V and CAL1_T
#define CAL1_V (1600) //mv
#define CAL1_T (25)   //℃
//Two-point calibration needs to be filled CAL2_V and CAL2_T
//CAL1 High temperature point, CAL2 Low temperature point
#define CAL2_V (1300) //mv
#define CAL2_T (15)   //℃

const uint16_t DO_Table[41] = {
    14460, 14220, 13820, 13440, 13090, 12740, 12420, 12110, 11810, 11530,
    11260, 11010, 10770, 10530, 10300, 10080, 9860, 9660, 9460, 9270,
    9080, 8900, 8730, 8570, 8410, 8250, 8110, 7960, 7820, 7690,
    7560, 7430, 7300, 7180, 7070, 6950, 6840, 6730, 6630, 6530, 6410};

uint8_t Temperaturet;
uint16_t ADC_Raw;
uint16_t ADC_Voltage;
uint16_t DO;

int16_t readDO(uint32_t voltage_mv, uint8_t temperature_c)
{
#if TWO_POINT_CALIBRATION == 0
  uint16_t V_saturation = (uint32_t)CAL1_V + (uint32_t)35 * temperature_c - (uint32_t)CAL1_T * 35;
  return (voltage_mv * DO_Table[temperature_c] / V_saturation);
#else
  uint16_t V_saturation = (int16_t)((int8_t)temperature_c - CAL2_T) * ((uint16_t)CAL1_V - CAL2_V) / ((uint8_t)CAL1_T - CAL2_T) + CAL2_V;
  return (voltage_mv * DO_Table[temperature_c] / V_saturation);
#endif
}

void setup()
{
  Serial.begin(115200);
}

void loop()
{
  Temperaturet = (uint8_t)READ_TEMP;
  ADC_Raw = analogRead(DO_PIN);
  ADC_Voltage = uint32_t(VREF) * ADC_Raw / ADC_RES;

  Serial.print("Temperaturet:\t" + String(Temperaturet) + "\t");
  Serial.print("ADC RAW:\t" + String(ADC_Raw) + "\t");
  Serial.print("ADC Voltage:\t" + String(ADC_Voltage) + "\t");
  Serial.println("DO:\t" + String(readDO(ADC_Voltage, Temperaturet)) + "\t");

  delay(1000);
}
After the upload is complete, open the serial port monitor, set the baud rate to 115200, you can see the following results
Temperaturet:    25    ADC RAW:    215    ADC Voltage:    1049    DO:    5413
Temperaturet:    25    ADC RAW:    214    ADC Voltage:    1044    DO:    5387
Temperaturet:    25    ADC RAW:    214    ADC Voltage:    1044    DO:    5387
Temperaturet:    25    ADC RAW:    213    ADC Voltage:    1040    DO:    5362
Temperaturet:    25    ADC RAW:    213    ADC Voltage:    1040    DO:    5362
Temperaturet ℃
ADC RAW ADC raw reading
ADC Voltage ADC original voltage mv
DO Dissolved oxygen μg/L, Convert to mg/L need ÷1000
Calibration principle
When the temperature is fixed, the voltage is linearly related to the dissolved oxygen concentration. Due to the slight differences in the production of the probe, the voltage corresponding to the saturated dissolved oxygen needs to be calibrated before accurate data can be obtained.

Saturated dissolved oxygen is greatly affected by temperature changes. In order to improve accuracy, it is necessary to consider changes in dissolved oxygen and saturation voltage caused by temperature changes.
The approximate relationship between saturation voltage and temperature is shown in the following figure. It is necessary to measure the saturated dissolved oxygen voltage at two different temperatures to obtain a temperature compensation curve.
The correspondence between the temperature and saturated dissolved oxygen at standard atmospheric pressure is known, and the saturated oxygen concentration and corresponding voltage at the current temperature can be determined by measuring the temperature to calculate the dissolved oxygen.


FAQ
| Q1.How to configure the saturated dissolved oxygen water by myself ? |
|---|
| A1. You can pump air into water for about 20 minutes to saturate the water with oxygen to obtain 100% dissolved oxygen standard liquid. |
| Q2.How to make zero dissolved oxygen water ? |
|---|
| A2.Add sodium sulfite(Na2SO3) into water until it is saturated. This can consume all the oxygen in the water to obtain the zero dissolved oxygen liquid. |
| Q3.How to store the probe ? |
|---|
| A3. 1. Short time (over night to a week ): dip the probe into purified water or deionized water to prevent the filling solution from evaporating. Disconnect the probe from the main instrument every time when it is not in use. 2. Long time: (over a week): unscrew the cap from the probe and wash the electrodes core (cathode: platinum, anode: lead) and wash the cap with purified water or deionized water. Dry all the components with tissue. Screw the cap back to the probe without adding any filling solution to prevent the anode from being consumed. Put all the components back into the package. |
| Q4.How to make 0.5 mol/L NaOH solution? |
|---|
| A4.You need to purchase the NaOH solution first, and add 1~2 drops glycerinum to the NaOH solution for every 100mL. Only by adding the NaOH solution into the probe can it be ready for use. |
| Q5.What problems would I usually meet ? How to solve it ? |
|---|
| A5. 1. If the readings of zero dissolved oxygen liquid is not zero or close to zero, you can polish the cathode of the probe. 2. If the readings is not within normal range or the readings drifts, please check the membrane on the cap. If there are cracks, holes or contaminations on the membrane, please change the cap. |
| For any questions, advice or cool ideas to share, please visit the DFRobot Forum. |
|---|
