Introduction
TFmini
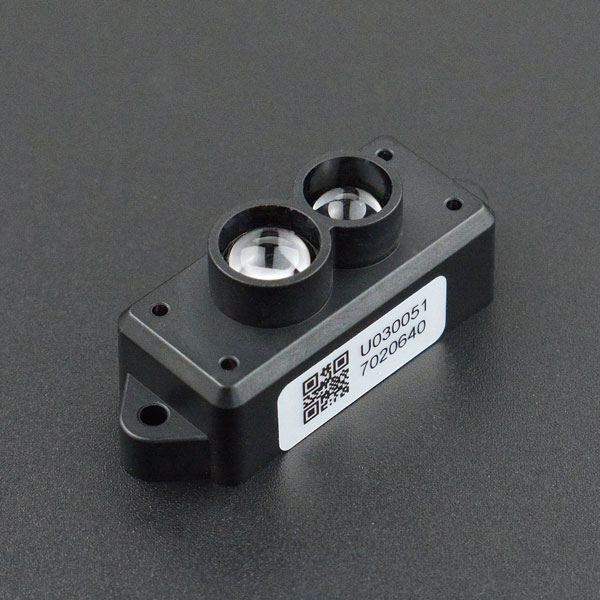
The TF Mini LiDAR is an unidirectional laser range finder based on time-of-flight (ToF) technology. It consists of special optical and electronic devices, which integrates adaptive algorithm for indoor and outdoor application environment. It has tiny body and high performance in distance measurement.
The laser sensor can be used as a distance-measuring tool to detect the distance from it to obstacles. It can also be used as an eye of a robot; it provides distance information for robotic safe avoidance and route selection. It supports for system automation in a variety of machine control scenarios. Because of its small size, light weight and low power consumption, it is also suitable for altitude holding and terrain following.
TF Mini's maximum detection distance is 12 meters. TF Mini also supports 100Hz sampling resolution, within 6 meters, its accuracy is within 4cm, 6~12 meters, accuracy within 6 cm. FOV of 2.3 degree. Its anti-interference is strong, and can work in outdoor light, the overall weight is 4.7g.
TF Mini LiDAR adopts UART (TTL) communication interface, can supplied by standard 5V, and its average power consumption is 0.6w. It can be compatible with a variety of Arduino controllers. With the DFRobot Gravity IO Expansion Shield, Arduino can be plugged in directly without additional wiring. It can be easily integrated into the system when used with the Arduino library developed by DFRobot.
NOTE:
- The product may be invalid when probing objects with high reflectivity, such as mirrors and smooth tiles.
- When there are transparent objects, such as glass and water, between the product and the tested object, it may become invalid.
- Do not touch the circuit board with your bare hands. If necessary, please wear an electrostatic wristband or antistatic gloves.
Specification
TFmini
- Voltage Range: 4.5V-6V
- Communication Interface: UART (TTL)
- Working Range: 0.3m-12m (indoor)
- The Maximum Range of Reflectivity 10%:5m
- Average Power: 0.6W
- Receive Angle: 2.3°
- Minimum Resolution: 5mm
- Refresh Frequency: 100Hz
- Ranging Accuracy: 1% (<6m), 2% (6 ~ 12m)
- Ranging Unit: mm
- Band: 850nm
- Size: 1.65in x0.59in x0.63in / 42mm x15mm x16mm
- Operating Temperature: 0°C ~ 60°C
- Storage Temperature: -20°C~75°C
- Anti-light Environment: 70Klux
- Weight: 4.7g
Board Overview
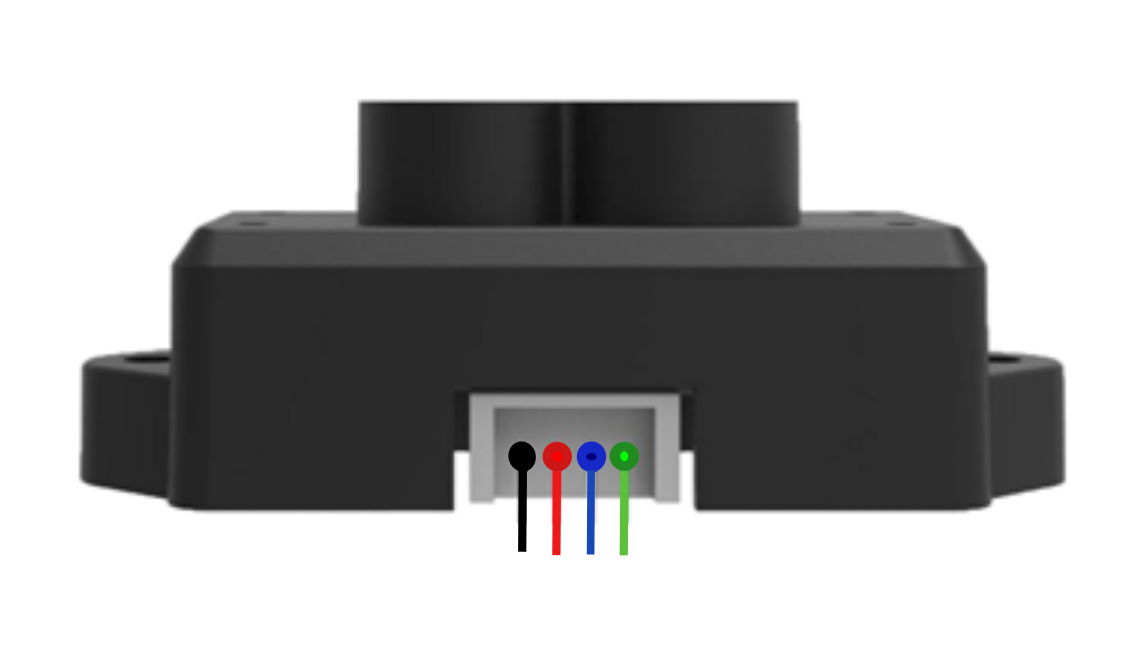
Tutorial
Here are two ways listed to make the LiDAR(ToF) laser range finder be more intuitive.
- Arduino Usage
- PC software Debugging
- Black and white line detection (line-tracking)
Requirements
- Hardware
- DFRduino UNO R3 x 1
- IO Sensor Expansion Board V7.1 x1
- Gravity: I2C 16x2 Arduino LCD with RGB Backlight Display x1(part of project will use it)
- 7.4V 2500MA lithium battery (with charge and discharge protection board) x1
- Serial port: USB to Serial x1
- Dupont wires
- Software
- Arduino IDE , [https://www.arduino.cc/en/software| Click to Download Arduino IDE from Arduino®]
- DFRobot TF Mini Library, Click to download TF Mini Library
- DFRobot LCD Library file, Click to download DFRobot_RGBLCD(Github)
Arduino Debugging (PC serial port)
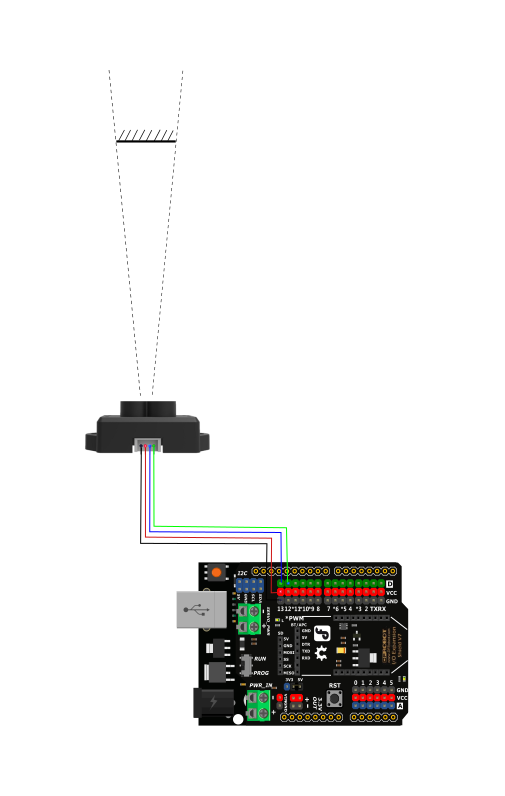
Since TF mini is a serial device and the ordinary Arduino only has one hardware serial port, so we recommend you to use a software serial port to match the sensor. Users can also use multi-serial port devices such as Arduino Leonardo and Arduino Mega2560. Here we choose Arduino UNO as a controller, which is very common to see and define D12 and D13 as software serial port.
Connection Diagram
- Use PC-side serial port to display the detected distance and power the entire system.
Sample Code(Arduino Debugging)
- PC serial port tool is needed. Data been read will be displayed in the serial port tool interface.
/*
  * @File  : DFRobot_TFmini_test.ino
  * @Brief : This example use TFmini to measure distance
  *         With initialization completed, we can get distance value and signal strength
  * @Copyright   [DFRobot](https://www.dfrobot.com), 2016
  *             GNU Lesser General Public License
  *
  * @version  V1.0
  * @date  2018-1-10
*/

#include <DFRobot_TFmini.h>

SoftwareSerial mySerial(12, 13); // RX, TX

DFRobot_TFmini  TFmini;
uint16_t distance,strength;

void setup(){
    Serial.begin(115200);
    TFmini.begin(mySerial);
}

void loop(){
    if(TFmini.measure()){                      //Measure Distance and get signal strength
        distance = TFmini.getDistance();       //Get distance data
        strength = TFmini.getStrength();       //Get signal strength data
        Serial.print("Distance = ");
        Serial.print(distance);
        Serial.println("cm");
        Serial.print("Strength = ");
        Serial.println(strength);
        delay(500);
    }
    delay(500);
}
- Serial port software shows the data format as below
 Distance = 1000 cm
 Strength =  600
Arduino LCD Distance Numerical Display
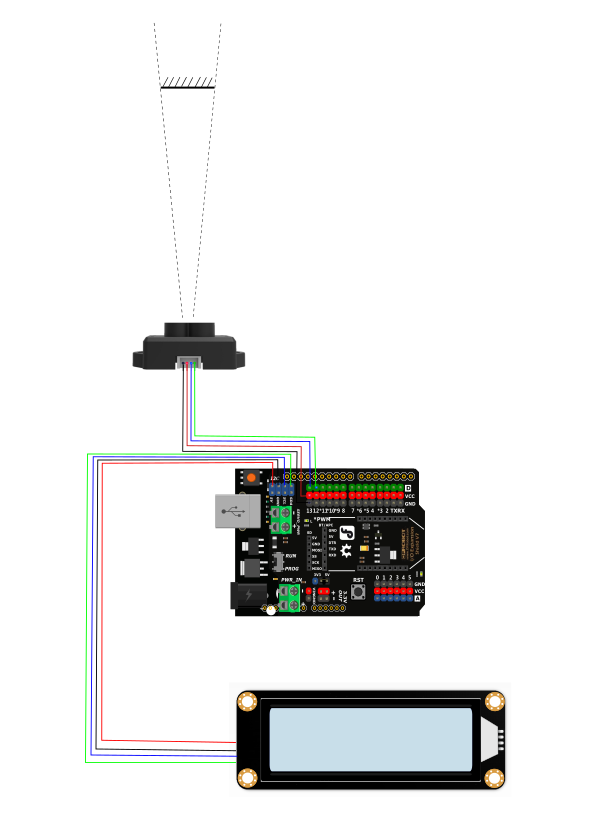
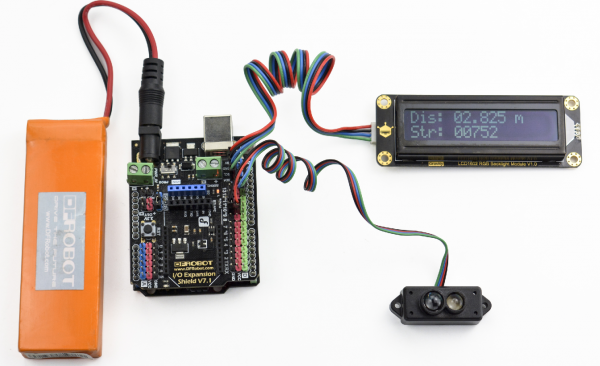
In practical application, the sensor will generally work offline. We provide a special case, which powered by a lithium battery and display distance measurement data with LCD. It is especially suitable for outdoor usage.
Connection Diagram(LCD)
Sample Code (Arduino Test)
/*
  * @File  : DFRobot_TFmini_test.ino
  * @Brief : This example use TFmini to measure distance
  *         With initialization completed, we can get distance value and signal strength
  * @Copyright   [DFRobot](http://www.dfrobot.com), 2016
  *             GNU Lesser General Public License
  *
  * @version  V1.0
  * @date  2018-1-10
*/
#include <Wire.h>
#include <DFRobot_RGBLCD.h>
#include <DFRobot_TFmini.h>            //TF Mini header file

SoftwareSerial mySerial(12, 13);      // RX, TX
DFRobot_TFmini  TFmini;
uint16_t distance,strength;

unsigned int lcd_r = 0, lcd_g = 0, lcd_b = 0;
unsigned long delaytime = 0, lighttime = 0;
DFRobot_RGBLCD lcd(16, 2);
void setup()
{lcd.init();
  delay(5000);
  Serial.begin(115200);
  Serial.println("hello start");

  TFmini.begin(mySerial);
  lighttime = millis();
  lcd.setCursor(0, 0);
  lcd.print("Dis:");
  lcd.setCursor(0, 1);
  lcd.print("Str:");
  lcd.setRGB(255, 255, 000);
}
void loop() {

/******************LCD*******************/
 lcd_r = random(256);
  delayMicroseconds(10);
  lcd_g = random(256);
  delayMicroseconds(10);
  lcd_b = random(256);
  if (millis() - lighttime > 3000)
  {
    lcd.setRGB(lcd_r, lcd_g, lcd_b);
    lighttime = millis();
  }
  //delay(100);
  /**************TF Mini***************/
 if(TFmini.measure()){                          //Measure Distance and get signal strength
        distance = TFmini.getDistance();       //Get distance data
        strength = TFmini.getStrength();       //Get signal strength data

    lcd.setCursor(5, 0);                       //LCD display
    lcd.print(  distance / 1000);
    lcd.print(  distance / 100 % 10);
    lcd.print('.');
    lcd.print(  distance / 10 % 10);
    lcd.print(  distance % 10);
    lcd.print(" m");
    lcd.setCursor(5, 1);
    lcd.print(strength / 10000);
    lcd.print(strength / 1000 % 10);
    lcd.print(strength / 100 % 10);
    lcd.print(strength / 10 % 10);
    lcd.print(strength % 10);
    }
}
- The following data format is displayed on the LCD monitor
Dis: 05.000 m
Str: 00600
Upper Computer Display
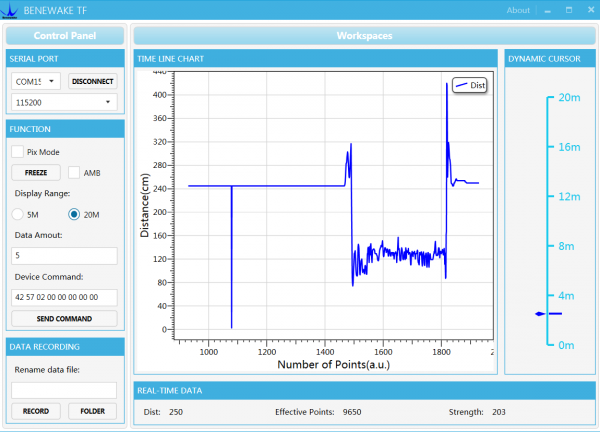
In addition to reading data through a single chip, we can also use PC Software to read distance output.
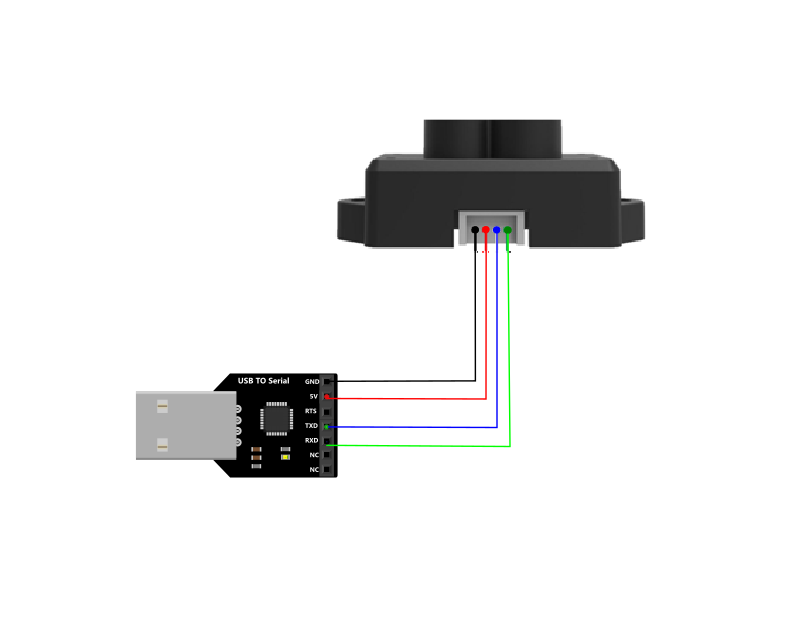
====Connection Diagram(Upper PC Display)====
- Connect TF Mini LiDAR(ToF) Laser Range Sensor to PC by an USB to TTL converter and read data by upper PC.
- Upper PC Data Display
Black & White Line Detection (Line-tracking Inspection)
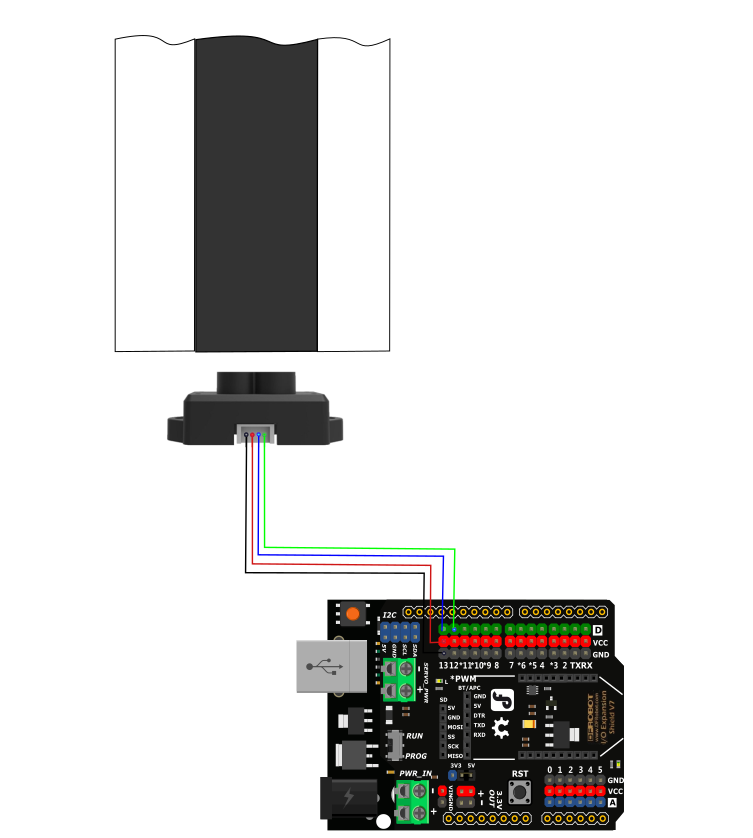
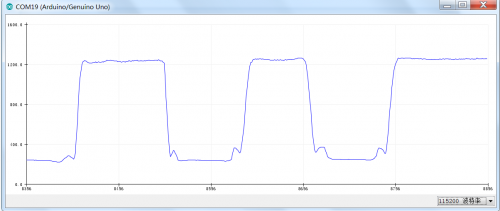
- TF Mini laser ranging radar is an optical sensor, but any optical sensor, the sensitivity of the light will be higher. We can use this feature to achieve close-range black and white line detection, line-tracking inspection. (NOTE: black is to absorb all the lights, do not reflect; white is to reflect all the light, do not absorb)
- We use the signal strength 'Strength' to distinguish between the two colors.
Connection Diagram(Line-tracking)
Sample Code(Line-tracking)
- NOTE: The code needs to be used in concert with TF Mini Library.
/*
  * @File  : DFRobot_TFmini_test.ino
  * @Brief : This example use TFmini to measure distance
  *         With initialization completed, we can get distance value and signal strength
  * @Copyright   [DFRobot](https://www.dfrobot.com), 2016
  *             GNU Lesser General Public License
  *
  * @version  V1.0
  * @date  2018-1-10
*/

#include <DFRobot_TFmini.h>

SoftwareSerial mySerial(12, 13); // RX, TX

DFRobot_TFmini  TFmini;
uint16_t distance,strength;

void setup(){
    Serial.begin(115200);
    TFmini.begin(mySerial);
}

void loop(){
    if(TFmini.measure()){                      //Measure Distance and get signal strength
        strength = TFmini.getStrength();       //Get signal strength data
        Serial.print("Strength = ");
        Serial.println(strength);
    }
}
- Downloaded the program, when you repeatedly measure white and black paper at the same distance, a signal strength changes could be seen through the serial port drawing tool.
FAQ
| Q&A | Some general Arduino Problems/FAQ/Tips |
|---|---|
| A | For any questions, advice or cool ideas to share, please visit the DFRobot Forum. |
