Introduction
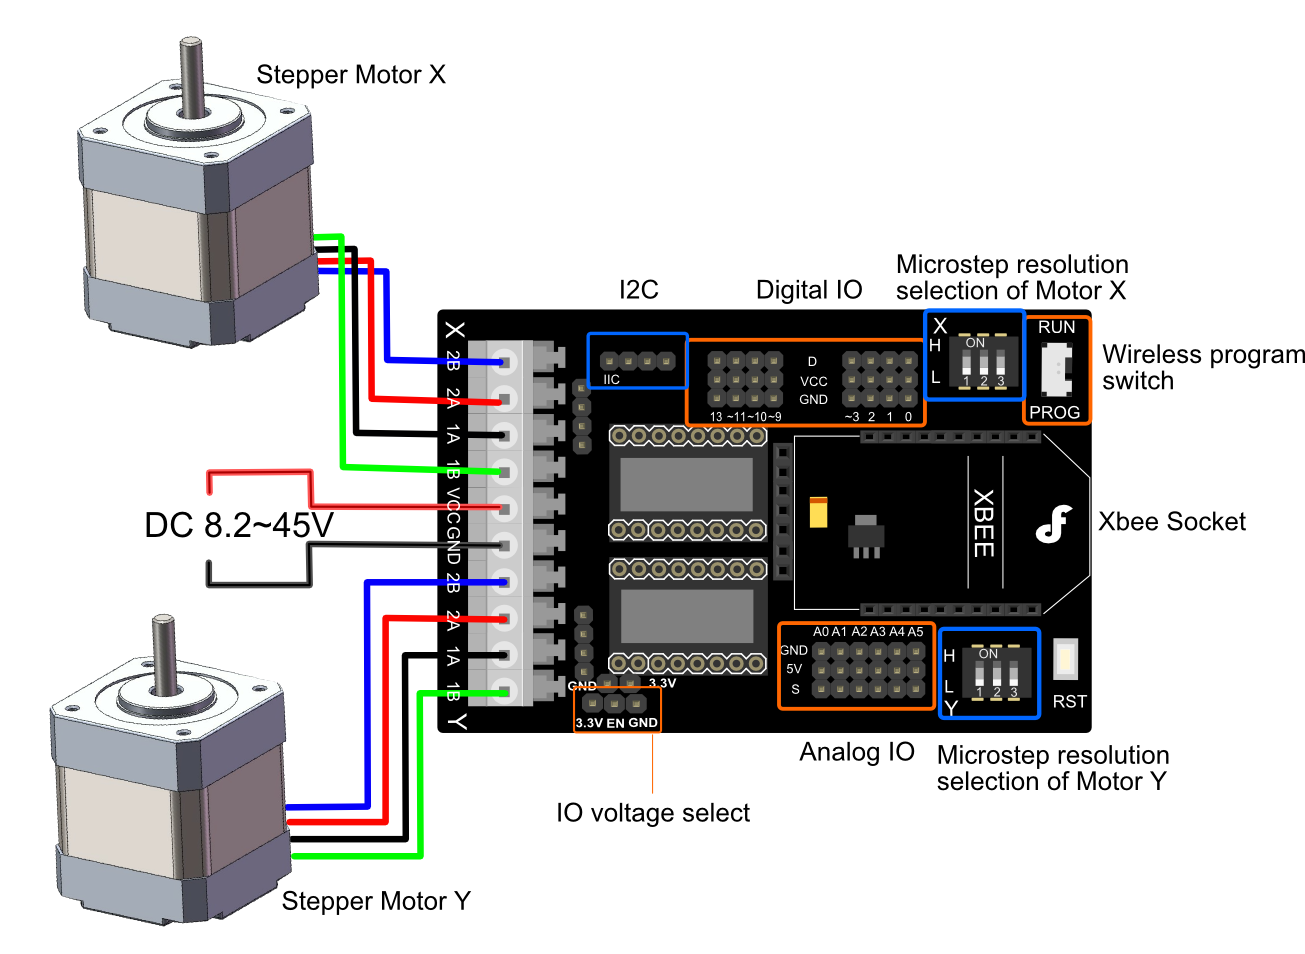
Do you want to do some projects with stepper motors such as a drafting instrument, a 3D printer, an auto curtain, etc...? As we all know, regular stepper motors are hard to drive, but with this stepper motor shield, you can easily drive 2 stepper motors via just 6 digital I/O’s. This board is compatible with the Arduino UNO R3. Directly supports Xbee and Xbee form factor Wi-Fi, Bluetooth and RF modules. Easy connection of cables via screwless PC terminals. Each stepper motor has a code switch for adjusting driving modes, to obtain different rotational speeds. Interfaces of the board include extension 6 channel Analog I/O, 8 channel Digital I/O & I2C.
Stepper motor is a brushless DC electric motor that divides a full rotation into a number of equal steps. The motor's position can then be commanded to move and hold at one of these steps without any feedback sensor (an open-loop controller), as long as the motor is carefully sized to the application in respect to torque and speed.
Specification
- Support 3.3V and 5V operating voltage
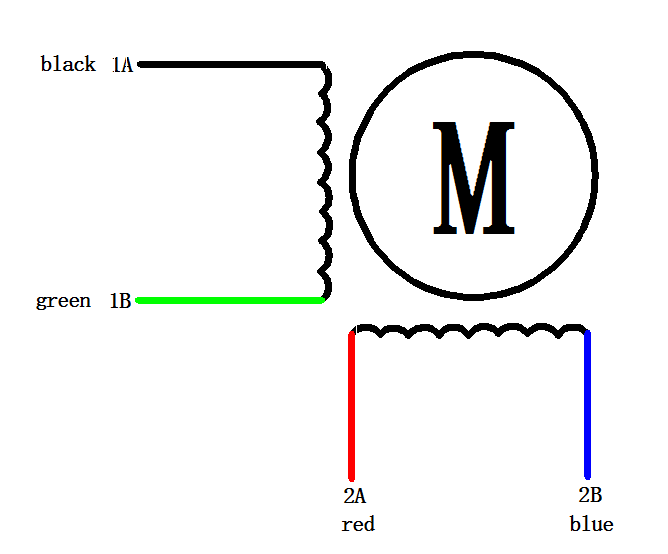
- Suitable for two-phase and four-wire stepper motor
- Board with two DRV8825 driver chip and a heat sink has been mounted.
- Input Voltage:8.2-45V DC (Just power the stepper motor driver), 1.6A output current per coil
- Driving Pins: D4,D5,D6,D7,D8,D12
- Squeeze connector, quite easy and convenient.
- 8 channel digital I/O pins & 6 channel Analog input pins
- DRV8825 Microstepping bipolar stepper motor driver
- Six different microstep resolutions (full-step, 1/2-step, 1/4-step, 1/8-step, 1/16-step, 1/32-step)
- Compatible with Arduino UNO R3, Leonardo, Mega and other controllers, with full port extensions. Support XBee, XBee Wi-Fi, Bluetooth and RF modules, ensure that the needs of your wireless communications.
- There is a switch on the board Xbee wireless interfaces corner. PROG stop wireless module, available USB programming. RUN time can use the wireless communication module.
Pin Out& Diagram

-
Wireless program switch:
- RUN: Turn the Switch here to use the Xbee module
- PROG: Turn the Switch here to upload the sketch via USB
-
Motor wiring diagram:

- The new version expand two enable pins, you can enable/disable the motor driver to save the power consumption, Motor X enable pin for the D8, Motor Y enable pin for the D12, low voltage enable, the following truth table:
| D8 | D12 | M1 | M2 |
| Low | Low | ENABLE | ENABLE |
| High | Low | DISENABLE | ENABLE |
| Low | High | ENABLE | DISENABLE |
| High | High | DISENABLE | DISENABLE |
*Dip switch settings for Microstep resolution:
| MS1 | MS2 | MS3 | Microstep Resolution |
| Low | Low | Low | Full step |
| High | Low | Low | Half step |
| Low | High | Low | 1/4 step |
| High | High | Low | 1/8 step |
| Low | Low | High | 1/16 step |
| High | Low | High | 1/32 step |
| Low | High | High | 1/32 step |
| High | High | High | 1/32 step |
*IO voltage select
-
- Change the the position of the jumper cap according to your Main board operating voltage.
-
More details

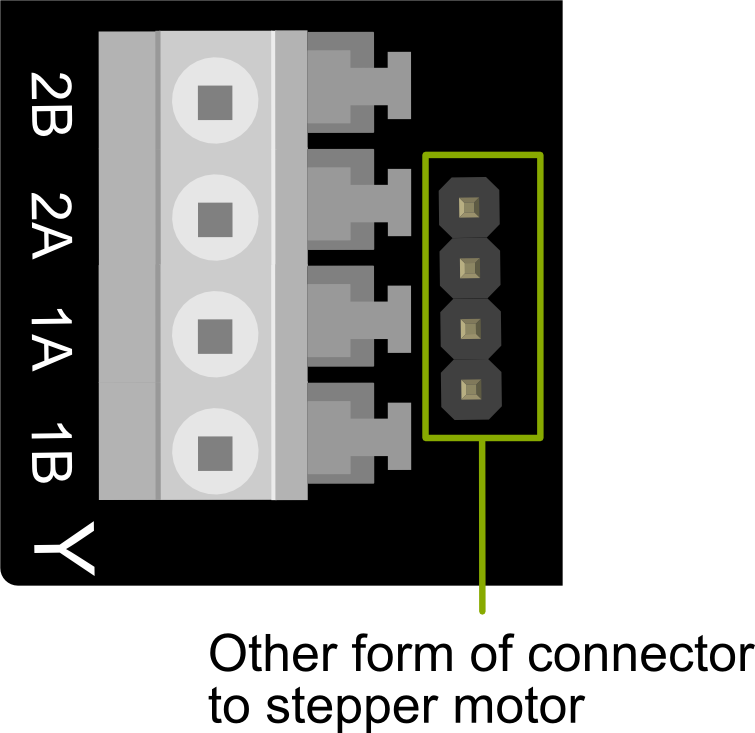
- Squeeze connector makes connection easily and quickly.
- The other form of connector for XH2.54 or female headers
Sample code
/*
This sample code is for testing the 2 stepper motors
The rotation velocity can be adjusted by the code switch
Microcontroller: Arduino UNO
*/
int M1dirpin = 7;  //Motor X direction pin
int M1steppin = 6; //Motor X step pin
int M1en=8;  //Motor X enable pin
int M2dirpin = 4;  //Motor Y direction pin
int M2steppin = 5; //Motor Y step pin
int M2en=12;  //Motor Y enable pin

void setup()
{
  pinMode(M1dirpin,OUTPUT);
  pinMode(M1steppin,OUTPUT);
  pinMode(M1en,OUTPUT);
  pinMode(M2dirpin,OUTPUT);
  pinMode(M2steppin,OUTPUT);
  pinMode(M2en,OUTPUT);

  digitalWrite(M1en,LOW);// Low Level Enable
  digitalWrite(M2en,LOW);// Low Level Enable

}
void loop()
{
    int j;
  delayMicroseconds(2);
  digitalWrite(M1dirpin,LOW);
  digitalWrite(M2dirpin,LOW);
  for(j=0;j<=5000;j++){
    digitalWrite(M1steppin,LOW);
    digitalWrite(M2steppin,LOW);
    delayMicroseconds(2);
    digitalWrite(M1steppin,HIGH); //Rising step
    digitalWrite(M2steppin,HIGH);
    delay(1);
  }
}
| For any question/advice/cool idea to share, please visit DFRobot Forum. |
