Introduction
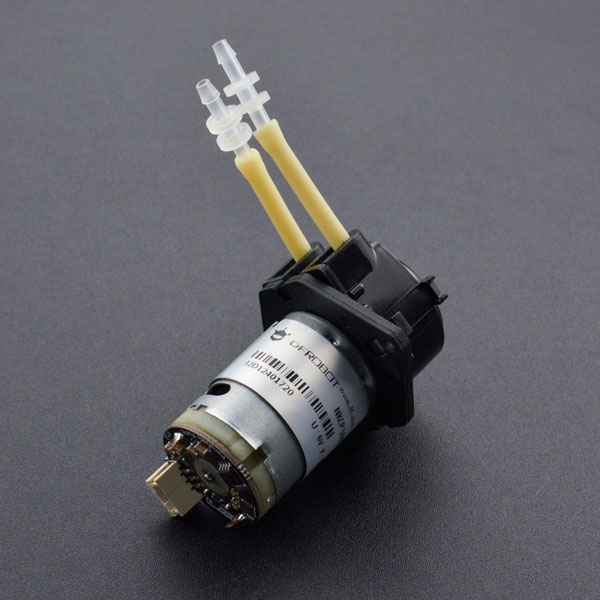
Gravity: digital peristaltic pump is a new product developed by DFRobot. This is a new member of our water quality monitoring devices. It is an actuator for the liquid system.
DFRobot peristaltic pump integrates a PPM motor driver on the pump, this is a Gravity interface (PH2.0-3P) motor driver. The control signal is compatible with standard servo motor, you can use Arduino, Raspberry Pi, micro:bit and other kinds of microcontrollers to control its direction and flow speed. The tube in the pump head is made up of BPT material, which is anti-acid and long life.
Peristaltic pumps are a kind of positive displacement pump used for delivering small amounts of fluid. The fluid is contained within a flexible tube fitted inside a circular pump casing. When the rotor rotates continuously, the fluid in the tube will be squeezed and deliver to the other side. In this way, the liquid flow rate can be easily accuracy controlled.
As a kind of metering pump, peristaltic pump can be conveniently used for quantitative delivery. It has a wide range of application scenarios, such as science experiment, hydroponics, drip irrigation, tropical fish farming, shrimp cylinder environment control, etc. A large number of titration experiments can be automated with this peristaltic pump, such as potentiometric titration, indicator-based colorimetric titration, pH-based titration, and so on. It is great helpful to improve your working efficiency On the other hand, peristaltic pumps also have a wide range of applications in food, medical and other industries. Making an automatic coffee machine will be a really good idea!
Specification
Driver Board:
- Input Voltage: 5V-6V
- Maximum Continuous Operating Current: 1.8A
- Peak Current: 2.5A
- Quiescent Current: <1mA (No PPM Signal Input)
- PPM Signal Resolution: 1us
- Positive Pulse Width of the PPM Signal: 500us-2500us
- Forward Pulse Width Range: 500us-1400us (500us: max forward speed)
- Stop Pulse Width Range: 1400us-1600us
- Inverted Pulse Width Range: 1600us-2500us (2500us: max inverted speed)
- PPM Frequency: 500Hz (Servo Control Signal)
- Connector: Gravity PH2.0-3P
- Size: 27.4 x 28.7 mm/1.08 x 1.13 inches
Peristaltic Pump
- Motor: DC Motor
- Rated Voltage: 6V
- Rated Power: 5W
- Tube Material: BPT
- Tube Specifications: inner diameter 3mm, outer diameter 5mm
- Pump Head Material: Engineering Plastics
- Pulsation: Three Rollers, Small Pulsation
- Flow: 85ml/min (Maximum revolution)
- Working Conditions: ambient temperature 0 ~ 40 ℃, relative humidity <80%
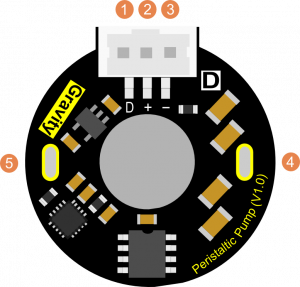
Board Overview

| Num | Label | Description |
|---|---|---|
| 1 | D | Control Signal Input(PPM Signal) |
| 2 | + | Power VCC(5V~6V) |
| 3 | - | Power GND(0V) |
| 4 | M- | Motor Negative Pin |
| 5 | M | Motor Positive Pin |
Basic Tutorial
| Since the motor power consumption (about 5W) is a little large, it’s better to add an external power supply on your microcontroller, USB port can only provide 2.5W power supply. |
|---|
This tutorial will demonstrate how to make this peristaltic pump clockwise rotation, stop rotation, counterclockwise rotation of these three basic functions.
The motor driver board uses the PPM signal to control the pump. The corresponding relationship is as follows:
| PPM Signal | Peristaltic Pump Status (Top View) |
|---|---|
| 500 ~ 1400us (0~81°) | Clockwise maximum speed rotation |
| 1400 ~ 1600us (81~99°) | Stop |
| 1600 ~ 2500us (99~180°) | Counterclockwise maximum speed rotation |
In addition, the closer to 500us(0°) or 2500us(180°), the faster the flow rate speed is; when the value is closer to 90°, the slower the motor speed. Therefore, according to the requirement, you can set the appropriate angle value to adjust the motor speed, to achieve the purpose of controlling the flow rate.
Requirements
-
Hardware
- DFRduino UNO R3 (or similar) x 1
- Motor of Peristaltic Pump x 1
- Pump Head of Peristaltic Pump x1
- External Power(5~7V) x1
- Digital 3Pin Gravity Cable x1
-
Software
- Arduino IDE (Version requirements: V1.0.x or V1.8.x), Click to Download Arduino IDE from Arduino®
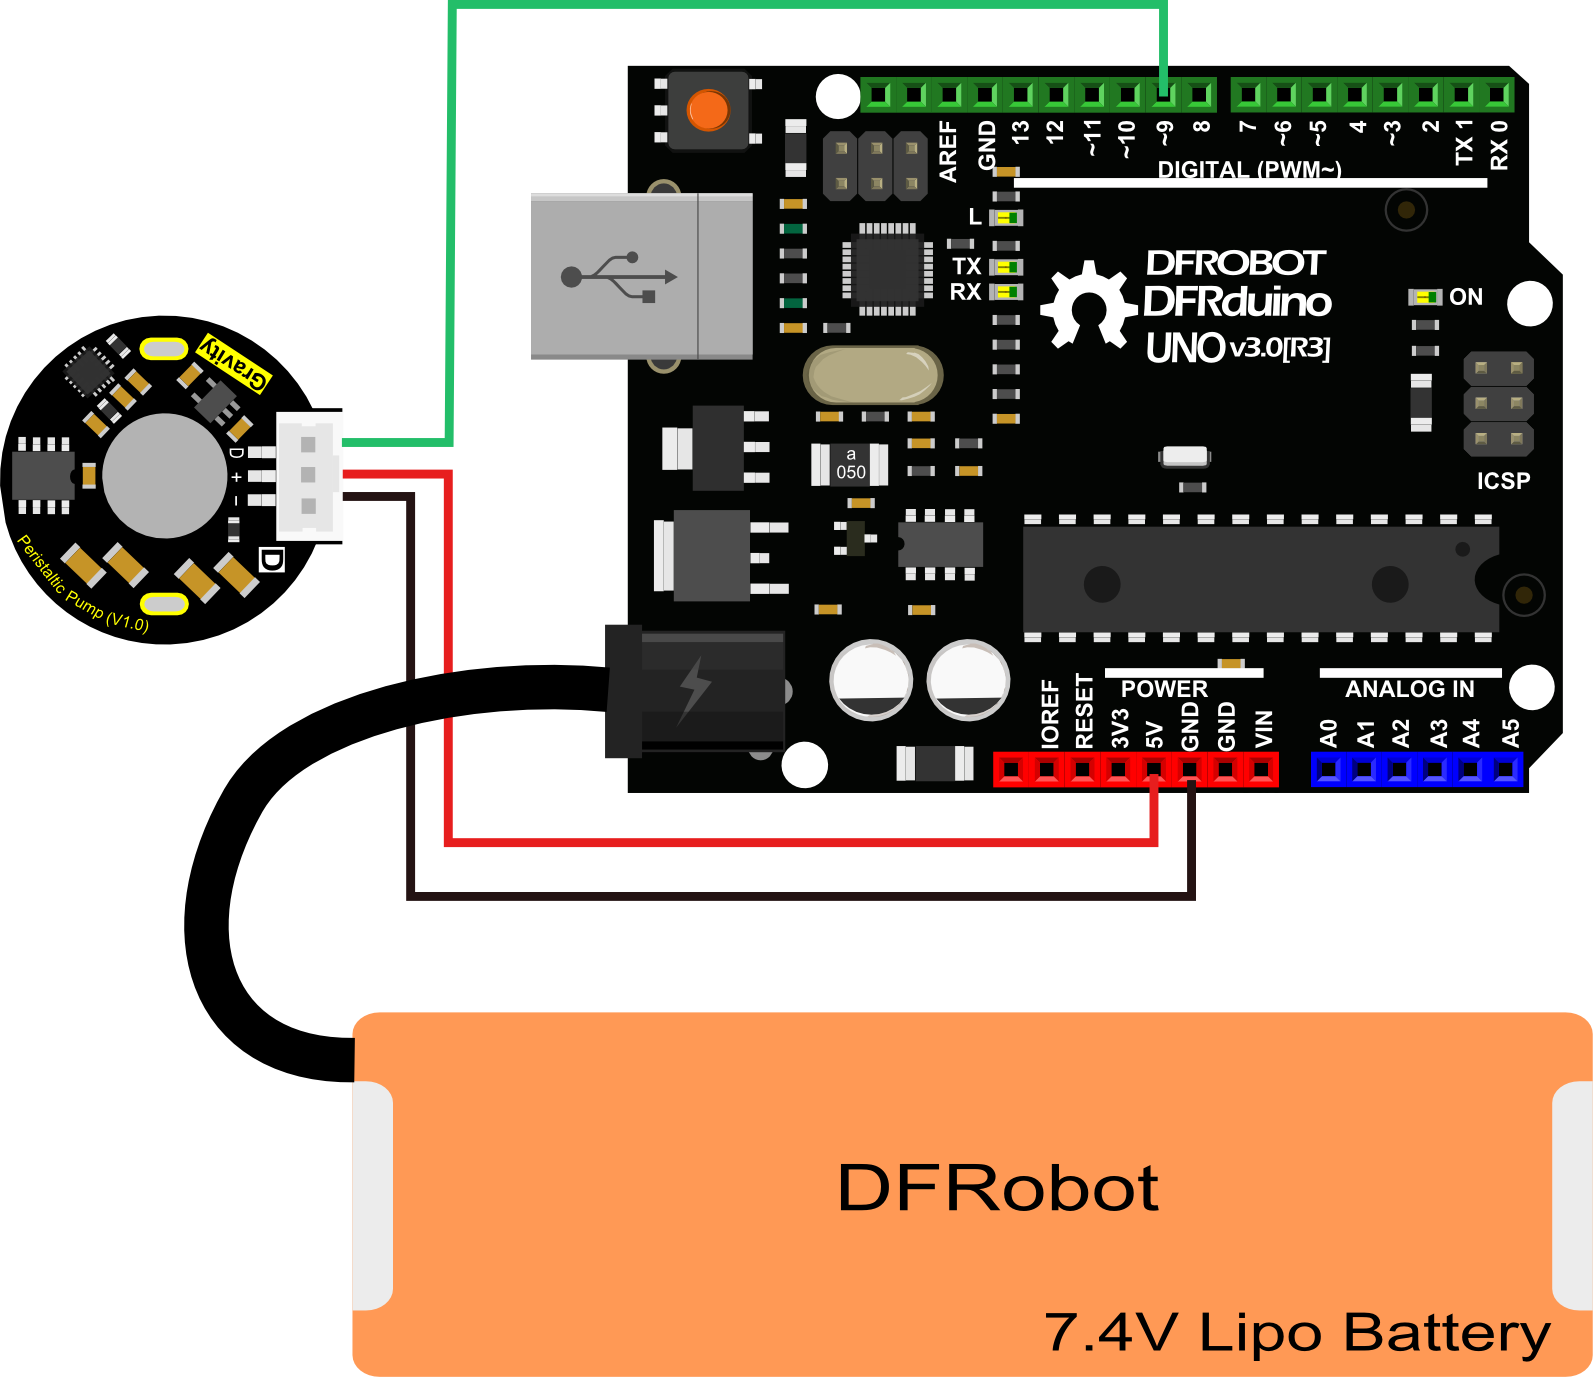
Connection Diagram

Arduino Sample Code
/***************************************************
 DFRobot Gravity: Peristaltic Pump
 <https://www.dfrobot.com/wiki/index.php/Gravitry: Peristaltic Pump SKU:DFR0523>

 ***************************************************
 This sample code shows 3 states: clockwise maximum speed rotation; stop; counterclockwise maximum speed rotation

 Created 2017-12-25
 By Jason <[email protected]@dfrobot.com>

 GNU Lesser General Public License.
 See <http://www.gnu.org/licenses/> for details.
 All above must be included in any redistribution
 ****************************************************/

 /***********Notice and Trouble shooting***************
0   -> clockwise maximum speed rotation
90  -> stop
180 -> counterclockwise maximum speed rotation
 ****************************************************/

#include <Servo.h>

Servo myservo;

#define PUMPPIN 9    //peristaltic pump control pin, connect to arduino digital pin 9
#define waitTime 2000 //interval time(ms) between every state

void setup()
{
  myservo.attach(PUMPPIN);
}

void loop()
{
    myservo.write(0);   //Clockwise maximum speed rotation
    delay(waitTime);
    myservo.write(90);  //Stop
    delay(waitTime);
    myservo.write(180); //Counterclockwise maximum speed rotation
    delay(waitTime);
    myservo.write(90);  //Stop
    delay(waitTime);
}
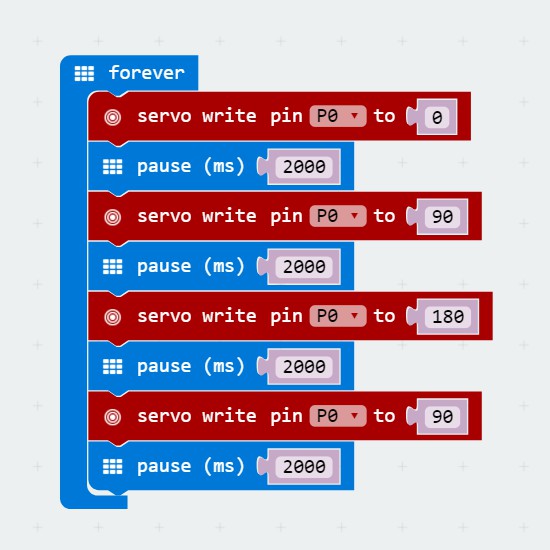
micro:bit Sample Code

Expected Results
After uploading the sample code, you can see that the peristaltic pump starts to work and continuously switches between the three states of clockwise maximum speed rotation, stop and maximum counterclockwise rotation speed every 2 seconds.
Advanced Tutorial
You can find the library for this peristaltic pump from this Github link : https://github.com/DFRobot/GravityPump
Arduino Example Code
    #include "GravityPump.h"
    #include "Button.h"//https://github.com/DFRobot/Button

    GravityPump pump;
    Button button;
    bool run = true;
    int debug = 1;

    void setup()
    {
        pump.setPin(9);
        button.init(2);
        Serial.begin(115200);
        pump.getFlowRateAndSpeed();
    }

    void loop()
    {
        pump.update();
        button.update();
        if (debug)
        //in debug mode the pump will do calibation.
        //if set the debug mode off then the function works.
        {
            pump.calFlowRate();
        }
        else
        {
            if(run)
            {
                //switch the function by using Comments.
                run = false;
                // Serial.println(pump.flowPump(6.6));
                //just put the number in ml then the pump will dosing the numbers of liquid to you.
                //and you can find the numbers from serial port.
                Serial.println(pump.timerPump(120000));
                //just put the number in milisecend then the pump will dosing the time of numbers for you.
                //and you can find the numbers from serial port.
            }

        }
        if(button.click())
        {
            //Serial.println("click");
            //when you click the button the pump will stop immediately
            pump.stop();
        }
        if(button.press())
        {
            Serial.println(pump.flowPump(100));
            //when you press the button the pump will continue working.
            //Serial.println("press");
        }
    }
Function Explanation
- void update();
get the state from system, need to be put in the loop.
- void setPin(int pin);
set the pin for GravityPump.
- void calFlowRate(int speed = 180);
Calibration function.the speed parameter is running speed what you needed.
please input the "STARTCAL" in serial to start cal
Pump some liquid in some secs
please input the actual mumber in serial by "SETCAL:XX" cal end
- void pumpDriver(int speed, unsigned long runTime);
the basic pump function, have to given speed in number(0 to 180. 90 for stop, 0 and 180 is max speed in each direction.)and runing time in milliseced.
- float timerPump(unsigned long runTime);
timer pump function,base on the basic function.the function need to given the running time then the pump will dosing as long as your have given and return the quantitation. if you have Calibration, the number will be close to result.
- float flowPump(float quantitation);
quantification setting pump function,base on the basic function,the function need to given a quantification. Then the pump will dosing the quantification in given number. if you have Calibration, the number will be close to result.
- void getFlowRateAndSpeed();
flowrate and speed reading from EEPROM
- void stop();
stop function. whenever you use this function the pump will stop immediately.
Result Explanation
The sample code has 2 mode, one is the debug mode, please set the bebug into 1, in debug mode we can calibarite pump. Please open the serial port and input STARCAL, When hit the enter key, the Pump will start to runing some time, then please using the measuring cylinder to get the measurement. then you can input the SETCAL:XX(XX is what you have read in)at the serial port and the cal mode is over. The date will be store in arduino's E2PROM. In normal mode please set debug into 0. After code be upload,the pump will runing press the button, pump will stop,and press again the pump will running again.
FAQ
| Q1. How to accuracy control the flow rate? |
|---|
| A1. It is better to make a calibration before usage, you can put the pump in the water, get power, and calculate the time it fill up the cylinder, Then, you will know the flow rate in each second. |
| For any questions, advice or cool ideas to share, please visit the DFRobot Forum. |
|---|
