Introduction
Devastator Tank Mobile Platform is our newest robot track platform, it is fully compatible with most popular controllers in the market such as Arduino, Raspberry Pi and so on.
The Devastator uses high strength aluminum alloy which makes it extremely solid and durable. The high speedmotors and premium tracks also allows it to move swiftly everywhere. Whatsmore, it benefits from a high performance suspension and enjoys an outstanding mobility across even the toughest terrains.
Users are able to add various sensors, servos, turntables and controllers (e.g. Romeo All-in-one, Raspberry Pi Model B+) with multiple mounting holes on the Devastator platform. It is perfect for hobbyists, educational, competitions and research projects.
Application
- Education/competition robot
- Mobile robotic arm
- Outdoors 2WD mobile robot...ect
Specification
- Working Voltage:3-8V DC
- Driver wheel diameter : 43mm
- Maximum Speed : 36cm/s
- Moror Specification: https://www.dfrobot.com/product-100.html
- Size:225*220*108
- Weight:780g
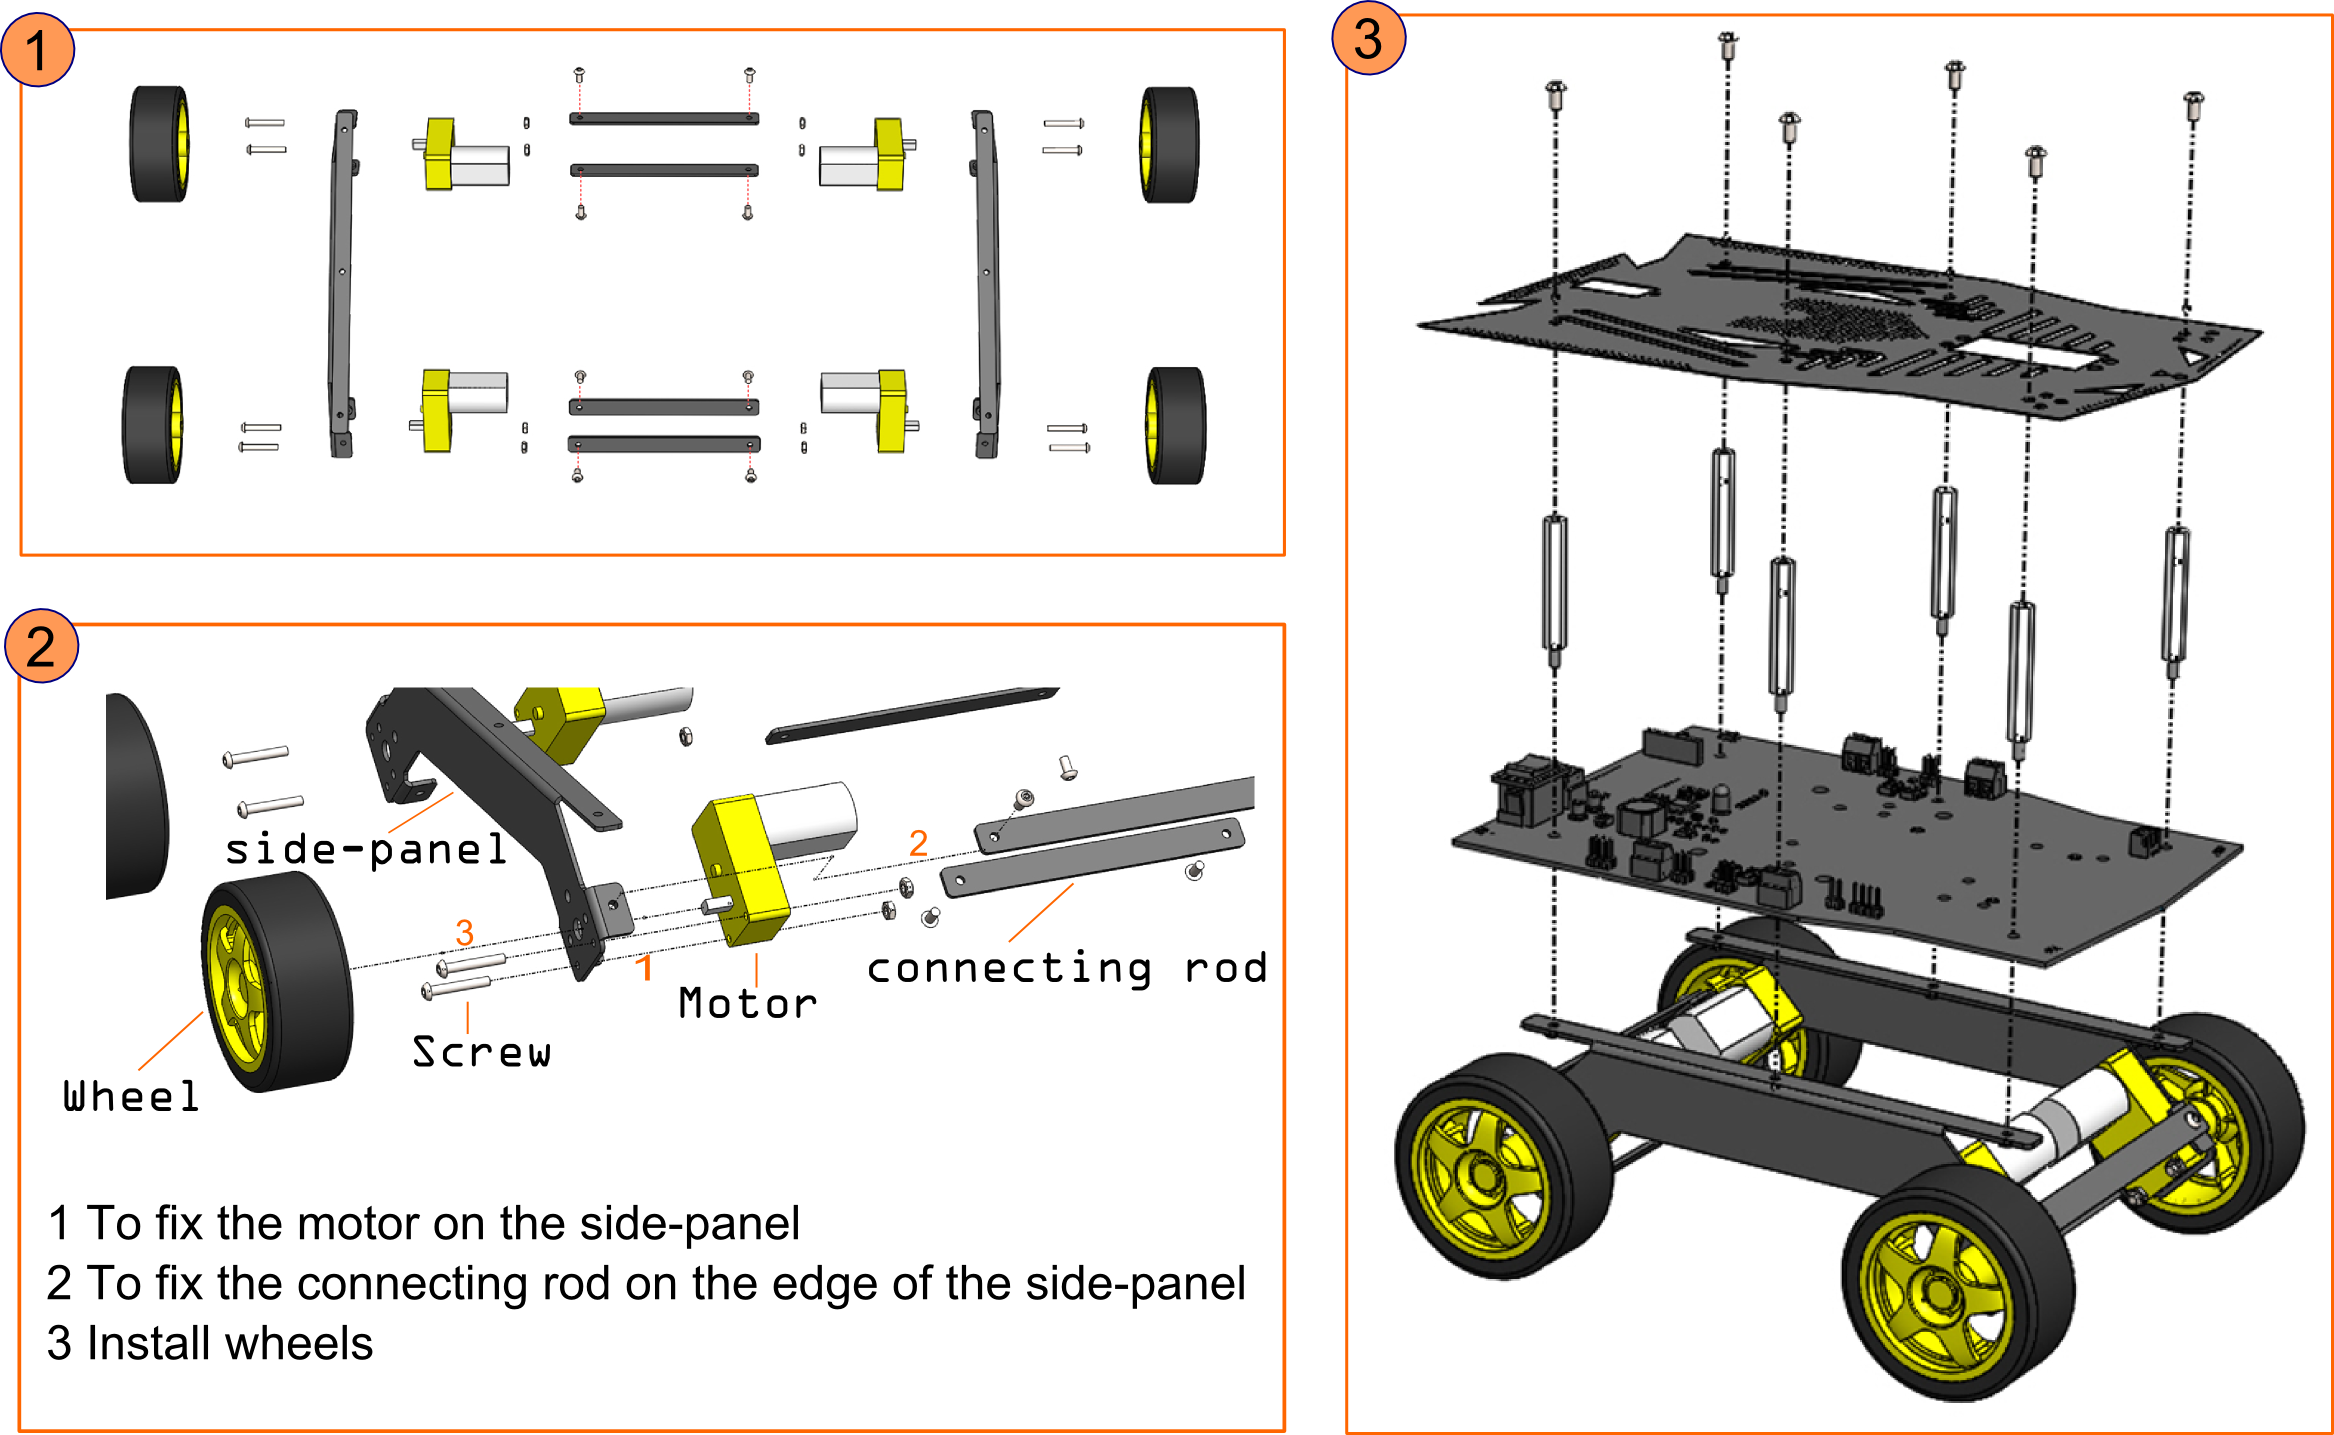
Installation steps

Step 1: Locate two side rails and four crossbars (all black metal), 4 yellow motors, and the bags containing long bolts, washers and lock washers, and medium short machine screws.
Step 2: Line up a motor with the hole in the angled section of a side rail. The white plastic shaft should protrude through the flat side of the rail.
Step 3: Pass two long bolts through the holes in the angled part of the rail, and through the holes in the yellow plastic motor case.
Step 4: Place a flat washer, then a lock washer, then a bolt on each of the two long screws. Tighten.
Step 5: Repeat Steps #2-4 three more times. All four motors should be in all four sections of angled rail. All long bolts, washers, lock washers and nuts should be used.
Step 6: Line up a crossbar with two holes of the side-rail. (Note that the diagram above only shows one hole in the crossbars, but there are actually two.) You should be able to see the yellow plastic of the motors through the holes. Screw that cross-bar to the rail with two medium-short machine screws.
Step 7: Repeat Step #6 seven more times, until the four crossbars connect the two side rails. All crossbars will be used. You will have medium-short machine screws left over.
Step 8: Line up the oblong hole in one of the four wheels with the white plastic shaft of a motor. Press the wheel into place. (It should take some pressure, but not much. If you feel like you are forcing it, make sure the two parts are lined up properly.)
Step 9: Repeat Step #8 three more times. All wheels should be on all motors.
Sample Code
NOTE: Make sure the Tank is connected to the Arduino GND when using USB to power the microcontroller.
/*
 # Editor : Phoebe
 # Date   : 2014.11.6
 # Ver    : 0.1
 # Product: Devastator Tank Mobile Platform
 # SKU    : RBO0112
 # Description:
 # Connect the D4,D5,D6,D7,GND to UNO digital 4,5,6,7,GND

*/

int E1 = 5;     //M1 Speed Control
int E2 = 6;     //M2 Speed Control
int M1 = 4;     //M1 Direction Control
int M2 = 7;     //M1 Direction Control

void stop(void)                    //Stop
{
  digitalWrite(E1,0);
  digitalWrite(M1,LOW);
  digitalWrite(E2,0);
  digitalWrite(M2,LOW);
}
void advance(char a,char b)          //Move forward
{
  analogWrite (E1,a);      //PWM Speed Control
  digitalWrite(M1,HIGH);
  analogWrite (E2,b);
  digitalWrite(M2,HIGH);
}
void back_off (char a,char b)          //Move backward
{
  analogWrite (E1,a);
  digitalWrite(M1,LOW);
  analogWrite (E2,b);
  digitalWrite(M2,LOW);
}
void turn_L (char a,char b)             //Turn Left
{
  analogWrite (E1,a);
  digitalWrite(M1,LOW);
  analogWrite (E2,b);
  digitalWrite(M2,HIGH);
}
void turn_R (char a,char b)             //Turn Right
{
  analogWrite (E1,a);
  digitalWrite(M1,HIGH);
  analogWrite (E2,b);
  digitalWrite(M2,LOW);
}

void setup(void)
{
  int i;
  for(i=4;i<=7;i++)
    pinMode(i, OUTPUT);
  Serial.begin(19200);      //Set Baud Rate
  Serial.println("Run keyboard control");
  digitalWrite(E1,LOW);
  digitalWrite(E2,LOW);

}

void loop(void)
{
  if(Serial.available()){
    char val = Serial.read();
    if(val != -1)
    {
      switch(val)
      {
      case 'w'://Move Forward
        advance (255,255);   //move forward in max speed
        break;
      case 's'://Move Backward
        back_off (255,255);   //move back in max speed
        break;
      case 'a'://Turn Left
        turn_L (100,100);
        break;
      case 'd'://Turn Right
        turn_R (100,100);
        break;
      case 'z':
        Serial.println("Hello");
        break;
      case 'x':
        stop();
        break;
      }
    }
    else stop();
  }

}
