Introduction
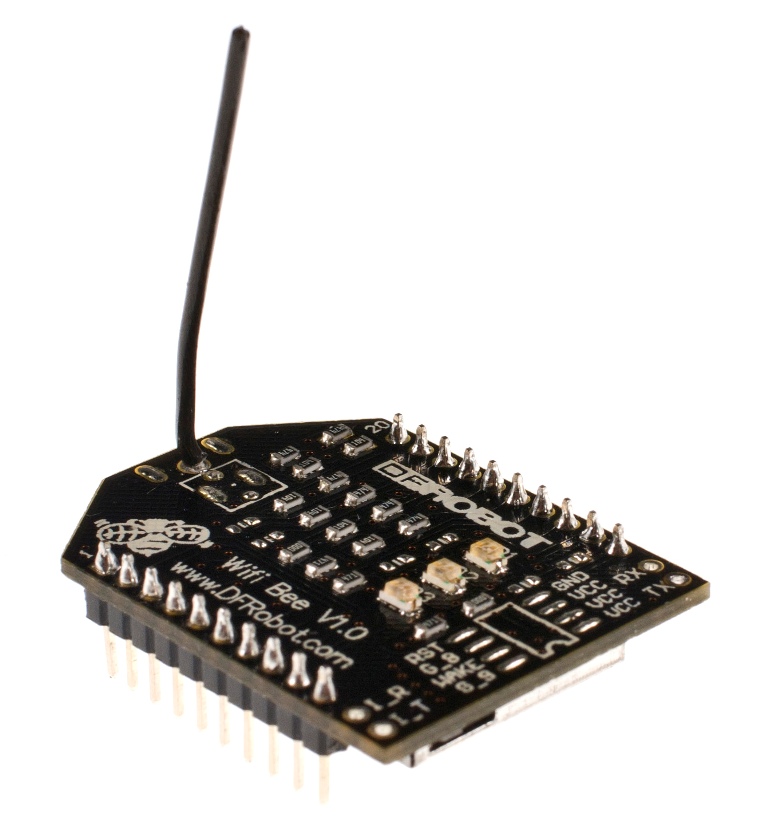
The RN-XV module by Roving Networks is a certified Wi-Fi solution especially designed for customer who want to migrate their existing 802.15.4 architecture to a standard TCP/IP based platform without having to redesign their existing hardware. In other words, if your project is set up for XBee and you want to move it to a standard WiFi network, you can drop this in the same socket without any other new hardware.
The RN-XV module is based upon Roving Networks' robust RN-171 Wi-Fi module and incorporates 802.11 b/g radio, 32 bit processor, TCP/IP stack, real-time clock, crypto accelerator, power management unit and analog sensor interface.The module is pre-loaded with Roving firmware to simplify integration and minimize development time of your application. In the simplest configuration, the hardware only requires four connections (PWR, TX, RX and GND) to create a wireless data connection. The Xbee module is widely used in the United States, Canada, Australia, Israel and Europe. The establishment of RF communication does not require any configuration and the module's default configuration supports a wide range of data system applications. You can also use a simple AT command to advanced configuration. An OEM developer is now XBee code development package. It is self-developed in collaboration with the MaxStream ZigBee/802.15.4 RF module code.
Specifications
- Based on common 802.15.4 XBee footprint
- Ultra low power: 4uA sleep mode, 38mA active
- Onboard TCP/IP stack includes DHCP, UDP, DNS, ARP, ICMP, HTTP client, FTP client and TCP
- Firmware configurable transmit power: 0dBm to 12dBm
- Hardware interfaces:TTL UART
- Host data rate up to 464Kbps over UART
- Supports Adhoc and infrastructure networking
- 8 general purpose digital I/O
- 3 analog sensor inputs
- Real-time clock for time-stamping, auto-sleep, and auto-wakeup modes
- Accepts 3.3VDC regulated power supply
- Wire antenna
Get started with the Wifi Bee
In this section, we will use the Wifi Bee to create a Web server as an sample application. Let's follow the steps below to make it work!
Tools need
Here's all the hardware needed.
Hardware setting
1. Plug the Wifi Bee into the Xbee USB adapter
2. Connet the Xbee USB adapter to your computer via mini USB cable
3. If Windows or Mac can't find the driver, we can download Here
Config the Wifi Bee setting via USB com port
1. We need a serial monitor for configuring the WIFI Bee setting in this part. There're lots of good tools like putty,CoolTerm and Arduino serial monitor. In this case, we choose the Coolterm, which is compatible with both Windows and Mac.
2. Click the Options bottom, set the baud rate to 9600 as following and choose the right serial port :
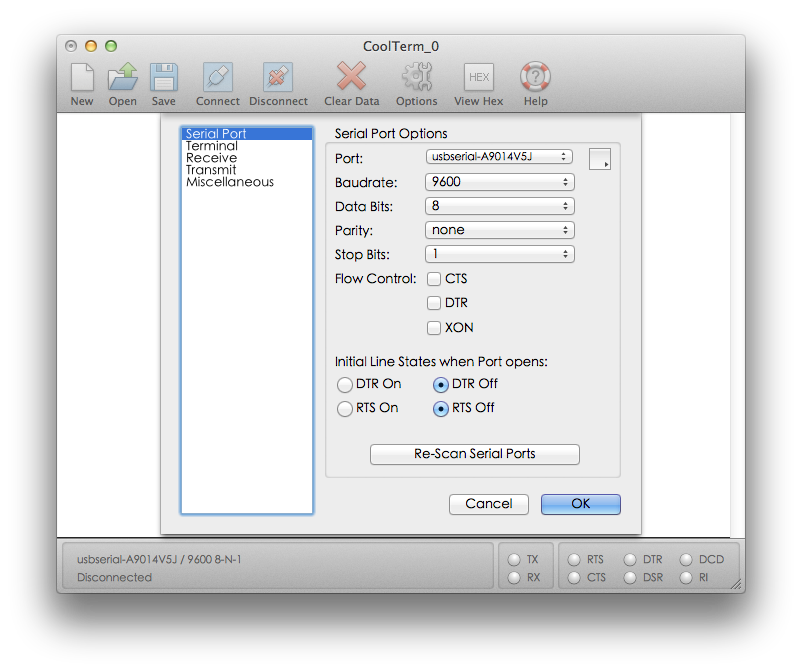
3. Click the "Connect" botton and open the com port.
4. Send AT command $$$ to the wifi Bee and it will reply "CMD" to indicate that it enter the command mode properly(if you use Arduino IDE, make sure this command has no line endings).
5. Type show net
6. Type scan
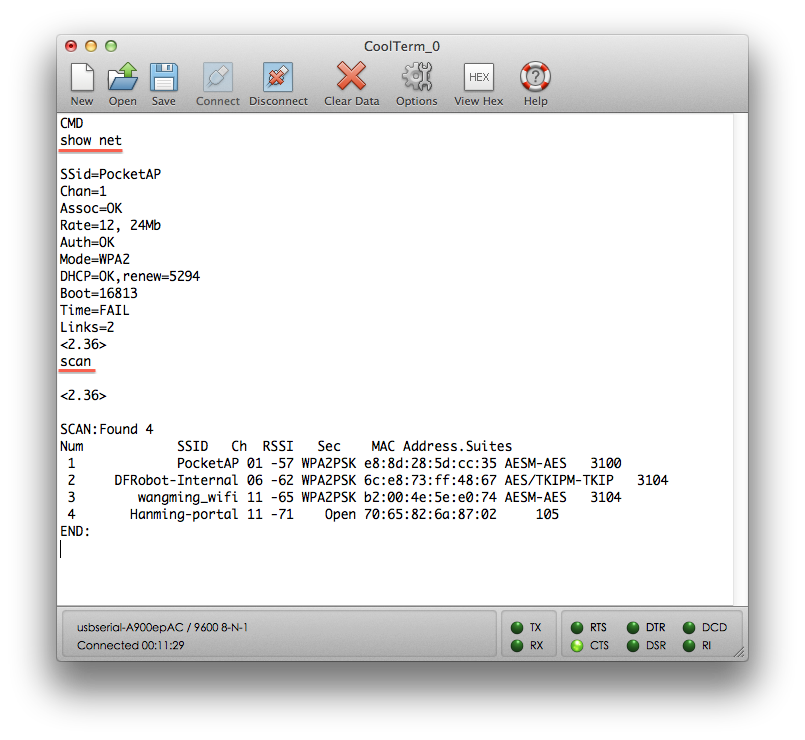
7. If the access is an open access point, you could inout join your router's SSID
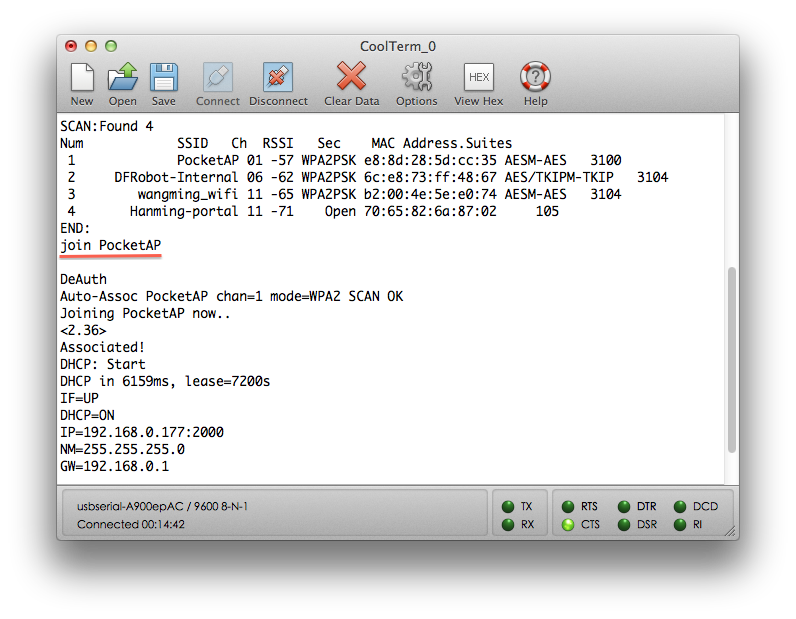
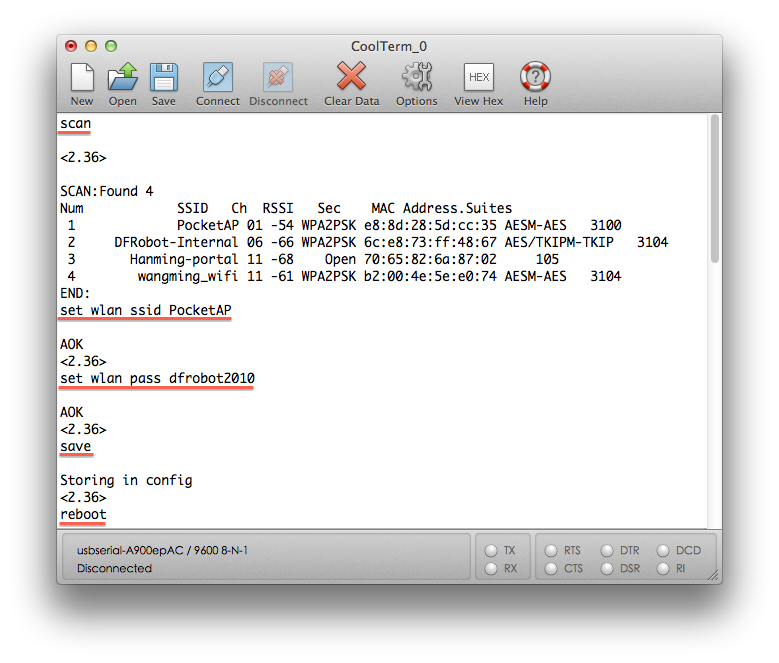
8. If it is secure network which requires password, you could do some settings by:
- set wlan ssid your router's SSID
- set wlan pass your router's password
- save
- reboot
Monitor will reply shown in Figure 4:
9. After the Wifi Bee reboot, it will automatically connect to your router.
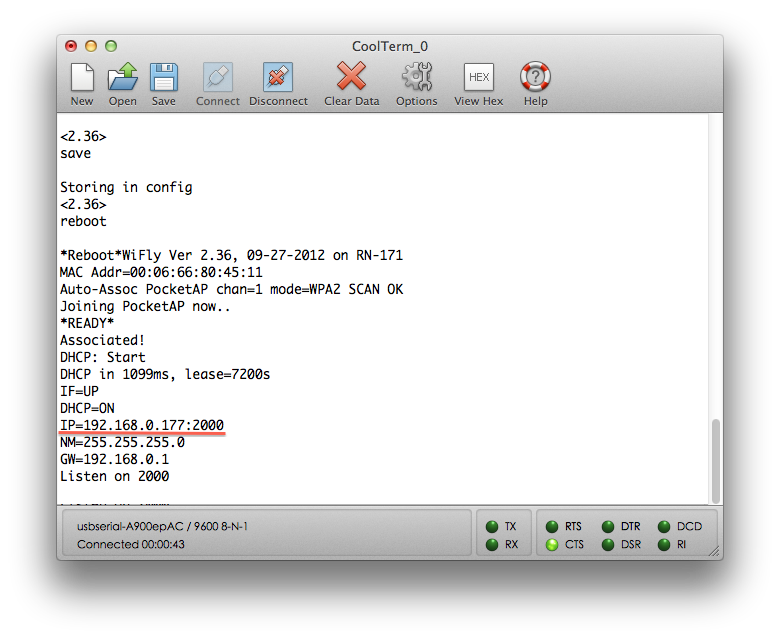
10.If all goes well, the monitor replies with current ip address and opened port. It can be easily figured out in the Figure 5 that the ip address of my Wifi Bee is 192.168.0.177 and the port is 2000. Once your message stopped until "READY" and did nothing after reboot, there is a possibility that the module haven't been set into the state of connecting wlan automatically, so you can try "set wlan join 1" before saving the config and then reboot(Page 30,Wifly Command Reference).
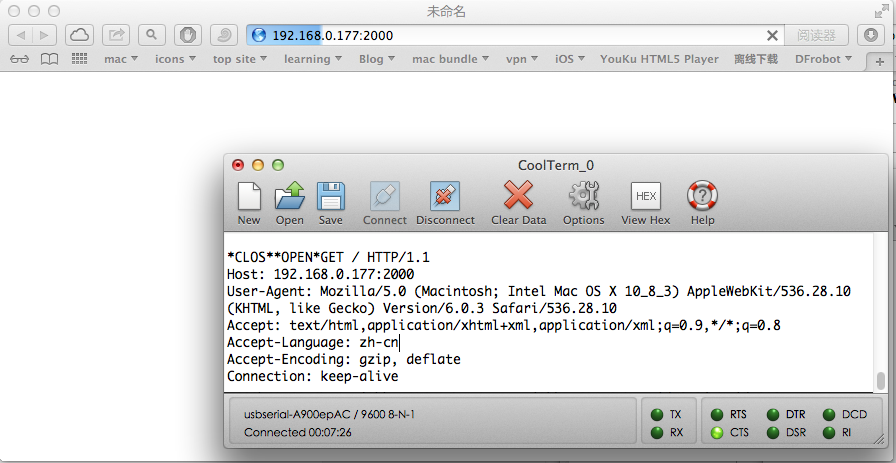
11.Use Web browser to access http://ip:port like: http://192.168.0.177:2000, and the monitor receives the http request from the Web browser shown in Figure 6. However, the Web browser will not receive anything for the wifi bee replies nothing.
12.For more command please view Wifly Command Reference
Config the Wifi Bee setting via Telnet
1. If successfully connected to the router, we can use telnet instead to config Wifi Bee setting.
2. Open the CMD in Windows or Terminal in Mac.
3. Type telnet ip port like: telnet 192.168.0.177 2000
4. Type $$$ quickly to enter the command mode and then we can set the Wifi Bee conveniently, which is shown in Figure7 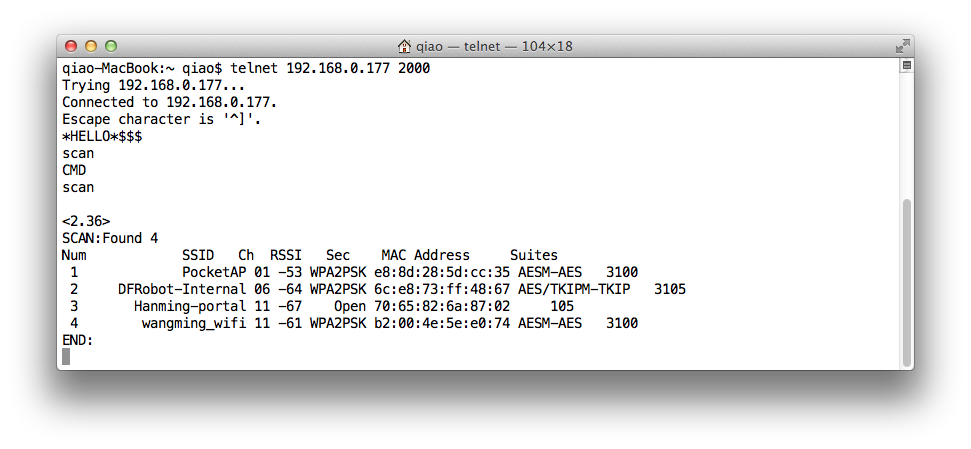
Connect to the TCP server from Wifi Bee
In this section, I choose putty to work as an TCP client and send commands to the WIFI Bee.
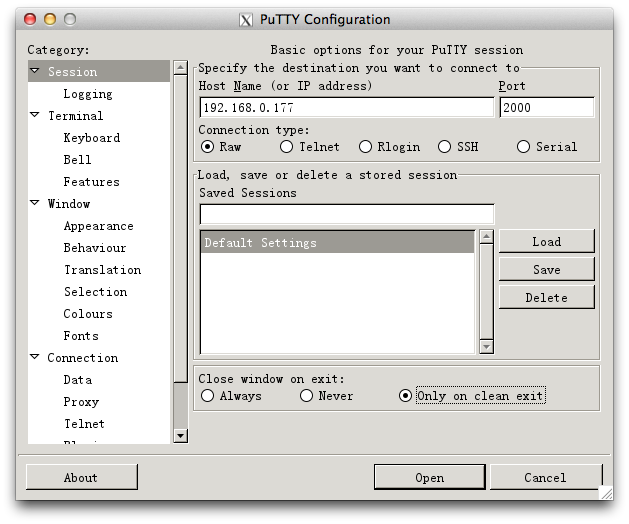
- Config the Host Name and Port.Set the connection type to Raw and Press open! Then you will connect to the server created by WIFI.
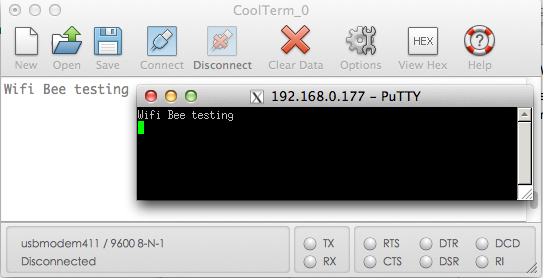
- Now you could send commands via the TCP client simulated by putty to the WIFI shield. Thus putty will receive the strings sent from the Serial monitor also.
Static IP Address Communication
In this section, we will use the static IP address to communicate PC and arduino.
AT Command:
- "set ip dhcp 0"
Turn off the DHCP serve, use the static ip address - "set ip address 192.168.0.123"
This is your wifi bee ip address, the third parameter depends your gateway third one. If it is "192.168.1.1", it should be "1";and if it is "192.168.0.1",it should be "0" - "set ip netmask 255.255.255.0"
- "set ip gateway 192.168.0.1"
The gateway of my router is "192.168.0.1". But usually it's "192.168.1.1".So please check the setting of your network also. And set the right IP address for your WIFI bee.
Attention: Make sure "123" is not occupied.
Arduino Server example
In this section,I plug the WiFi Bee to the I/O expansion. 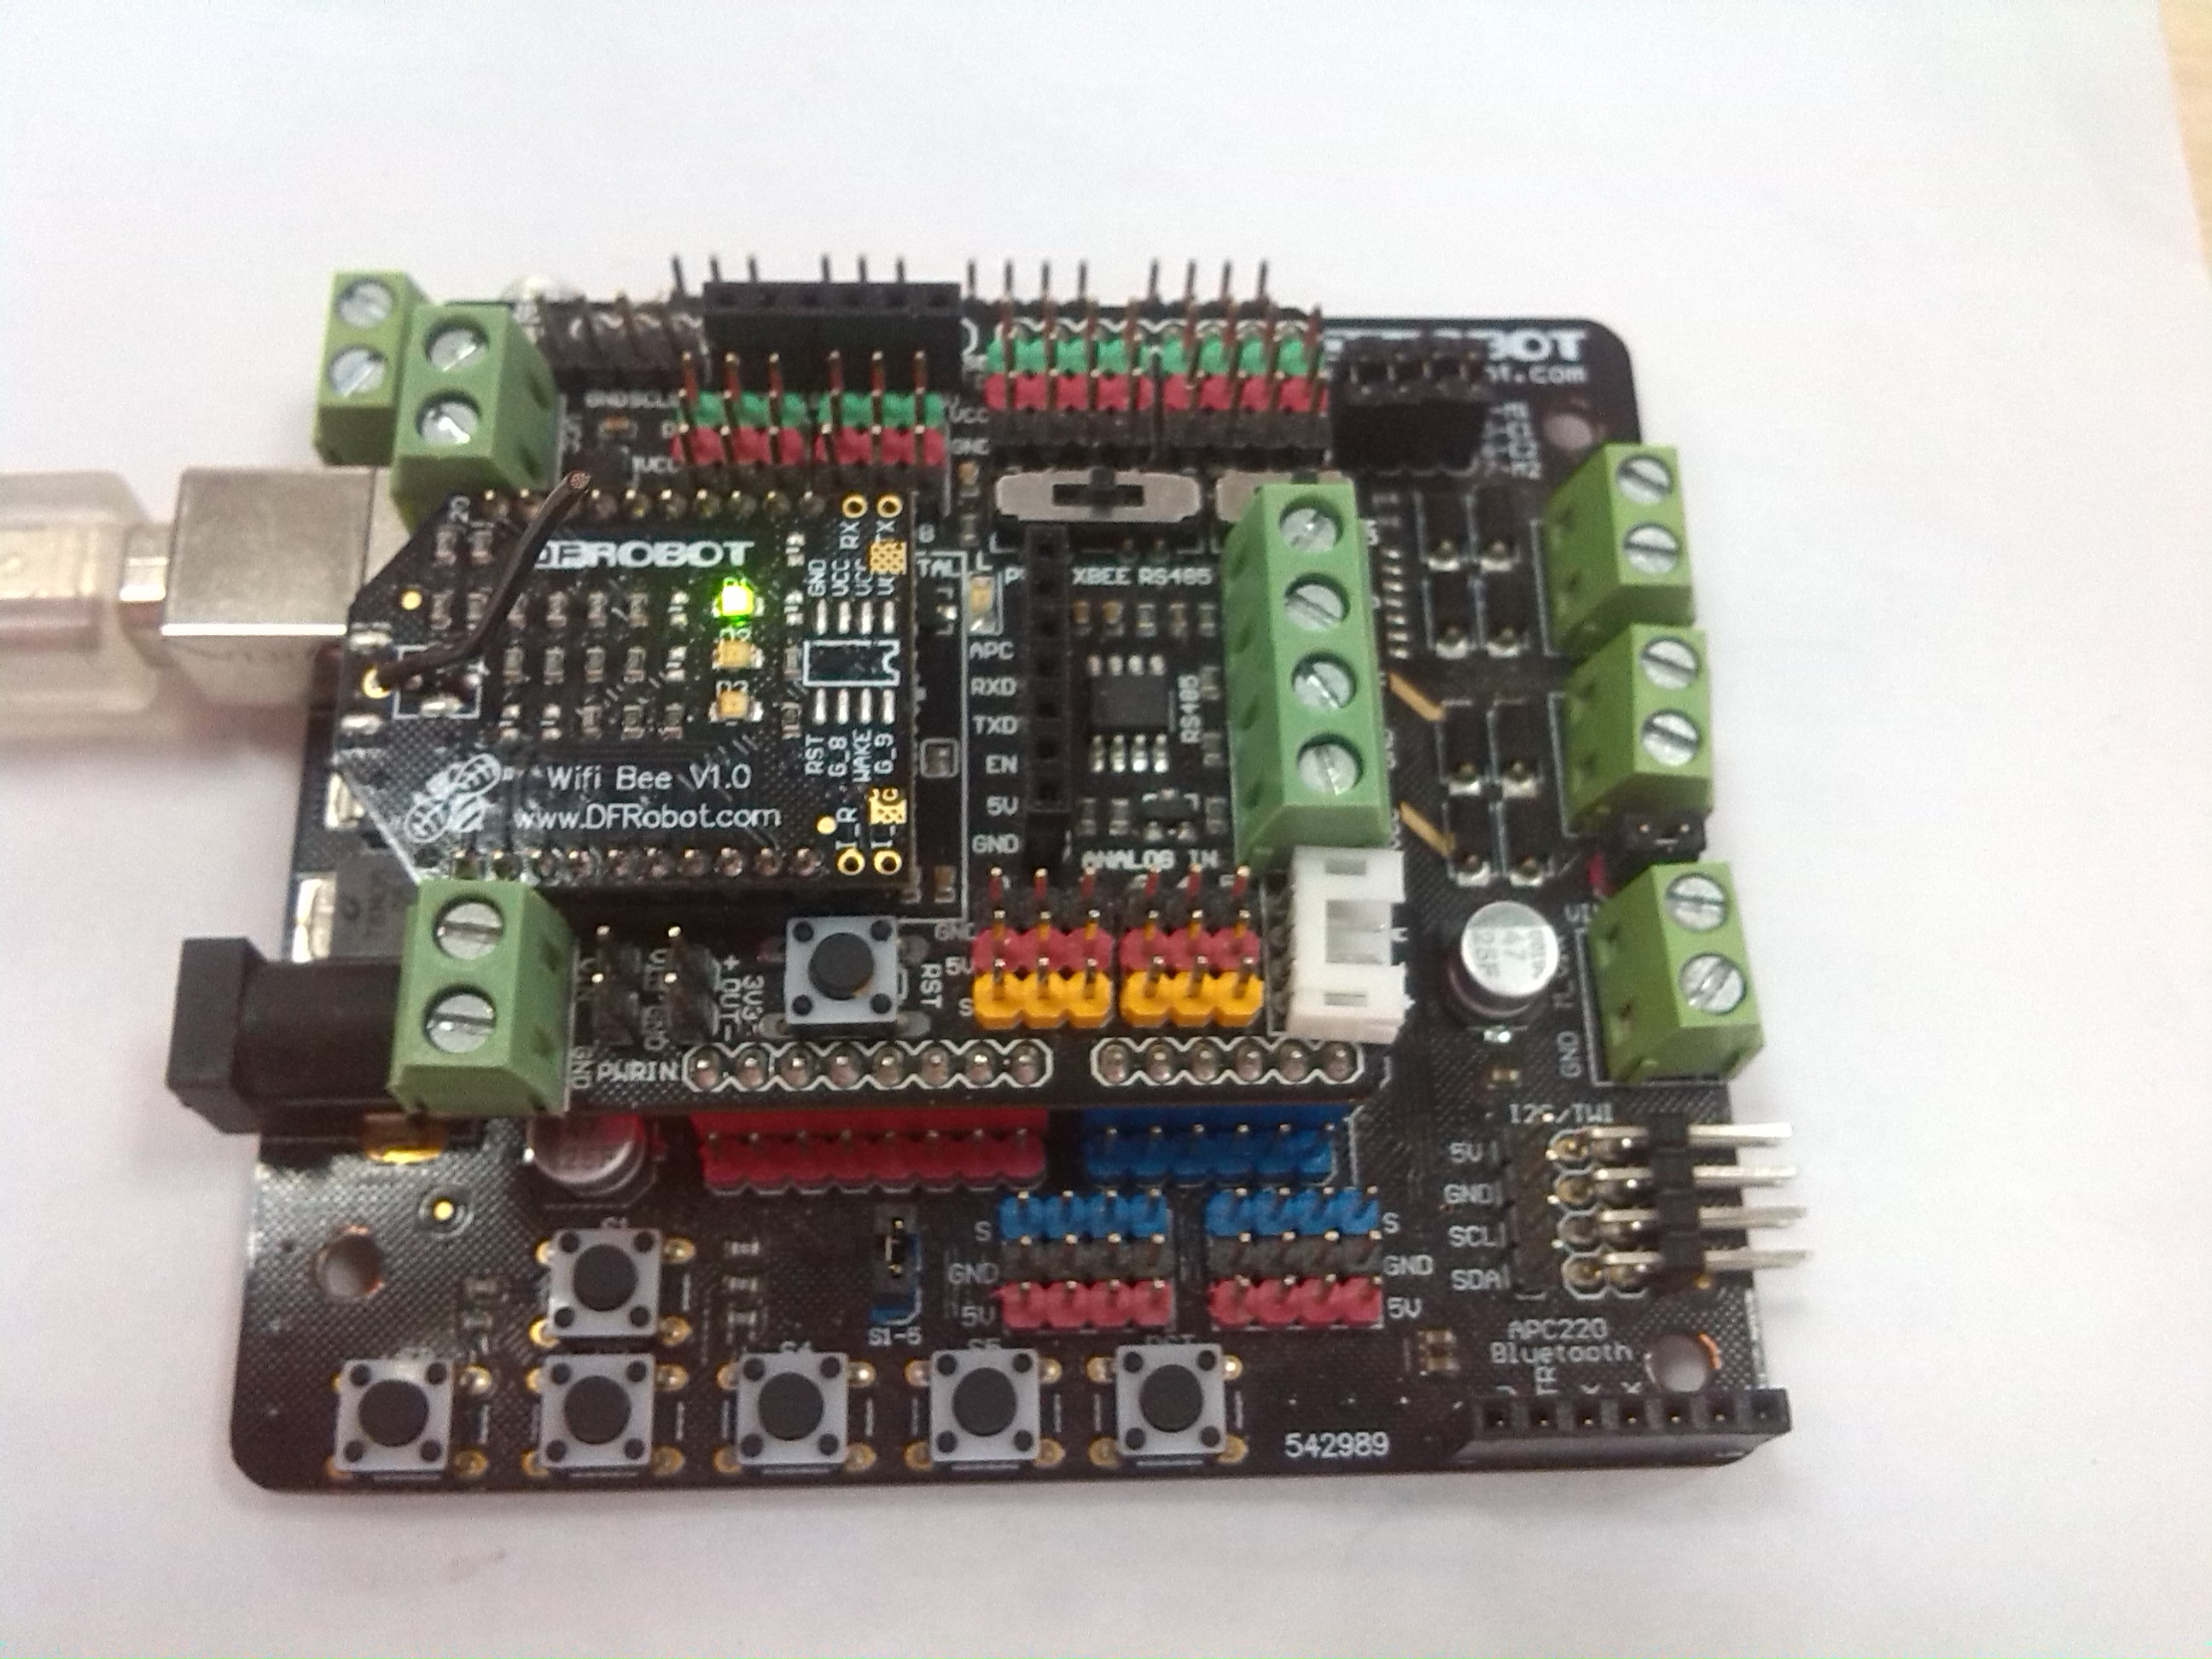
Sample Code
This sample code configures my wifi settings with WPA password on the first run if configuration is commented out. Then you must comment it back and it will run a simple server on Arduino.
This webserver outputs the readings from an analog pin randomly. But it could be upgraded to use buttons and enable pins on user click.
The software serial is commented out, in case you want to do debugging
// WiFi Bee example server with Arduino
// This code requires the following hardware
//  * DFRduino
//  * DFRobot IO shield
//  * WiFi Bee


String ESSID = "your wlan ssid";  //Change it to your home ESSID
String password = "your wlan password";  // Change it to your secret password

String inputString;  // string to store HTML stuff
String inputString2;  // string to store IP stuff
String ip;

void setup() {
  Serial.begin(9600);

  pinMode(13, HIGH);
  Serial.println("program start");

  // To set up the Wireless uncomment the next line
//#define firsttime
  // This function should be run once whenever you change Wireless Network.
  // Should be disabled once the Wireless configuration is setup and working.
#ifdef firsttime
  delay(1000);
  digitalWrite(13, HIGH);  //Turn on LED to debug configuration mode
  Serial.print("$$$"); //enter command mode
  delay(300);
  Serial.println();
  Serial.print("set w s "); // set your wireless name
  Serial.println(ESSID);
  delay(300);
  Serial.print("set w p ");  // Set your wireless password
  Serial.println(password);
  delay(300);
  Serial.println("set ip localport 80"); // set default port to access your device. 80 for webservers
  delay(300);
  Serial.println("set c r 0"); // disable all default messages from the bee
  Serial.println("set c o 0"); // disable all default messages from the bee
  Serial.println("set c c 0"); // disable all default messages from the bee
  delay(300);
  Serial.println("save"); // save it forever and ever
  Serial.println("reboot"); // reboot to load configuration
  delay(2000);
  digitalWrite(13, LOW);
#endif
  Serial.print("The IP is= ");
  printIP();
}


void loop() {
  //If we have a client Read all the browser data.
  while(Serial.available()>0){
    char inChar = (char)Serial.read();
    inputString += inChar;
    if(inputString.length()>0 && inChar == '\n'){
      inputString.trim();  // trim it down to avoid using too much RAM

      if(inputString.indexOf("HTTP") >0)
      {
        putHTML("test");  // your custom HTML tag
      }
      inputString = "";
    }
  }
}

void putHTML(String iStr){
  Serial.println("HTTP/1.1 200 OKn");
  Serial.println("Content-Type: text/html");
  Serial.println("Connection: close");  // the connection will be closed after completion of the response
  Serial.print("\r");
  Serial.print("\n");
  Serial.println("<!DOCTYPE HTML>");
  Serial.println("<html>");
  Serial.println("<meta http-equiv=\"refresh\" content=\"5\">");  // refresh for sensor update
  Serial.println("<link rel=\"stylesheet\" type=\"text/css\" href=\"https://www.dfrobot.com/ihome/stylesheet/stylesheet.css\" />");
  Serial.println("<center> <a href=\"https://www.dfrobot.com\"><img src=\"http://alturl.com/qf6vz\"></a> </center> ");
  Serial.println("<head><title> DFRobot </title></head>");
  Serial.println("<body>");
  Serial.println("<h1>DFRobot WiFi Bee</h1>");
  Serial.println("<p>My Robot data.</p>");
  Serial.println(iStr);
  Serial.println("<p>My crazy temperature sensor");
  Serial.println(analogRead(2));
  Serial.println("</p>");
  Serial.println("</body></HTML>");
  // Close the connection from the Bee manually
  Serial.println();
  delay(300);
  Serial.print("$$$"); //enter command mode
  delay(300);
  Serial.println();
  Serial.println("close"); // Close the connection so the port is open for others
  Serial.println("exit"); // Exit command mode
}

void printIP(){
  delay(300);
  Serial.print("$$$"); //enter command mode
  delay(300);
  Serial.println();
  Serial.println("get i");  // enter get ip command
  delay(600);
  while(Serial.available()>0){ // read output from command
    char inChar;
    if((char)Serial.read() == 'I' && (char)Serial.read() == 'P') { // parse it to get rid of non required stuff
    Serial.print(Serial.read());
      Serial.read();
      inputString2 += inChar;
      while(Serial.available()>0){
        char inChar = (char)Serial.read();
        inputString2 += inChar;
      }
    }
  }
  Serial.println(inputString2);
  inputString2="";
  delay(300);
  Serial.println("exit");
}
When you have upload the code, it will display the IP address and the enabled port ( by default 80 on the configuration code ):
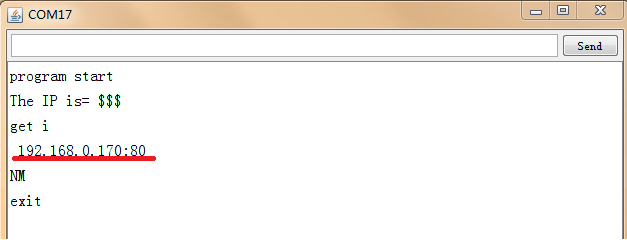
Input the IP address into your browser address :
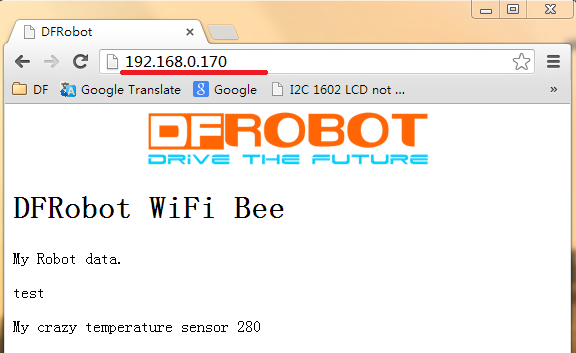
Now you can watch your Arduino on the network. Note, the code will automatically refresh every 5 seconds, but you can disable by commenting out the refreshing meta tag.