Introduction
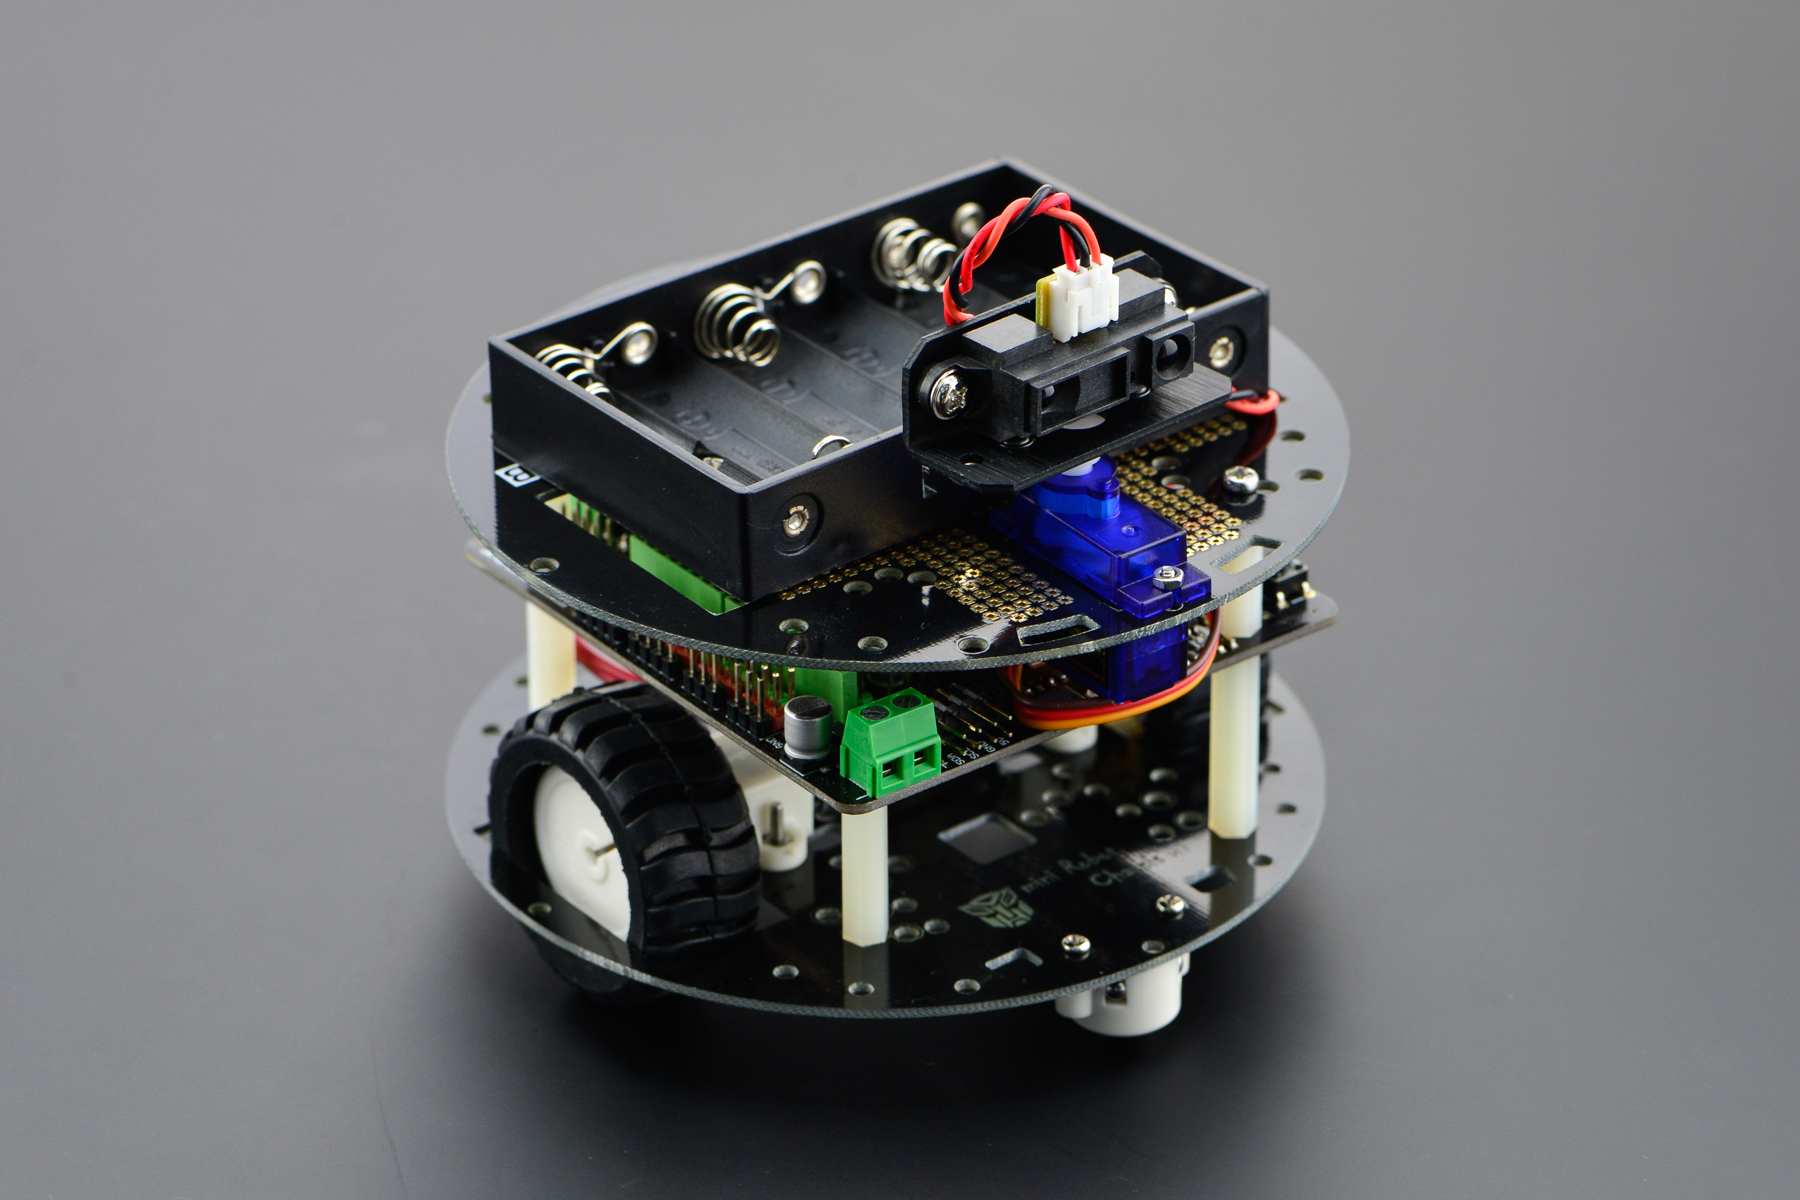
Explore the physical world with MiniQ robot! This is a MinQ 2WD Plus which is based on our MiniQ 2WD Chasis. To make it suitable for educational, competions and fun to play with, we also added extra modules such as Romeo V2 All-in-one controller, Sharp GP2Y0A21 Distance Sensor and 9g micro servo into this kit. What makes it different from the original miniQ robots is that it comes with an upper deck, which allow you to install sensors, servos and even do some prototypings. The leaf pads on the surface make it an ideal on-the-go prototyping board, and it is stackable. You can not only solder DIP components but also solder SMD components with this upper deck. Whatsmore, we have soldered motor wires and glued for you in advance. With this kit you'll be able to play immediately after simple assembling and programming. Our sample codes include many interesting senarios such as obstacle avoidance, enjoy!
Specification
-
Sharp GP2Y0A21 Distance Sensor
- operating voltage: 4.5 V to 5.5 V
- average current consumption: 30 mA (typical)
- distance measuring range: 10 cm to 80 cm (4" to 32")
- output type: analog voltage
- output voltage differential over distance range: 1.9 V (typical)
- response time: 38 ± 10 ms
-
Others
- 13000 rpm @ No load
- 50:1 Gear ratio
- 260 rpm @ 6V
- 40mA @ 6V
- 360mA stall current @ 6V
- 10 oz inches torque @ 6V
Tutorial
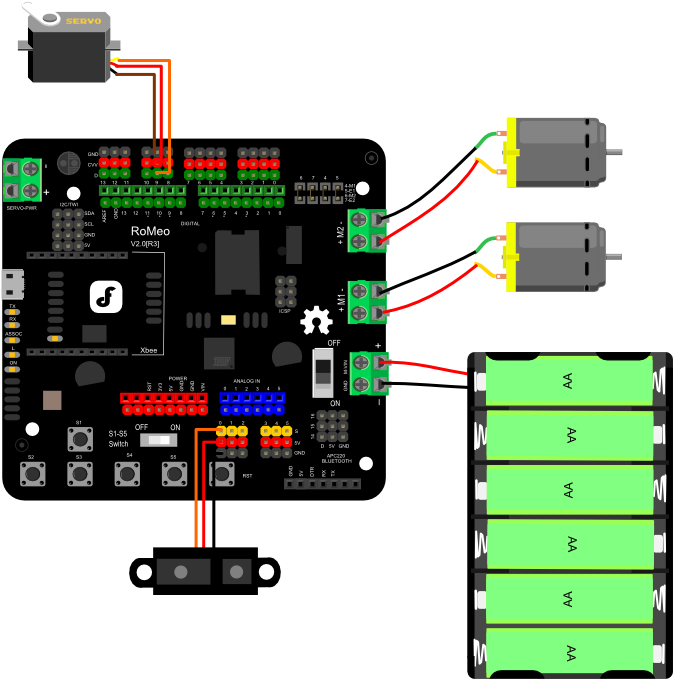
Connection Diagram

Sample Code
/*
 # This Sample code is for testing the MiniQ Discovery Kit.

 # Editor : Phoebe
 # Date   : 2014.6.19
 # Ver    : 0.1
 # Product: MiniQ Discovery Kit
 # SKU    : KIT0071

 # Description:
 # Obstacle avoidance function of MiniQ Discovery Kit

 */

#include <math.h>
#include <Servo.h>                                //Include Servo library
Servo irservo;                                    // create servo object to control a servo

#define Svo_Pin 9

int posnow;

int E1 = 5;     //M1 Speed Control
int E2 = 6;     //M2 Speed Control
int M1 = 4;     //M1 Direction Control
int M2 = 7;     //M1 Direction Control

void stop(void)                    //Stop
{
  digitalWrite(E1,0);
  digitalWrite(M1,LOW);
  digitalWrite(E2,0);
  digitalWrite(M2,LOW);
}
void advance(char a,char b)          //Move forward
{
  analogWrite (E1,a);      //PWM Speed Control
  digitalWrite(M1,LOW);
  analogWrite (E2,b);
  digitalWrite(M2,LOW);
}
void back_off (char a,char b)          //Move backward
{
  analogWrite (E1,a);
  digitalWrite(M1,HIGH);
  analogWrite (E2,b);
  digitalWrite(M2,HIGH);
}
void turn_L (char a,char b)             //Turn Left
{
  analogWrite (E1,a);
  digitalWrite(M1,LOW);
  analogWrite (E2,b);
  digitalWrite(M2,HIGH);
}
void turn_R (char a,char b)             //Turn Right
{
  analogWrite (E1,a);
  digitalWrite(M1,HIGH);
  analogWrite (E2,b);
  digitalWrite(M2,LOW);
}


void setup()
{
  int i;
  for(i=4;i<=7;i++)
   pinMode(i, OUTPUT);
//  pinMode(2,OUTPUT);
//  Serial.println("Run keyboard control");
  digitalWrite(E1,LOW);
  digitalWrite(E2,LOW);
  irservo.attach(Svo_Pin);                         //attaches the servo on pin 9 to the servo object
  Serial.begin(19200);                            //Set Baud Rate
  advance(80,80);
}

int pos=0;                                        // variable to store the servo position
float distance;

void loop()
{
//  digitalWrite(2,HIGH);
  for (int i=0;i<180;i++)
  {
    irservo.write(i);
    int x=analogRead(0);                   // connect the GP2Y0A21 distance sensor to Analog 0
    Serial.println(x);                    // print distance
    if(x>350)
    {
//      digitalWrite(2,LOW);delay(100); digitalWrite(2,HIGH); delay(100);
      if(i<135)
      {
        back_off(80,80);delay(300);
        turn_L(80,80);delay(300);
      }
      else
      {
        back_off(80,80);delay(300);
        turn_R(80,80);delay(300);
      }
      advance(80,80);
    }
    delay(4);
  }
  for(int i=180;i>0;i--)
  {
    irservo.write(i);
    int x=analogRead(0);
    Serial.println(x);                    // print distance
    if(x>350)
    {
//      digitalWrite(2,LOW);delay(100); digitalWrite(2,HIGH); delay(100);
      if(i<135)
      {
        back_off(80,80);delay(300);
        turn_L(80,80);delay(300);
      }
      else
      {
        back_off(80,80);delay(300);
        turn_R(80,80);delay(300);
      }
      advance(80,80);
    }
    delay(4);
  }
}
FAQ
| Q&A | Some general Arduino Problems/FAQ/Tips |
|---|---|
| A | For any questions, advice or cool ideas to share, please visit the DFRobot Forum. |
