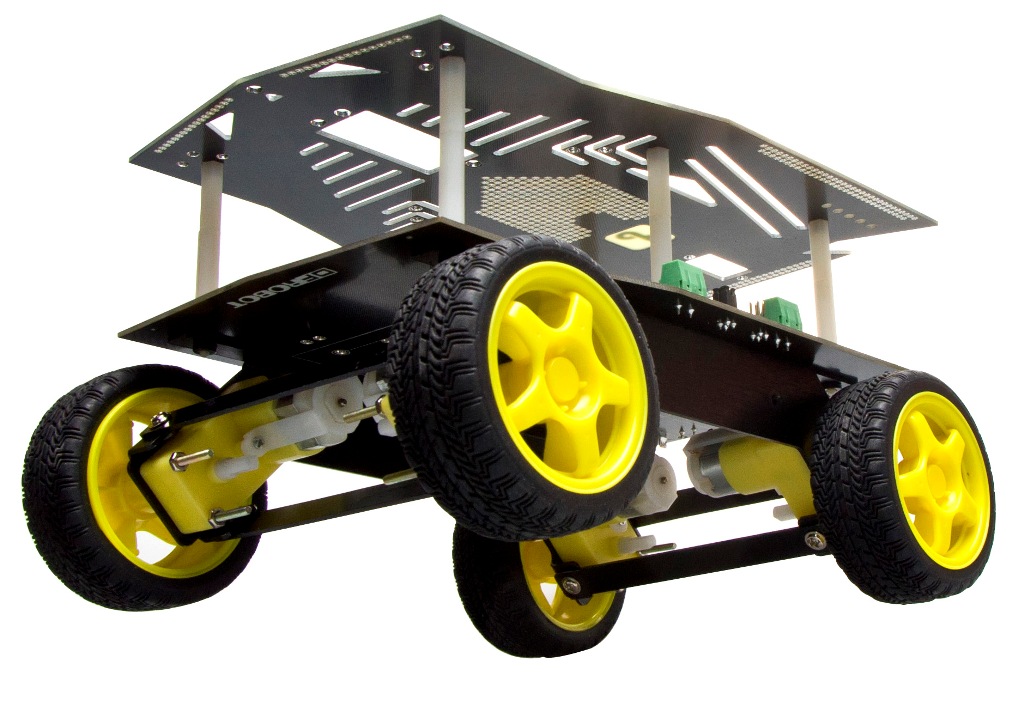
Introduction
The Cherokey 4WD Robot Kit is a versatile mobile robot that is compatible with popular microcontrollers such as the arduino UNO, arduino MEGA 2560, Romeo (Arduino Robot Control Board with Bluetooth ), etc.
The Cherokey PCB is embedded with a L298P motor driver chip which allows it to drive two 6-12v DC motors with a maximum of 2A current. The integrated 2 way DC motor driver and XBee & APC220 socket allows you to start your project immediately without the need for an additional motor driver or wireless shield.
The expansion plate significantly increases the surface area of the Cherokey allowing you to easily connect a 9g micro servo or a standard sized servo in two different locations so that you can install a robotic arm or ultrasonic/IR sensors. The prototyping area makes it convenient to install sensors on the robot. Double sided solder pads in the middle of the top place can be populated with DIP or SMD components to extend the robot's functions.
The high strength aluminium alloy chassis provides flexibilitiy in rapid movement particularly in outdoor enviornments, such as grass, gravel, sand or sloped surfaces.
The Cherokey 4WD mobile platform is also suitable for robot competitions and research-related projects.
With this robot kit you will be able to build a automatic obstacle avoiding robot using an ultrasonic sensor as a distance measuring device. The sensor is mounted on a sweeping servo in order to increase the range of the robot's "senses".
Assembly
Refer to the Cherokey Instruction Manual for detailed instructions on how to assemble the kit.
The "brain" of this robot is the RoMeo BLE microcontroller, hereafter referred to as the "microcontroller". This microcontroller intrgrates some useful features for our robot, including integrated L298P motor drivers and Bluetooth 4.0 (BLE).
The microcontroller needs to be mounted to the Cherokey's PCB like so:

When the chassis is assembled and the microcontroller is mounted on the PCB, you are nearly ready to make it move!
Connections
Logic Connections
After mounting the RoMeo BLE on the Cherokey PCB, connect the logic pins using F-F jumper wires. The diagram below shows the motors and logic connections that need to be made. The necessary connections are conveniently listed on the Cherokey PCB.
Also connect the Cherokey PCB to +5v and GND on your microcontroller so that it can be powered from the same source.
| RoMeo BLE | Cherokey PCB |
|---|---|
| RX | RX |
| TX | TX |
| D4 | D4 |
| D4 | D4 |
| D5 | D5 |
| D6 | D6 |
| D7 | D7 |
| 5v | 5v |
| GND | GND |

Motor Terminals
Next connect the motors to the motor terminals. Make sure the positive and negative terminals are connected the correct way, or your motors will turn in the wrong direction. If you have access to a soldering iron, we recommend tinning the end of each wire for the best continuity. Tighten each terminal with a Phillips screwdriver so that good connections are made.
Motor Jumpers

On the Cherokey PCB, find the pins around the edge market M1=M3 and M2=M4. These take the signal from the microcontroller going to M1 and M2 and repeat them to M3 and M4 to make the platform 4 wheel drive, rather than just 2 wheel drive.
Make sure there are jumpers shorting the M1=M3 and M2=M4 pin headers. If you are facing the rear of the Cherokey PCB, these jumpers need to be positioned vertically across each set of pins. There should be two sets of jumpers placed horizontally across the pins.
Be careful not to accidentally short the nearby 5V and GND pins, as this will cause damage to the board!
View the diagram above for the correct jumper positioning.
Power Supply
There are two options to supply power - 5x AA batteries or a 7.5v LiPo battery. We recommend using a LiPo battery as it is rechargeable and more compact.
Simple Test Program
Use Arduino IDE to upload the following sketch to the microcontroller via the USB port. In Arduino IDE's board settings, you can use "Arduino UNO".
Under COM settings, select the microcontrollers COM port (the COM port will vary on your computer).
(Make sure your COM port is correctly assigned to your microcontroller in the IDE or the program will not upload!)
int speedPin_M1 = 5;     //M1 Speed Control
int speedPin_M2 = 6;     //M2 Speed Control
int directionPin_M1 = 4;     //M1 Direction Control
int directionPin_M2 = 7;     //M1 Direction Control

void setup(){
}

void loop(){
    carAdvance(100,100);
    delay(1000);
    carBack(100,100);
    delay(1000);
    carTurnLeft(250,250);
    delay(1000);
    carTurnRight(250,250);
    delay(1000);
}

void carStop(){                 //  Motor Stop
  digitalWrite(speedPin_M2,0);
  digitalWrite(directionPin_M1,LOW);
  digitalWrite(speedPin_M1,0);
  digitalWrite(directionPin_M2,LOW);
}

void carBack(int leftSpeed,int rightSpeed){         //Move backward
  analogWrite (speedPin_M2,leftSpeed);              //PWM Speed Control
  digitalWrite(directionPin_M1,HIGH);
  analogWrite (speedPin_M1,rightSpeed);
  digitalWrite(directionPin_M2,HIGH);
}

void carAdvance(int leftSpeed,int rightSpeed){       //Move forward
  analogWrite (speedPin_M2,leftSpeed);
  digitalWrite(directionPin_M1,LOW);
  analogWrite (speedPin_M1,rightSpeed);
  digitalWrite(directionPin_M2,LOW);
}

void carTurnLeft(int leftSpeed,int rightSpeed){      //Turn Left
  analogWrite (speedPin_M2,leftSpeed);
  digitalWrite(directionPin_M1,LOW);
  analogWrite (speedPin_M1,rightSpeed);
  digitalWrite(directionPin_M2,HIGH);
}
void carTurnRight(int leftSpeed,int rightSpeed){      //Turn Right
  analogWrite (speedPin_M2,leftSpeed);
  digitalWrite(directionPin_M1,HIGH);
  analogWrite (speedPin_M1,rightSpeed);
  digitalWrite(directionPin_M2,LOW);
}
First Test
After code has been uploaded to the microcontroller, unplug the USB cable from the board.
Place the Cherokey on a flat surface and at ground level for safety.
Turn the Cherokey on using the switch at the rear.
It should go backwards, forwards, turn to the left and turn to the right.
TROUBLESHOOTING TIPS: Batteries must be connected to make the motors move! If the Cherokey is only plugged in with USB power through the microcontroller, the motors will be under powered and will not work! If batteries are installed but the motors are not moving, make sure the switch at the rear of the Cherokey PCB is turned on |
Control Test Program
Now we can try another program that will give us keyboard control over the Cherokey.
The advantage of this program is that we will be given feedback to predefined directions. By observing the robot's motion, you can debug the motor directions so that each motor is spinning the correct way.
Upload the following code as before:
/*
 # Edited by:  Matt
 # Date:       2015.09.06
 # Version:    1.1
 # Product:    Cherokey 4WD Mobile Platform
 # SKU:        ROB0102/ROB0117

 # Description:
 # Drive 2 motors with this Cherokey 4WD Mobile Platform
 # Connect D4,D5,D6,D7,GND to UNO digital 4,5,6,7,GND

*/
//Motor Definitions
int E1 = 5;     //M1 Speed Control
int E2 = 6;     //M2 Speed Control
int M1 = 4;     //M1 Direction Control
int M2 = 7;     //M2 Direction Control

//DIRECTIONS

//STOP
void stop(void)
{
  digitalWrite(E1, 0);
  digitalWrite(M1, LOW);
  digitalWrite(E2, 0);
  digitalWrite(M2, LOW);
}

//ADVANCE
void advance(char a, char b)
{
  analogWrite (E1, a);
  digitalWrite(M1, HIGH);
  analogWrite (E2, b);
  digitalWrite(M2, HIGH);
}

//MOVE BACKWARDS
void back_off (char a, char b)
{
  analogWrite (E1, a);
  digitalWrite(M1, LOW);
  analogWrite (E2, b);
  digitalWrite(M2, LOW);
}


//TURN LEFT
void turn_L (char a, char b)
{
  analogWrite (E1, a);
  digitalWrite(M1, LOW);
  analogWrite (E2, b);
  digitalWrite(M2, HIGH);
}

//TURN RIGHT
void turn_R (char a, char b)
{
  analogWrite (E1, a);
  digitalWrite(M1, HIGH);
  analogWrite (E2, b);
  digitalWrite(M2, LOW);
}

void setup(void) {
  int i;
  for (i = 4; i <= 7; i++)
    pinMode(i, OUTPUT);
  Serial.begin(9600);      //Set Baud Rate
  Serial.println("hello. w = forward, d = turn right, a = turn left, s = backward, x = stop, z = hello world"); //Display instructions in the serial monitor
  digitalWrite(E1, LOW);
  digitalWrite(E2, LOW);
}

void loop(void) {
  if (Serial.available()) {
    char val = Serial.read();
    if (val != -1)
    {
      switch (val)
      {
        case 'w'://Move Forward
          Serial.println("going forward");
          advance (255, 255);  //move forward at max speed
          delay (1000);
          stop();
          break;
        case 's'://Move Backward
          Serial.println("going backward");
          back_off (255, 255);  //move backwards at max speed
          delay (1000);
          stop();
          break;
        case 'a'://Turn Left
          Serial.println("turning left");
          turn_L (255, 255);
          delay (1000);
          stop();
          break;
        case 'd'://Turn Right
          Serial.println("turning right");
          turn_R (255, 255);
          delay (1000);
          stop();
          break;
        case 'z':
          Serial.println("hello world!");
          break;
        case 'x':
          Serial.println("stopping");
          stop();
          break;
      }
    }
    else stop();
  }
}
Once the code has uploaded, keep the USB cable plugged in. Make sure the Cherokey's switch is ON and that a power supply is connected - e.g.: a lipo battery.
Open the Arduno IDE serial monitor. Set the bottom panels to "No line ending" and the baud rate to 9600. This is important as the microcontroller needs to communicate with your computer for this program to work properly.
If it is working correctly, the following line should appear when the serial monitor is opened:
hello. w = forward, d = turn right, a = turn left, s = backward, x = stop, z = hello world
These are basic instructions for this program. Using the W, D, A, S, and Z keys on your keyboard, try moving the Cherokey.
When you press "W", the Cherokey should move forward for 1 second, and then stop
When you press "D", the Cherokey should turn to the right 90 degrees and then stop
When you press "A", the Cherokey should turn to the left 90 degrees and then stop
When you press "S", the Cherokey should move backwards for 1 second, and then stop
When you press "Z", the Arduino IDE serial monitor should print: "hello world!"
If motors are spinning incorrectly, there are two methods to change this:
- Changing the polarity of the motors by changing the positive and negative wiring. (which works, but isn't an elegant solution)
- Changing lines in the code, covered in the section below
Changing the Motor Direction in Code
Let's examine some of the global variables in the program:
int M1 = 4;     //M1 Direction Control
int M2 = 7;     //M2 Direction Control
Digital pins 4 and 7 have been assigned as the motor direction control pins. By setting each either HIGH or LOW (i.e. on or off), we can control which way the motor will turn.
Let's examine another section of code:
//TURN LEFT
void turn_L (char a, char b)
{
  analogWrite (E1, a);
  digitalWrite(M1, LOW);
  analogWrite (E2, b);
  digitalWrite(M2, HIGH);
}
This is a function that tells the Cherokey to turn left. M1 and M2 are set as LOW and HIGH respectively. This means that the left-side wheels will turn backwards and the right-side wheels turn forwards.
Conversely, turning right has the motor pins set like so:
//TURN RIGHT
void turn_R (char a, char b)
{
  analogWrite (E1, a);
  digitalWrite(M1, HIGH);
  analogWrite (E2, b);
  digitalWrite(M2, LOW);
}
Therefore, if you find that your Cherokey's wheels are going in a direction you don't intend them to, try changing the motor pins signal. If they are going the wrong way and the direction pin is set to HIGH, try changing it to LOW, and vice versa. You can use the keyboard control program to debug and verify these settings.
When you are satisfied with the movement of your Cherokey, you may move on to the next section where we will make the Cherokey autonomous with the use of an ultrasonic sensor.
Using the URM Sensor
Adding The Servo and Ultrasonic Sensor
Now that your Cherokey is going the way you like it, we can add an obstacle avoidance function.
We will use a URM sensor to sense obstacles. As this can only see what is in front of it, we will mount it on top of a servo which will sweep from left to right to increase the range of the Cherokey's "sight".
For this section, it is recommended you remove the microcontroller from the Cherokey PCB to make debugging easier.
Connections


| RoMeo BLE | URM Sensor |
|---|---|
| D3 | Echo (URM V4.0)/PWM (URM v3.2) |
| D10 | Comp/Trig |
| +5v | +5v |
| GND | GND |
The servo connects to digital pin 9. It will need power and ground connections as well. You can simply connect it to the row of male header pins on the microcontroller at digital pin 9. Make sure your power, ground and signal connections are the correct way around or it will not work! +5v is red, GND is black and signal is green.
Note: The latest version of the URM sensor has different markings on the PCB. The v3.2 URM37 sensor has 9 pins, with pin4 marked "PWM". The latest version of the URM37 sensor is v.4, which also has 9 pins, but pin 4 is marked as "Echo". Both will work with these connections.
Sample Code
For this code to work you will need to install the Metro library.
NOTE: Please uncomment several lines to monitor the sensor value on your computer.
Codes are commented out and the code won't print the sensor data to serial port.
//Serial.println(actualDistance);
//delay(100);
Uncomment the lines and the code prints to serial monitor where you can monitor the sensor data.
Serial.println(actualDistance);
delay(100);
Sample sketch:
#include <Servo.h>
#include <Metro.h>
Metro measureDistance = Metro(50);
Metro sweepServo = Metro(20);

unsigned long actualDistance = 0;

Servo myservo;  // create servo object to control a servo
int pos = 60;
int sweepFlag = 1;


int URPWM = 3; // PWM Output 0-25000US,Every 50US represent 1cm
int URTRIG= 10; // PWM trigger pin
uint8_t EnPwmCmd[4]={0x44,0x02,0xbb,0x01};    // distance measure command

void setup(){                                 // Serial initialization
  myservo.attach(9);
  Serial.begin(9600);                         // Sets the baud rate to 9600
  SensorSetup();
}

void loop(){
 if(measureDistance.check() == 1){
      actualDistance = MeasureDistance();
//      Serial.println(actualDistance);
//      delay(100);
 }

 if(sweepServo.check() == 1){
      servoSweep();
 }

}

void SensorSetup(){
  pinMode(URTRIG,OUTPUT);                     // A low pull on pin COMP/TRIG
  digitalWrite(URTRIG,HIGH);                  // Set to HIGH
  pinMode(URPWM, INPUT);                      // Sending Enable PWM mode command
  for(int i=0;i<4;i++){
      Serial.write(EnPwmCmd[i]);
   }
}

int MeasureDistance(){        // a low pull on pin COMP/TRIG  triggering a sensor reading
    digitalWrite(URTRIG, LOW);
    digitalWrite(URTRIG, HIGH);               // reading Pin PWM will output pulses
    unsigned long distance=pulseIn(URPWM,LOW);
    if(distance==50000){              // the reading is invalid.
      Serial.print("Invalid");
    }else{
      distance=distance/50;           // every 50us low level stands for 1cm
    }
    return distance;
}

void servoSweep(){
  if(sweepFlag ){
     if(pos>=60 && pos<=120){
        pos=pos+1;                                  // in steps of 1 degree
        myservo.write(pos);                         // tell servo to go to position in variable 'pos'
    }
      if(pos>119)  sweepFlag = false;                       // assign the variable again
  }else {
      if(pos>=60 && pos<=120){
        pos=pos-1;
        myservo.write(pos);
      }
      if(pos<61)  sweepFlag = true;
   }
}
When the code has been uploaded to them microcontroller, keep the USB plugged in and open the Arduino IDE serial monitor.
You should see numbers appearing at regular intervals. These numbers show the distance an object is from the URM sensor. The lower the number, the shorter the distance. Try moving your hand towards and away from it and observe how the numbers change. The servo should also sweep within a 180 degree angle.
When your servo and URM sensor are working successfully, you can mount the assembly in the Cherokey frame and we can move on to the final section.
Obstacle Avoiding Robot
- Follow the instructions manual to install the servo and URM sensor in the Cherokey frame
- Connect the URM sensor, servo and motor drivers
Finally, we will install this software on the microcontroller so that it will move forward and avoid obstacles.
/***************************************************
DFRobot
ROB0117 Cherokey 4WD
Sonar Dodge
***************************************************
This example uses a URM sensor to drive the robot and avoid obstacles

Updated 2015-12-31
By Matt

GNU Lesser General Public License.
See <http://www.gnu.org/licenses/> for details.
All above must be included in any redistribution
****************************************************/

/***********Notice and Troubleshooting***************
For help and info visit the wiki page for this product:
https://www.dfrobot.com/wiki/index.php?title=Basic_Kit_for_Cherokey_4WD_SKU:ROB0117
For any other problems, post on the DFRobot forum or email [email protected]
****************************************************/
#include <Servo.h>
#include <Metro.h>

Metro measureDistance = Metro(50);
Metro sweepServo = Metro(20);

int speedPin_M1 = 5;     //M1 Speed Control
int speedPin_M2 = 6;     //M2 Speed Control
int directionPin_M1 = 4;     //M1 Direction Control
int directionPin_M2 = 7;     //M2 Direction Control
unsigned long actualDistance = 0;

Servo myservo;  // create servo object to control a servo
int pos = 60;
int sweepFlag = 1;

int URPWM = 3; // PWM Output 0-25000US,Every 50US represent 1cmk
int URTRIG = 10; // PWM trigger pin
uint8_t EnPwmCmd[4] = {0x44, 0x02, 0xbb, 0x01}; // distance measure command

void setup(){                                 // Serial initialization
  myservo.attach(9);
  Serial.begin(9600);                         // Sets the baud rate to 9600
  SensorSetup();
  delay(1000);
}

void loop() {
  if (measureDistance.check() == 1) {
    actualDistance = MeasureDistance();
//    Serial.println(actualDistance);
//    delay(100);
  }

  if (sweepServo.check() == 1) {
    servoSweep();
  }

  if (actualDistance <= 30) {             //alter this value to change sensor's sensitivity
    myservo.write(90);
    if (pos >= 90) {
      carBack(200, 200);
      Serial.println("carBack");
      delay(300);
      carTurnRight(255, 255);             //alter these values to change turn right speed
      Serial.println("carTurnRight");
      delay(500);
    } else {
      carBack(255, 255);                  //alter these values to change reverse speed
      Serial.println("carBack");
      delay(300);
      carTurnLeft(255, 255);              //alter these values to change turn left speed
      Serial.println("carTurnLeft");
      delay(500);
    }
  } else {
    carAdvance(100, 100);                 //alter these values to change forward speed
    Serial.println("carAdvance");
    delay(300);
  }
}

void SensorSetup() {
  pinMode(URTRIG, OUTPUT);                    // A low pull on pin COMP/TRIG
  digitalWrite(URTRIG, HIGH);                 // Set to HIGH
  pinMode(URPWM, INPUT);                      // Sending Enable PWM mode command
  for (int i = 0; i < 4; i++) {
    Serial.write(EnPwmCmd[i]);
  }
}

int MeasureDistance() { // a low pull on pin COMP/TRIG  triggering a sensor reading
  digitalWrite(URTRIG, LOW);
  digitalWrite(URTRIG, HIGH);               // reading Pin PWM will output pulses
  unsigned long distance = pulseIn(URPWM, LOW);
  if (distance == 1000) {          // the reading is invalid.
    Serial.print("Invalid");
  } else {
    distance = distance / 50;       // every 50us low level stands for 1cm
  }
  return distance;
}

void carStop() {                //  Motor Stop
  digitalWrite(speedPin_M2, 0);
  digitalWrite(directionPin_M1, LOW);
  digitalWrite(speedPin_M1, 0);
  digitalWrite(directionPin_M2, LOW);
}

void carBack(int leftSpeed, int rightSpeed) {       //Move backward
  analogWrite (speedPin_M2, leftSpeed);             //PWM Speed Control
  digitalWrite(directionPin_M1, LOW);              //set LOW to reverse or HIGH to advance
  analogWrite (speedPin_M1, rightSpeed);
  digitalWrite(directionPin_M2, LOW);
}

void carAdvance(int leftSpeed, int rightSpeed) {     //Move forward
  analogWrite (speedPin_M2, leftSpeed);
  digitalWrite(directionPin_M1, HIGH);
  analogWrite (speedPin_M1, rightSpeed);
  digitalWrite(directionPin_M2, HIGH);
}

void carTurnLeft(int leftSpeed, int rightSpeed) {           //Turn Left
  analogWrite (speedPin_M2, leftSpeed);
  digitalWrite(directionPin_M1, LOW);
  analogWrite (speedPin_M1, rightSpeed);
  digitalWrite(directionPin_M2, HIGH);
}
void carTurnRight(int leftSpeed, int rightSpeed) {         //Turn Right
  analogWrite (speedPin_M2, leftSpeed);
  digitalWrite(directionPin_M1, HIGH);
  analogWrite (speedPin_M1, rightSpeed);
  digitalWrite(directionPin_M2, LOW);
}

void servoSweep() {
  if (sweepFlag) {
    if (pos >= 60 && pos <= 120) {
      pos = pos + 15;                              // in steps of 1 degree
      myservo.write(pos);                         // tell servo to go to position in variable 'pos'
    }
    if (pos > 119)  sweepFlag = false;                    // assign the variable again
  }
  else {
    if (pos >= 60 && pos <= 120) {
      pos = pos - 15;
      myservo.write(pos);
    }
    if (pos < 61)  sweepFlag = true;
  }
}
The Cherokey should drive forward and the servo should sweep from left to right. When facing an obstacle, it will reverse, turn, and then keep going until it faces another obstacle.
Congratulations! You have built and programmed your own robot!
Next Steps
There is lots of room for different modules on the Cherokey expansion plate. Why not try adding extra features? How about controlling it yourself via bluetooth? Why not try adding a webcam to it and controlling it over a wireless network? There are lots of possibilities for this kit!
If you have any cool ideas to share, drop us a message on the DF Forum.