Introduction
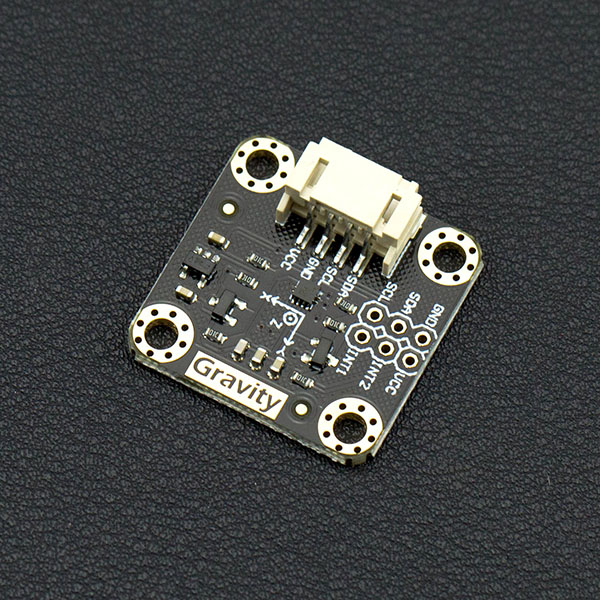
DFRobot presents the ultra low-power Arduino triple axis accelerometer! This device is based around a MEMS LIS2DH chip solution and has high-performance ultra-low power mode. The module is fitted with a Gravity I2C interface for easy plug and play integration in to your projects. The build in LDO power management chip gives you a wide range of input voltages, from 3.3 – 5V. The on-board I2C level conversion also makes it compatible with 3.3 and 5V devices.
Compared to traditional ADXL345, The LIS2DH accelerometer has advantages such as extra stability and more efficient power consumption. Low power mode requires only 2μA, while normal mode requires 11μA. At maximum the module supports an output frequency of 5.3KHz. Sensitivity levels are adjustable to either +-2g, +-4g, +-8g or +-16g and the module supports 16-bit data outputs. There are 2 independent programmable interrupt generators for free-fall and motion detection, that will activate interrupt wake-up. This module has many potential applications including wearable tech, display orientation and impact recognition.
Application
- Motion-activated
- Display orientation
- Shake control
- Pedometer
- Gaming and virtual reality input devices
- Impact recognition and logging
Features
- Gravity plug and play interface
- Ultra-low power (2uA)
- Fast response rate (up to 400KHz)
- Low price
- Compact and easy to install
Specification
- Operating Voltage: 3.3V ~ 5V
- Operating Current: 2uA (low-power mode 50Hz ODR) / 11uA (normal mode 50Hz ODR)
- Interface: Gravity-I2C interface
- Adjustable Sensitivity: ± 2g / ± 4g / ± 8g / ± 16g
- Frequency: 1Hz ~ 5.3KHz
- 16-bit data output
- 2 independent programmable interrupt generators for free-fall and motion detection
- 6D/4D orientation detection
- Embedded Temperature Sensor
- Embedded FIFO
- 1 million grams of high impact resistance
- Operating Temperature: -40 ℃ ~ +85 ℃
- Module Size: 26.2 × 26.2 (mm) /1.03 x 1.03 (inches)
- Weight: 12 g
Tutorial
In this tutorial, we'll show you how does the sensor work.
Requirements
-
Hardware
- DFRduino UNO (or similar) x 1
- Gravity: I2C Triple Axis Accelerometer - LIS2DH x1
- M-M/F-M/F-F Jumper wires
-
Software
- Arduino IDE, Click to Download Arduino IDE from Arduino®
Connection Diagram

| LIS2DH | Arduino |
|---|---|
| VCC | 5V / 3V3 |
| GND | GND |
| SDA | A4(SDA) |
| SCL | A5(SCL) |
Sample Code
Click to download Arduino LIS2DH Library
How to install Libraries in Arduino IDE
/**!
 * @file getAcceleration.ino
 * @brief Get the acceleration in the three directions of xyz, the range can be ±2g、±4g、±8g、±16g
 * @copyright  Copyright (c) 2010 DFRobot Co.Ltd (http://www.dfrobot.com)
 * @license     The MIT License (MIT)
 * @author [tangjie]([email protected])
 * @version  V1.0
 * @date  2021-01-16
 * @url https://github.com/DFRobot/DFRobot_LIS
 */

#include <DFRobot_LIS2DH12.h>

/*!
 * @brief Constructor
 * @param pWire I2c controller
 * @param addr  I2C address(0x18/0x19)
 */
DFRobot_LIS2DH12 acce(&Wire,0x18);

void setup(void){

  Serial.begin(9600);
  //Chip initialization
  while(!acce.begin()){
     Serial.println("Initialization failed, please check the connection and I2C address settings");
     delay(1000);
  }
  //Get chip id
  Serial.print("chip id : ");
  Serial.println(acce.getID(),HEX);

  /**
    set range:Range(g)
              eLIS2DH12_2g,/< ±2g>/
              eLIS2DH12_4g,/< ±4g>/
              eLIS2DH12_8g,/< ±8g>/
              eLIS2DH12_16g,/< ±16g>/
  */
  acce.setRange(/*Range = */DFRobot_LIS2DH12::eLIS2DH12_16g);

  /**
    Set data measurement rate:
      ePowerDown_0Hz
      eLowPower_1Hz
      eLowPower_10Hz
      eLowPower_25Hz
      eLowPower_50Hz
      eLowPower_100Hz
      eLowPower_200Hz
      eLowPower_400Hz
  */
  acce.setAcquireRate(/*Rate = */DFRobot_LIS2DH12::eLowPower_10Hz);
  Serial.print("Acceleration:\n");
  delay(1000);
}

void loop(void){

  //Get the acceleration in the three directions of xyz
  long ax,ay,az;
  //The measurement range can be ±100g or ±200g set by the setRange() function
  ax = acce.readAccX();//Get the acceleration in the x direction
  ay = acce.readAccY();//Get the acceleration in the y direction
  az = acce.readAccZ();//Get the acceleration in the z direction
  //Print acceleration
  Serial.print("Acceleration x: ");
  Serial.print(ax);
  Serial.print(" mg\t  y: ");
  Serial.print(ay);
  Serial.print(" mg\t  z: ");
  Serial.print(az);
  Serial.println(" mg");
  delay(300);

}
Expected Results
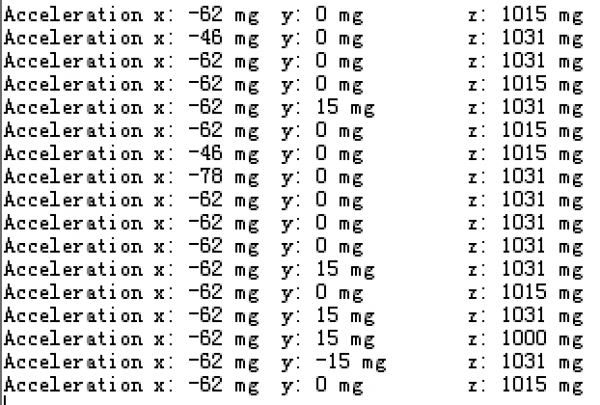
Open the Serial monitor, you'll get the following data.

FAQ
| For any questions, advice or cool ideas to share, please visit the DFRobot Forum. |
|---|
