Introduction
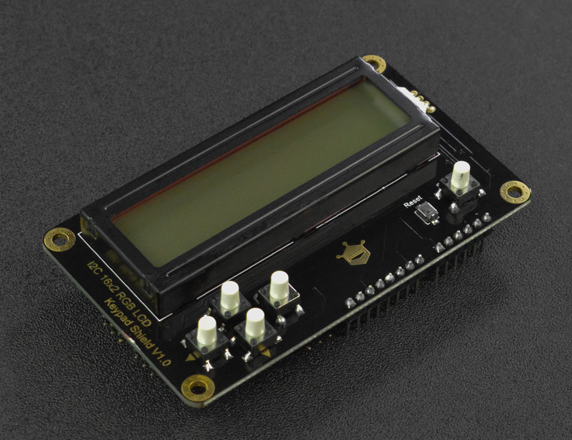
This shield with a 16×2 RGB LCD screen could bring you a brand-new experience with LCD screen!
The RGB LCD shield extends all IOs of Arduino UNO on the back, by which you can connect with modules like sensors, LEDs, servos while using this screen to display content. More possibilities for your creative projects!
Besides, there are 6 keys on the shield, 5 of which are programable and can be used to switch and set functions.
The 1602 RGB LCD shield adopts an integrated design approach and I2C communication. No more complicated wiring, you can directly plug this shield onto an Arduino controller, call the Arduino library, add a couple lines of codes, then the screen can display numbers or characters.
This 1602 RGB LCD shield can not only be used in interactive projects, but also suitable for building data monitoring platforms to feed back the real-time status of various devices.
Specification
- Operating Voltage: 5.0V
- Operating Current: <60mA
- Display: 16*2
- Communication: I2C
- Operating Temperature: -20 to+ 70℃
- Storage Temperature: -30 to+ 80℃
Board Overview
This 1602 RGB LCD module is designed with dual-row analog/digital ports. User can combine this product with other sensors, LEDs, servos, and so on to make various appications based on their needs.
Note: There are silkscreens besides the dual-row pins, and the former corresponds to the upper row while the latter indicates the lower row. Shown as below:


There are 5 buttons connected to A0 and the correspondence between key value and key pressed is shown below. If multiple button are pressed at the same time, the lowest readings among all pressed buttons will be read.
| Key Pressed | A0 value |
|---|---|
| RIGHT | 0 |
| UP | 206 |
| DOWN | 407 |
| LEFT | 624 |
| SELECT | 824 |
| No button pressed | 1023 |
As the analog signal is susceptible to interference, the measured value sometime is not exactly the same as the table above, and the error of ±10 is tolerable.
Tutorial
This demo shows how to use 1602 RGB LCD shield.
Requirements
Hardware
- Arduino UNO x1
- LCD Keypad Shield V2.0 x1
- M-M/F-M/F-F Jumper wires
Software
- Arduino IDE V1.6.5 Click to Download Arduino IDE
Sample Code
If your Arduino IDE does not have this library, please follow the steps below to install it.
Click the link to download library and reference files.
Unzip this folder and copy it to the libraries folder under Arduino installation directory.
About how to install the library?
- Next, open the Arduino IDE and copy the following code to the IDE window. (Delete all contents in the IDE just opened!)
- Select the correct serial port and board (Arduino UNO).
/*!
 * @file Button.ino
 * @brief Button.
 * @copyright    Copyright (c) 2010 DFRobot Co.Ltd (http://www.dfrobot.com)
 * @licence     The MIT License (MIT)
 * @maintainer DFRobot
 * @version  V1.0
 * @date  2023-07-03
 * @url https://github.com/DFRobot/DFRobot_RGBLCD1602
 */
#include "DFRobot_RGBLCD1602.h"

/*
Change the RGBaddr value based on the hardware version
-----------------------------------------
       Moudule        | Version| RGBAddr|
-----------------------------------------
  LCD1602 Module      |  V1.0  | 0x60   |
-----------------------------------------
  LCD1602 Module      |  V1.1  | 0x6B   |
-----------------------------------------
  LCD1602 RGB Module  |  V1.0  | 0x60   |
-----------------------------------------
  LCD1602 RGB Module  |  V2.0  | 0x2D   |
-----------------------------------------
*/
DFRobot_RGBLCD1602 lcd(/*RGBAddr*/0x60 ,/*lcdCols*/16,/*lcdRows*/2);  //16 characters and 2 lines of show

// Define keys
int lcdKey     = 0;
int adcKeyIN  = 0;
int r=255;   //Set red brightness (Range: 0-255)
int g=255;   //Set green brightness
int b=0;     //Set blue brightness

#define btnRIGHT  0
#define btnUP     1
#define btnDOWN   2
#define btnLEFT   3
#define btnSELECT 4
#define btnNONE   5

void setup()
{
  Serial.begin(9600);
  lcd.init();
  lcd.setRGB(r,g,b);  // Set RGB
}

int readLcdButtons()    // Determine which button is pressed
{
 adcKeyIN = analogRead(0);          // 0 read the ADC from analog values
 // By setting different threshold, you can read the corresponding to the appropriate buttons
 if (adcKeyIN > 1000) return btnNONE;
 if (adcKeyIN < 50)   return btnRIGHT;
 if (adcKeyIN < 250)  return btnUP;
 if (adcKeyIN < 450)  return btnDOWN;
 if (adcKeyIN < 650)  return btnLEFT;
 if (adcKeyIN < 850)  return btnSELECT;
 return btnNONE;
}

void loop()
{
 lcd.setCursor(9,1);            //Set display output position
 lcd.print(millis()/1000);      //Output time(second)
 lcd.setRGB(r,g,b);             //Set RGB
 lcd.setCursor(0,1);
 lcdKey = readLcdButtons();     // Read button content
 switch (lcdKey)                // Select to output content according to the pressed button
 {
   case btnRIGHT:
     {
     lcd.print("RIGHT ");
     break;
     }
   case btnLEFT:
     {
     lcd.print("LEFT   ");
     break;
     }
   case btnUP:
     {
     lcd.print("UP    ");
     break;
     }
   case btnDOWN:
     {
     lcd.print("DOWN  ");
     break;
     }
   case btnSELECT:
     {
     lcd.print("SELECT");
     break;
     }
     case btnNONE:
     {
     lcd.print("NONE  ");
     break;
     }
 }
}
Result
Yellow background, output NONE when no button pressed, otherwise, output the corresponding button.
FAQ
For any questions, advice or cool ideas to share, please visit the DFRobot Forum.

