Introduction
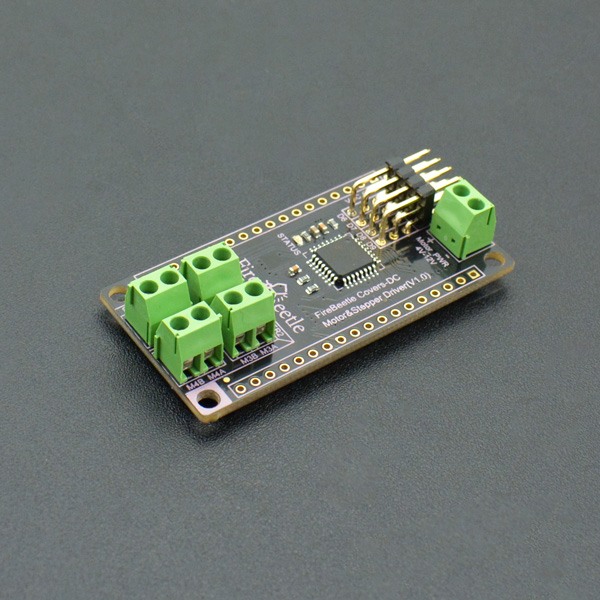
DFRobot FireBeetle series are low power consumption microcontrollers designed for Internet of Things (IoT) development. FireBeetle Covers-DC Motor & Stepper Driver is a DC motor & Stepper Motor driver designed for FireBeetle Microcontrollers. It can control up to four-channels DC motors / two-phase four-wire stepper motors simultaneously.
The motor driver cover integrates a STM8 as its coprocessor, controlling the motor speed and direction. It communicates with Microcontroller via IIC port, supports up 1000Hz refresh rate. The assisted processor STM8 controls motors and set the main control free. It effectively reduces the dependence on MCU pin resources and MCU occupancy. Independant motor control make the multi-motors projects more affordable. Cooperate with DFRobot Arduino Motor Library, it will reduce your development difficulty.
This stepper motor driver adopts 2x TB6612FNG chips and performs excellent in low power consumption application. The consumption current is only 30mA under static state, and motor driver can provide 1.2A output current at 5V and the peak current is 3.2A@5V. Besides, the motor drive supports 4~12V wide-range power input.
FireBeetle Covers-DC Motor & Stepper Driver also provides four independent interfaces to drive servo. So, you can control servo directly. It can be widely applied to intelligent car control and gear control.
Features
- Support 4 channels DC motors drive
- Support 2 channels two-phase four-wire stepper motors drive
- Support 4 channels servo drive
- Up to 1000Hz refresh rate
- Equipped with a STATUS indicator (LED)
Specification
- Microprocessor: STM8S105
- Operating Voltage: 3.3~5V (Connect to FireBeetle VCC Terminal)
- Operating Voltage: 30mA
- Motor Drive Chip: TB6612FNG
- Motor [null Drive] Voltage: 4-12V
- Output current: 1.2A single-channel continuous drive current
- Start / Peak Current: 2A (continuous pulse) / 3.2A (single pulse)
- Communication Port: IIC
- IIC Address: 0x18
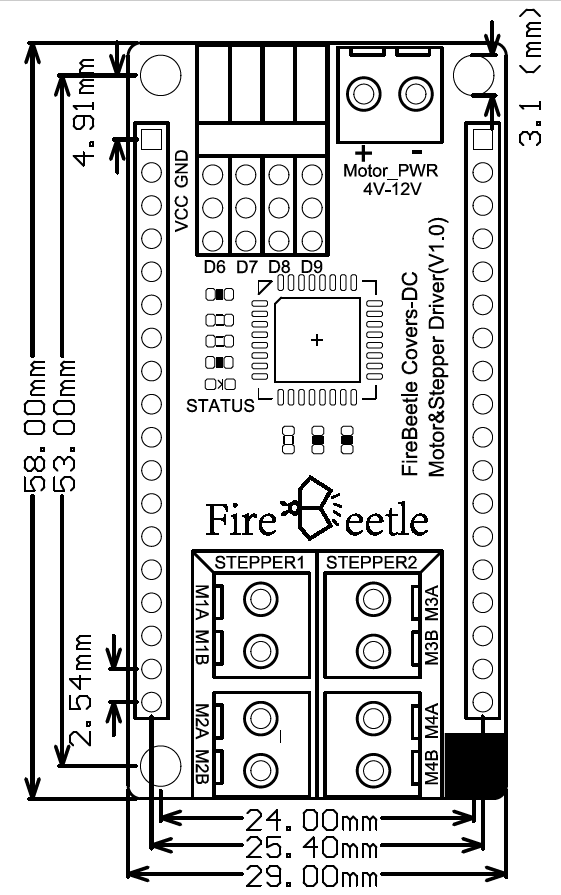
- Dimension: 2.28inches x 1.14inches (58mm x 29mm)
NOTE: The motor power supply must be independent from logic control power supplies!
Function Diagram
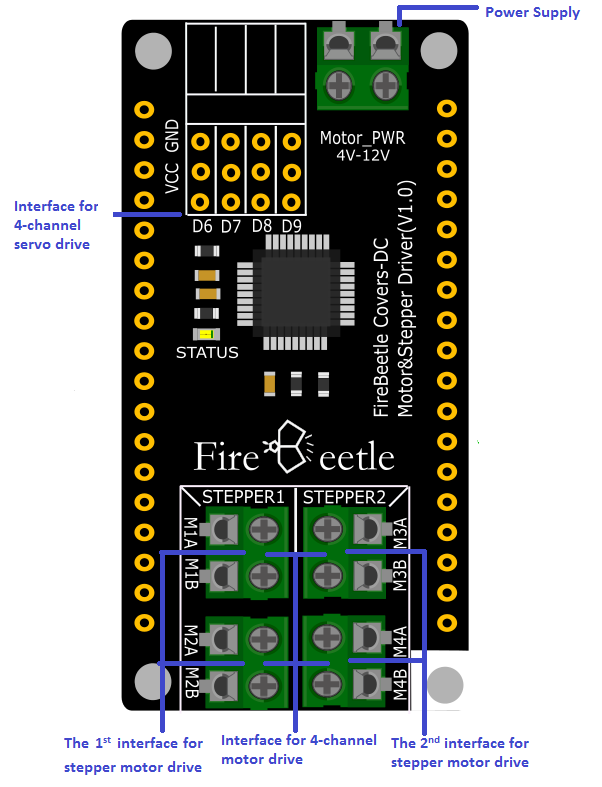
- Provide 4-channel servo drive interfaces (D6-D9)
- Provide 4-channel general motor drive interfaces (M1A/M1B, M2A/M2B, M3A/M3B, M4A/M4B).
Board Overview
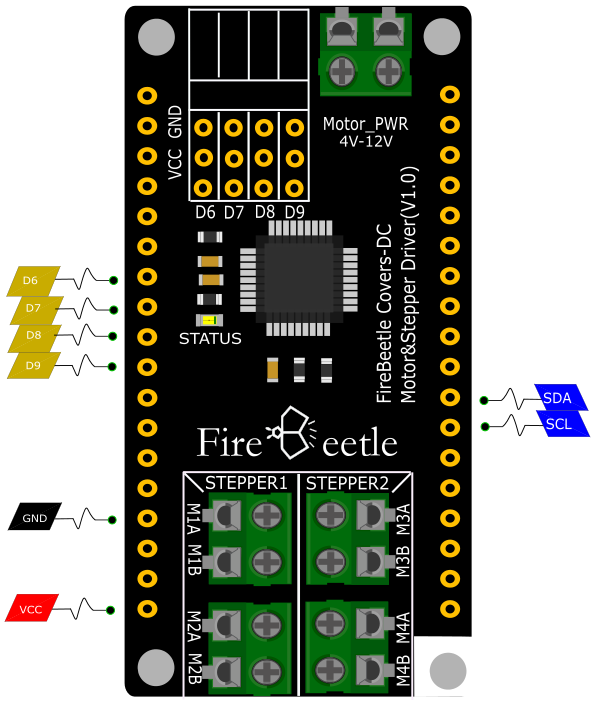
STATUS Instruction
- LED Mode1: Blink (frequency: 30Hz), indicating the motor drive chip is waiting for initialization commands from the host.
- LED Mode2: Lighting, indicating the motor drive chip works well (control motor operation and wait initialization commands from the host).
- LED Mode3: OFF, indicating communication error of the motor drive chip.
NOTE: NC means Not Connected, VCC means Output Voltage of power supply (5V-USB;3.7V-lithium battery)
Tutorial
Requirements
Take FireBeetle ESP8266 board as an example at here, other Arduino control boards such as arduino UNO, arduino Mega… are also can be used.
- Hardware
- 1 x ESP32/ESP8266 Board
- 1 x FireBeetle Covers-DC Motor&Stepper Driver
- 1 x Hybrid Stepper Motor for 3D Printer (3.5kg)
- 1 x DC Motor
- Software
DC Motor Drive
FireBeetle Covers-DC Motor&Stepper Driver can control up to 4-channel DC motors simultaneously. There are 4 marked motor connectors: M1A&M1B, M2A&M2B, M3A&M3B and M4A&M4B. We’ll show you how to control a DC motor with a Firebeetle or Arduino board.
Hardware Connection
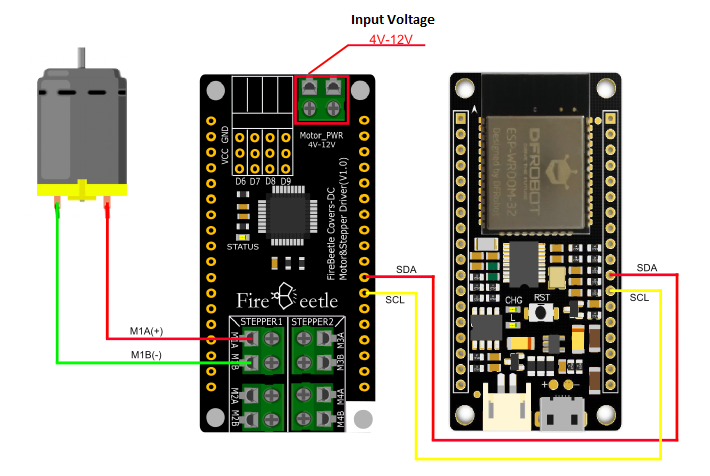
Connect the DC motor to M1A&M1B port, M1A to anode and M1B to cathode. Generally, you need to connect a motor power (4~12V) to Motor PWR port, and connect a logic power (3.3~5V) to VCC & GND pins. If you use FireBeetle, you can plug the cover on the board, and connect the external power (4~12V).
Sample Code
/*!
 * @file Motor.ino
 * @brief DFRobot's Motor Drive
 * @n The example demonstrates four groups D.C motors work together
      at the same time, contains operations such as rotation, speed
      adjustment, brakes and so on.

 * @copyright  [DFRobot](https://www.dfrobot.com), 2016
 * @copyright GNU Lesser General Public License

 * @author [LiXin]
 * @version  V1.0
 * @date  2017-7-31
 * @https://github.com/DFRobot/DFRobot_MotorStepper
 */
#include "Arduino.h"
#include "Wire.h"
#include "DFRobot_MotorStepper.h"

/*****************Keywords instruction*****************/
//M1--->motor_Group_1--->[M1A(+),M1B(-)]
//M2--->motor_Group_2--->[M2A(+),M1B(-)]
//M3--->motor_Group_3--->[M3A(+),M3B(-)]
//M4--->motor_Group_4--->[M4A(+),M4B(-)]
//CW: rotate in positive direction
//CCW: rotate in reverse
//A0: Chip Selection Address 1
//A1: Chip Selection Address 2
//A2: Chip Selection Address 3
//A3: Chip Selection Address 4
/*****************Function instruction*****************/
//void start(uint8_t dir)
  //*This function can be used to start the motor
  //*dir: Set Orientation       CW or CCW
//void speed(uint16_t val)
  //*This function is used to set the motor speed
  //*val: Set the speed       0<=val<=4096
//void stop()
  //*This function is used to stop the motor turning

DFRobot_Motor motor1(M1,A0);


void setup() {
  //initialize serial communication at 9600 bits per second:
  Serial.begin(115200);
  //join i2c bus (address optional for master)
  Wire.begin();
  //Initialize D.C motor drive chip (Group1)
  motor1.init();
}

void loop()
{
  //Setting initial velocity(Min:0  Max:4096)
  motor1.speed(4096);
  //Motor1 rotate in positive direction
  motor1.start(CW);
  delay(2000);

  //All motors rotate in reverse
  motor1.start(CCW);
  delay(2000);

  //All motors brake and stop rotating
  motor1.stop();
  delay(2000);
}
Program Function: the first group rotate in C.W.(Clockwise) for 2s and rotate in anti-clockwise for 2s, then stop for 2s and followed by recycling.
Functions:
Create a motor object
DFRobot_Motor motor1(M1) M1 represents the first group DC motor M1A(+),M1B(-)
Initiate the motor drive, read Product ID and Version ID, and print to the serial port.
init()
Set speed
speed(val) 0<=val<=4096(the maximum speed is 4096)
Set direction and start to rotate
start(dir) dir=CW: rotate in C.W.(Clockwise) dir=CCW: rotate in anti-clockwise
Stepper Motor Drive
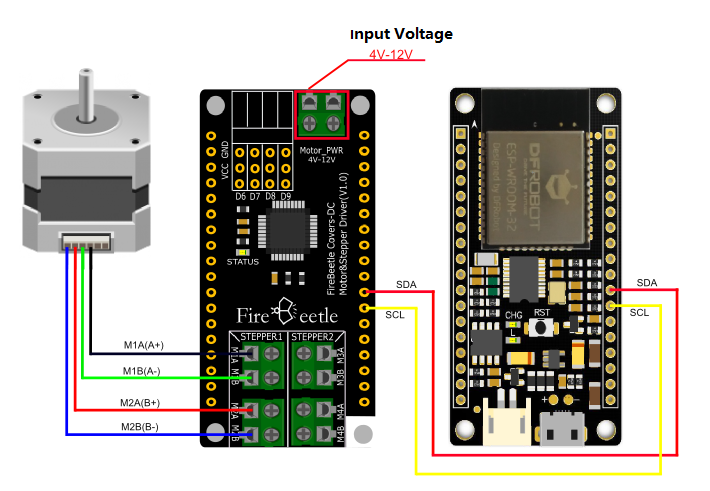
FireBeetle Covers-DC Motor&Stepper Driver can control two-channel two-phase four-wire stepper motors simultaneously. It adopts DC motor interface and control via IIC interface. The test explains the way demonstrates how to control a two-channel two-phase four-wire stepper motor by Arduino main board.
Hardware Connection
Connect the stepper motor to STEPPER1 and the power supply of motor should be 4~12V, shown as below.
Sample Code
/*!
 * @file Stepper.ino
 * @brief DFRobot's Motor Drive
 * @n The example demonstrates two groups of stepping motors (Group A and Group B) work together
      at the same time, including operations such as precision control of rotation angles, rotation
      directions etc.

 * @copyright  [DFRobot](https://www.dfrobot.com), 2016
 * @copyright GNU Lesser General Public License

 * @author [LiXin]
 * @version  V1.0
 * @date  2017-7-31
 * @https://github.com/DFRobot/DFRobot_MotorStepper
 */
#include "Arduino.h"
#include "Wire.h"
#include "DFRobot_MotorStepper.h"

/*****************Keywords instruction*****************/
//SA--->Stepper_Group_A--->[M1A(A+),M1B(A-),M2A(B+),M2B(B-)]
//SB--->Stepper_Group_B--->[M3A(A+),M3B(A-),M4A(B+),M4B(B-)]
//CW: rotate in positive direction
//CCW: rotate in reverse
//A0: Chip Selection Address 1
//A1: Chip Selection Address 2
//A2: Chip Selection Address 3
//A3: Chip Selection Address 4
/*****************Function instruction*****************/
//void start(float angle, uint16_t speed, uint8_t dir)
  //*This function can be used to start the motor
  //*angle: Set the Angle       Min:0°(If the Angle is equal to 0°,The motor will not stop spinning)
  //*speed: Set the speed       Min:8
  //*dir: Set Orientation       CW or CCW
//void getDir()
  //*This function can get the current rotation direction of the motor

DFRobot_Stepper stepperA(SA,A0);

void reverse_SA()
{
  stepperA.start(0, 12, !stepperA.getDir());
}

void setup() {
  //initialize serial communication at 9600 bits per second:
  Serial.begin(115200);
  //join i2c bus (address optional for master)
  Wire.begin();
  //Initialize drive chips of stepping motors (Group A and Group B)
  stepperA.init();
  //Setting stepping motor Group A rotate in positive direction
  stepperA.start(0, 20, CW);
}

void loop()
{
  //Stepping motor (Group A) rotate in reverse in every 2 seconds
  reverse_SA();
  delay(2000);
}
Program Function: group A stepper motor (M1A(A+), M1B(A-), M2A(B+), M2B(B-)) reverse the rotation direction in every 2s.
Functions:
Create a stepper motor object.
DFRobot_Stepper stepperA(SA) SA represents group A stepper motors (M1A(A+), M1B(A-), M2A(B+), M2B(B-))
Initiate the motor drive, read Product ID and Version ID, and print to the serial port.
init()
Set angle, speed, direction of the stepper motor rotation and start to rotate.
start(angle, speed, dir)
angle: set the rotation resolution.
The maximum resolution is  0.9°, which means the minimum rotate angle is 0.9°.
So that the motor won’t rotate if the resolution set to be 0.1° and only rotate to 0.9° if the resolution set to be 1°.
Min: 0°
Min: 0° (if the rotate angel set to be 0, the motor will keep rotating).
speed: set speed. The speed range is 0~1023. Set it to 0 and the rotate speed is 0r/min; set it to maximum 1023 and the rotate speed is 200r/min.
dir: set direction. dir=CW: rotate in C.W.(Clockwise); dir=CCW: rotate in anti-clockwise
Reverse the function of group A stepper motor
reverse_SA()
DC Motor & Stepper Motor Drive
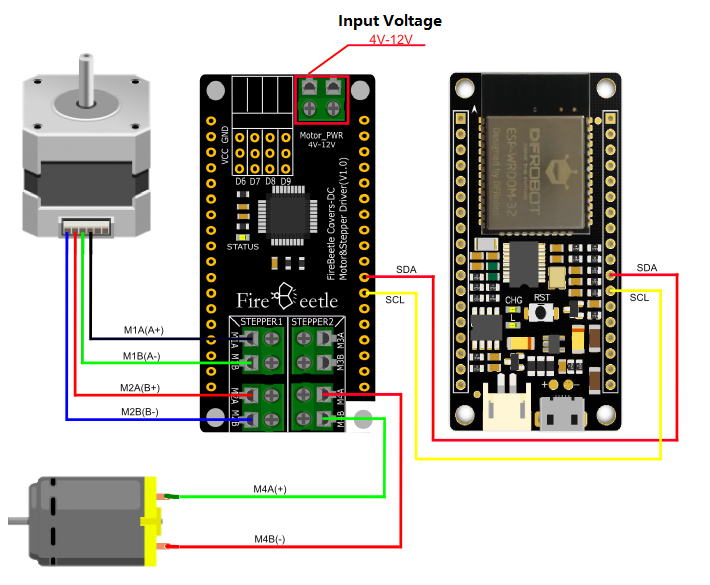
FireBeetle Covers-DC Motor&Stepper Driver can control a stepper motor and 2 DC motors simultaneously and let them work independent to each other. The test explains the way to control both stepper motor and DC motors at the same time.
Hardware Connection
Connect the stepper motor to STEPPER1 and DC motor to M4, shown as below.
Sample Code
*!
 * @file Motor_Stepper.ino
 * @brief DFRobot's Motor Drive
 * @n The example demonstrates one group of stepping motor and 2 groups
      of D.C motors work together at the same time, contains direction control
      of D.C motors and stepping motor.

 * @copyright  [DFRobot](https://www.dfrobot.com), 2016
 * @copyright GNU Lesser General Public License

 * @author [LiXin]
 * @version  V1.0
 * @date  2017-7-31
 * @https://github.com/DFRobot/DFRobot_MotorStepper
 */
#include "Arduino.h"
#include "Wire.h"
#include "DFRobot_MotorStepper.h"

/*****************Keywords instruction*****************/
//M3--->motor_Group_3--->[M3A(+),M3B(-)]
//M4--->motor_Group_4--->[M4A(+),M4B(-)]
//SA--->Stepper_Group_A--->[M1A(A+),M1B(A-),M2A(B+),M2B(B-)]
//CW: rotate in positive direction
//CCW: rotate in reverse
//A0: Chip Selection Address 1
//A1: Chip Selection Address 2
//A2: Chip Selection Address 3
//A3: Chip Selection Address 4
/*****************Function instruction*****************/
//void start(float angle, uint16_t speed, uint8_t dir)
  //*This function can be used to start the motor
  //*angle: Set the Angle       Min:0°(If the Angle is equal to 0°,The motor will not stop spinning)
  //*speed: Set the speed       Min:8
  //*dir: Set Orientation       CW or CCW
//void getDir()
  //*This function can get the current rotation direction of the motor

DFRobot_Stepper stepperA(SA,A0);
DFRobot_Motor motor4(M4,A0);

void reverse_4()
{
  motor4.start(!motor4.getDir());
}

void reverse_SA()
{
  stepperA.start(0, 12, !stepperA.getDir());
}

void setup() {
  //initialize serial communication at 9600 bits per second:
  Serial.begin(115200);
  //join i2c bus (address optional for master)
  Wire.begin();
  //Initialize motor drive chip of stepping motor (Group A) and ¾ group of D.C motor
  stepperA.init();
  motor4.init();
  //Set the initial direction
  motor4.start(CW);
  stepperA.start(0, 12, CW);
  delay(1500);
}

void loop()
{
  static int i=0;
  //motor4 reverse in every 1.5 seconds
  reverse_4();
  //Stepping motor (Group A) reverse in every 3 seconds
  if((++i%2) == 0) {
    reverse_SA();
    i=0;
  }
  delay(1500);
}
Program Function: group A stepper motors (M1A(A+), M1B(A-), M2A(B+), M2B(B-)) reverse in every 3s and group 4 DC motor (M4A(+), M4B(-))reverse in every 1.5s.
Functions:
Create a stepper motor object.
DFRobot_Stepper stepperA(SA): SA represents group A stepper motors (M1A (A+), M1B (A-), M2A (B+), M2B(B-))
Create a DC motor object.
DFRobot_Motor (M4): M4 represents group 4 DC motors (M4A (+), M4B (-))
Initiate the motor drive, read Product ID and Version ID, and print to the serial port.
init()
Set the rotation direction of the DC motor and start to rotate.
start(dir) dir=CW: rotate in C.W.(Clockwise) dir=CCW: rotate in anti-clockwise
Set angle, speed, direction of the stepper motor rotation and start to rotate.
angle: set the rotation resolution. The maximum resolution is  0.9°, which means the minimum rotate angle is 0.9°.
So that the motor won’t rotate if the resolution set to be 0.1° and only rotate to 0.9° if the resolution set to be 1°.
Min: 0° (if the rotate angel set to be 0, the motor will keep rotating).
speed: set speed. The speed range is 0~1023. Set it to 0 and the rotate speed is 0r/min; set it to maximum 1023 and the rotate speed is 200r/min.
 dir: set direction. dir=CW: rotate in C.W.(Clockwise) ; dir=CCW: rotate in anti-clockwise.
The reverse function of group 4 DC motor.
reverse_4()
The reverse function of group A stepper motor.
reverse_SA()
Definition of API Function and Macro
Macro:
Object:
M1--->the first group DC motor--->[M1A(+),M1B(-)]
M2--->the second group DC motor--->[M2A(+),M1B(-)]
M3--->the third group DC motor--->[M3A(+),M3B(-)]
M4--->the fourth group DC motor--->[M4A(+),M4B(-)]
SA--->the group A stepper motor------>[M1A(A+),M1B(A-),M2A(B+),M2B(B-)]
SB--->the group A stepper motor ------>[M3A(A+),M3B(A-),M4A(B+),M4B(B-)]
Keyword Expansion:
CW: rotate in C.W.(Clockwise)
CCW: rotate in counter clockwise
CS (Chip Select) Address
A0: the first chip select address
A1: the second chip select address
A2: the third chip select address
A3: the fourth chip select address
Function:
The library used to control DC motor and stepper motor, including C.W rotation, C.C.W rotation, speed adjustment and stopping.

1. Open drive hardware of DC motor and stepper motor, read Product ID and Version ID.
void init();
2. Shutdown the drive hardware.void shutdown();
3. Stop the motor rotation.
void stop();
4. Set the DC motor rotation direction and start rotating.
void start(uint8_t dir);dir:   set direction       CW or CCW
5. Set angle, speed, direction of the stepper motor rotation and start rotating.
void start(float angle, uint16_t speed, uint8_t dir);angle: set the rotation resolution.
The maximum resolution is 0.9° which means the minimum rotate angle is 0.9°.
So that the motor won't rotate if the resolution set to be 0.1°and only rotate to 0.9° if the resolution set to be 1°.
Min: 0° (if the rotate angel set to be 0, the motor will keep rotating).
speed: set speed. The speed range is 0~1023. Set it to 0 and the rotate speed is 0r/min;set it to maximum 1023 and the rotate speed is 200r/min.
dir: set direction. dir=CW: rotate in C.W.(Clockwise) ; dir=CCW: rotate in CCW(anti-clockwise)
6. Speed control of DC motor & stepper motor
void speed(uint16_t val);val:   set speed     motor:0<=val<=4096  stepper:0<=val<=1023
Dimension Diagram
FAQ
| Q&A | Some general Arduino Problems/FAQ/Tips |
|---|---|
| Q | How could FireBeetle Board-ESP32 control servos with Arduino? |
| A | ESP32 is incompatible with local servo library files of Arduino IDE itself, but you can download DFRobot Arduino-Servo library to enable servo drive. |
| Q | Why the program cannot be downloaded when plug the Motor Expansion Board? |
| A | FireBeetle-ESP32 Board V1.0 is conflict with the motor expansion board in RESET circuit. You need to unplug the expansion board to download and upload.And DFRobot fixed this problem in the following FireBeetle series. |
For any question/advice/cool idea to share, please visit DFRobot Forum.
