Introduction
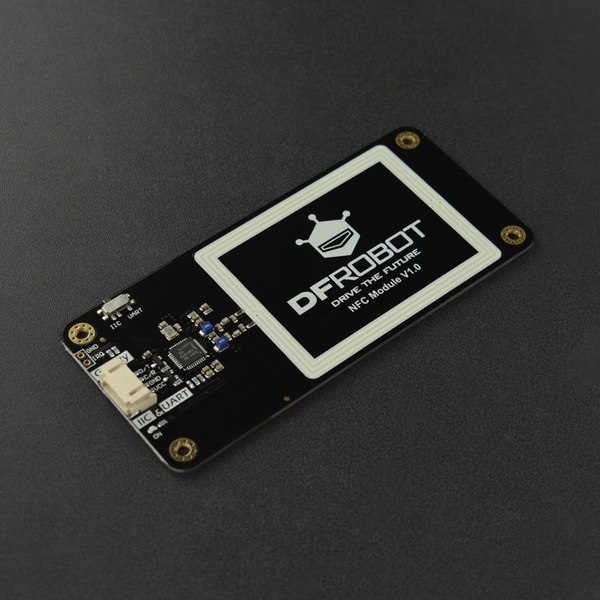
Gravity: UART & I2C NFC Module adopts NXP PN532, a highly integrated NFC communication controller, which supports various types of NFC smart cards or tags like the commonly used MIFARE Classic series and NTAG series in the market. Apart from the large PCB antenna design of better communication area and distance , the upgraded version joins the Gravity family by adopting a standard Gravity PH2.0-4P interface with I2C & UART composite rather than 2.54mm headers, making the wiring more convenient. A switch is added for conveniently switching between these two interfaces. When using the UART, you can easily read and write various NFC cards by using the common USB to UART converter and PN532 compatible PC software. When using the I2C interface, it can be used for various 3V3/5V controller such as Arduino, micro:bit, FireBeetle ESP32 and FireBeetle ESP8266.
About NFC
Near Field Communication (NFC), also known as short-range wireless communication, is a short-range high-frequency wireless communication technology that allows non-contact point-to-point data transmission (within ten centimeters) to exchange data between electronic devices. . This technology evolved from contactless radio frequency identification (RFID) and is backward compatible with RFID. It was first developed by Sony and Philips, and is mainly used to provide M2M (Machine to Machine) communication in handheld devices such as mobile phones. Because of the natural security of near field communication, NFC technology is widely used in POS mobile payment, bus cards, bank cards, access cards, water cards and other occasions.
Features
- NXP highly integrated NFC controller
- Gravity I2C & UART composite interface, flexible use
- Support various kinds of mainstream NFC smart cards or tags
- Compatible with 3.3V/5V controller
Application
- Contactless payment system
- Links for Bluetooth and WiFi devices
- Social sharing features like contacts, photos, and videos
- Smart phone NFC application
Specification
- IC: NXP PN532
- Input Voltage (VCC) : 3.3V~5.5V
- Interface: Gravity I2C & UART (PH2.0-4P, Logic Level 0-3.3V)
- UART Baud Rate: 115200 bps
- I2C Address: 0x48
- Communication Frequency: 13.56 MHz
- Maximum Communication Distance: ≥10mm,depend on the size of the NFC card/tag
- Protocol Support:
- Reader/Writer Mode: ISO/IEC 14443A, ISO/IEC 14443B, MIFARE, FeliCa
- Card Emulation Mode: ISO 14443A/MIFARE Classic 1K or 4K, FeliCa
- Peer-to-Peer: ISO/IEC18092, ECM340
- Dimension: 110 ×50 mm / 4.33×1.97 in
- Weight: 20 g
Board Overview
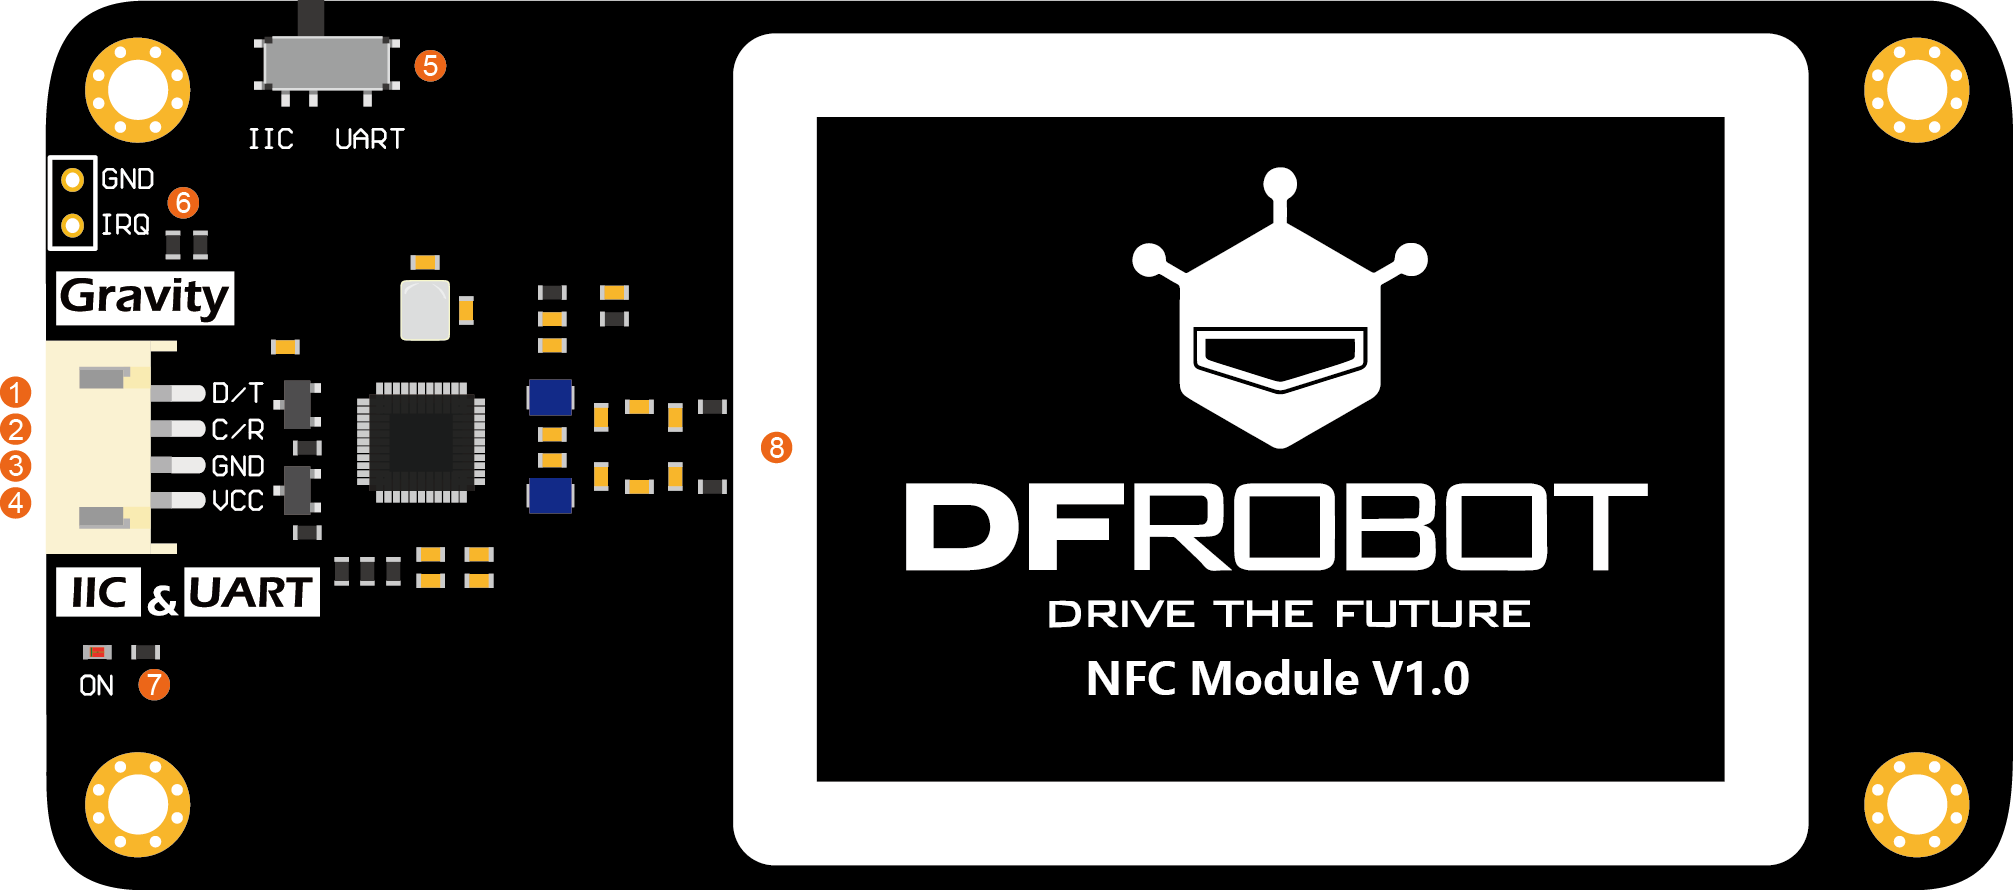
| No. | Label | Description |
|---|---|---|
| 1 | D/T | I2C data SDA or UART transmission TXD |
| 2 | C/R | I2C clock SCL or UART receive RXD |
| 3 | GND | Power negative |
| 4 | VCC | Power positive (3.3V ~ 5.5V) |
| 5 | / | I2C/UART selector |
| 6 | IRQ | Interruption output |
| 7 | ON | Power indicator (red) |
| 8 | / | NFC antenna |
Quick Start
Read/write S50 NFC Card
- First use the NFC module to write data to the NFC card. Connect UNO to the NFC module via IIC according to the first wiring diagram below, and toggle the switch to IIC.
- Download and install the DFRobot_PN532 library and upload the sample program below.
#include <DFRobot_PN532.h>

#define BLOCK_SIZE       16
#define  PN532_IRQ        2
#define  INTERRUPT        1
#define  POLLING          0
// The block to be read
#define  READ_BLOCK_NO    2

DFRobot_PN532_IIC  nfc(PN532_IRQ, POLLING);
uint8_t dataRead[16] = {0};

void setup() {
  Serial.begin(115200);
  Serial.print("Initializing");
  while (!nfc.begin()) {
    Serial.print(".");
    delay (1000);
  }
  Serial.println();
  Serial.println("Waiting for a card......");
}
void loop() {
  // For S50 card/tag, block 1-2, 4-6, 8-10, 12-14... 56-58, 60-62 are for user data
  // You can read/write these blocks freely.
  // Use "MifareClassic_ReadAllMemory.ino" to check all the blocks
  if (nfc.scan()) {
    if (nfc.readData(dataRead, READ_BLOCK_NO) != 1) {
      Serial.print("Block ");
      Serial.print(READ_BLOCK_NO);
      Serial.println(" read failure!");
    }
    else {
      Serial.print("Block ");
      Serial.print(READ_BLOCK_NO);
      Serial.println(" read success!");

      Serial.print("Data read(string):");
      Serial.println((char *)dataRead);
      Serial.print("Data read(HEX):");
      for (int i = 0; i < BLOCK_SIZE; i++) {
        Serial.print(dataRead[i], HEX);
        Serial.print(" ");
        dataRead[i] = 0;
      }
      Serial.println();
    }
    delay(500);
  }
}
- Open the serial port monitor and set the baud rate to 115200.
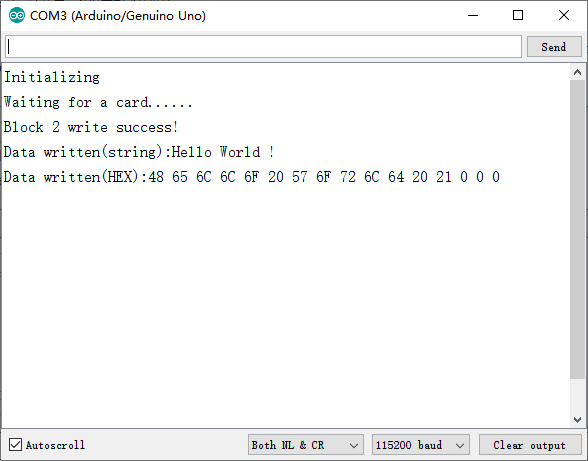
- Place the S50 NFC card on the sensing area of the module. If the card is correctly written, it will be like this:
- Upload the sample program below to read the information just written in the card.
#include <DFRobot_PN532.h>

#define  BLOCK_SIZE         16
#define  PN532_IRQ          2
#define  INTERRUPT          1
#define  POLLING            0
// The block to be written
#define  WRITE_BLOCK_NO      2

DFRobot_PN532_IIC  nfc(PN532_IRQ, POLLING);

uint8_t dataWrite[BLOCK_SIZE] = {"Hello World !"};

void setup() {
  Serial.begin(115200);
  Serial.print("Initializing");
  while (!nfc.begin()) {
    Serial.print(".");
    delay (1000);
  }
  Serial.println();
  Serial.println("Waiting for a card......");
}
void loop() {
  // For S50 card/tag, block 1-2, 4-6, 8-10, 12-14... 56-58, 60-62 are for user data
  // You can read/write these blocks freely.
  // Use "MifareClassic_ReadAllMemory.ino" to check all the blocks
  if (nfc.scan()) {
    if (nfc.writeData(WRITE_BLOCK_NO, dataWrite) != 1) {
      Serial.print("Block ");
      Serial.print(WRITE_BLOCK_NO);
      Serial.println(" write failure!");
    }
    else {
      Serial.print("Block ");
      Serial.print(WRITE_BLOCK_NO);
      Serial.println(" write success!");
      Serial.print("Data written(string):");
      Serial.println((char *)dataWrite);
      Serial.print("Data written(HEX):");
      for (int i = 0; i < BLOCK_SIZE; i++) {
        Serial.print(dataWrite[i], HEX);
        Serial.print(" ");
      }
    }
  }
  delay(500);
}
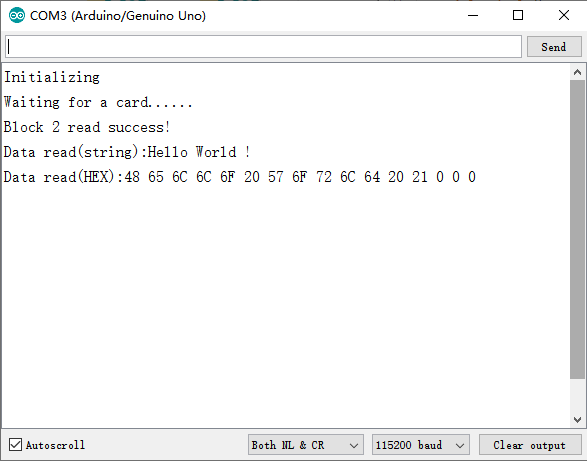
- Put the NFC card on the sensing area. If the card is correctly read, the program will print the info just written to the card.
- In addition, the following points are worth noting during use.
- The program reads and writes to the NFC card by Blocks (also called pages in some datasheet) . Each time a block is read or written. Each block has 16 bytes and a total of 64 blocks for S50 card. Part of the Blocks are used for the memory card serial number, read/write and encryption control words. Therefore, the S50 card, which is labeled as 1KB capacity, has only 752 Bytes of space available for users to read and write. In fact, all NFC cards/tags available user memory is less than the nominal capacity. For more details, see the memory organization part in the datasheets of different NFC cards.
- For the S50 card, blocks available for read/write freely are 1-2, 4-6, 8-10, 12-14,..., 56-58, 60-62, a total of 47 blocks. The macro definition READ_BLOCK_NO or WRITE_BLOCK_NO in the sample program is 2, indicating that the block 2 is read and written.
Arduino Tutorial
This tutorial presents a basic usage of the module with Arduino UNO.
Requirements
-
Hardware
- DFRduino UNO R3 or DFRobot Mega 2560 V3.0 x 1
- Gravity: UART & I2C NFC Module x 1
- Gravity 4P sensor wire (or Dupont wires) x 1
- USB to TTL Converter x 1
-
Software
Connection Diagram
- I2C interface: turn the switch to the left. I2C interface is mainly used for communication with various 3.3V/5V controllers by programming.
.png)
- UART interface: turn the switch to the right. The UART interface is mainly used to communicate with the PC through the USB to serial port convert to read, write or copy various NFC smart tags/cards, but it can also communicate with various 3.3V/5V controllers by programming. The connection diagram is based on the Arduino Mega2560. Note that the module's D/T and USB to serial port module's RXD, C/R and TXD are connected respectively.
.png)
.png)
Attention
- Every time switching the interfaces, you need to reset the controller to communicate normally.
- Because UNO only has one serial port for communication with the PC, the maximum speed of its soft serial port is only 38400, which can't reach 115200 of the serial port of the NFC module. Please use the I2C interface instead.
- The chip may become hot during working. DO NOT touch or cover it.
Example Codes
- The following three examples show the basic operation of the module for the commonly used MIFARE Classic S50 card. For more functions, see the examples of the DFRobot_PN532 library.
Read the Basic Info of the NFC Card
- According to the first connection diagram, connect UNO to the NFC module through IIC, and turn the switch to IIC.
- Download and install the DFRobot_PN532 library and upload the codes below.
- Open the Serial Monitor and set the baud rate to 115200.
- Place the attached NFC card on the sensing area and observe the data printed to the serial.
/*!
    @flie NFC_cardinfo.ino
    @Copyright   [DFRobot](https://www.dfrobot.com), 2016
    @Copyright   GNU Lesser General Public License
    @version  V1.0
    @date  07/03/2019

    @brief This demo runs on the arduino platform.
           Download this demo to read the basic information of the card,
           including UID, manufacturer, storage space, RF technology etc.

           Suported NFC card/tag:
           1.MIFARE Classic S50/S70
           2.NTAG213/215/216
           3.MIFARE Ultralight

    This demo and related libraries are for DFRobot Gravity: I2C&UART NFC Module
    Product(CH): https://www.dfrobot.com.cn/goods-2029.html
    Product(EN): https://www.dfrobot.com/product-1905.html
*/
#include <DFRobot_PN532.h>

#define  BLOCK_SIZE      16
#define  PN532_IRQ      (2)
#define  INTERRUPT      (1)
#define  POLLING        (0)
// Use this line for a breakout or shield with an I2C connection
// Check the card by polling
DFRobot_PN532_IIC  nfc(PN532_IRQ, POLLING);
struct card NFCcard;

void setup() {

  Serial.begin(115200);
  //Initialize the NFC module
  while (!nfc.begin()) {
    Serial.println("initial failure");
    delay (1000);
  }
  Serial.println("Please place the NFC card/tag on module..... ");
}

void loop() {
  //Scan, write and read NFC card every 2s
  //Print all what is to be written and read

  if (nfc.scan()) {
    //Read the basic information of the card
    NFCcard = nfc.getInformation();
    Serial.println("----------------NFC card/tag information-------------------");
    Serial.print("UID Lenght: "); Serial.println(NFCcard.uidlenght);
    Serial.print("UID: ");
    for (int i = 0; i < NFCcard.uidlenght; i++) {
      Serial.print(NFCcard.uid[i], HEX);
      Serial.print(" ");
    }
    Serial.println("");
    Serial.print("AQTA: "); Serial.print("0x"); Serial.print("0"); Serial.print(NFCcard.AQTA[0], HEX); Serial.print(""); Serial.println(NFCcard.AQTA[1], HEX);
    Serial.print("SAK: "); Serial.print("0x"); Serial.println(NFCcard.SAK, HEX);
    Serial.print("Type: "); Serial.println(NFCcard.cardType);
    Serial.print("Manufacturer:"); Serial.println(NFCcard.Manufacturer);
    Serial.print("RF Technology:"); Serial.println(NFCcard.RFTechnology);
    Serial.print("Memory Size:"); Serial.print(NFCcard.size); Serial.print(" bytes(total)/"); Serial.print(NFCcard.usersize); Serial.println(" bytes(available)");
    Serial.print("Block/Page Size:"); Serial.print(NFCcard.blockSize); Serial.println(" bytes");
    //Serial.print("Sector Size:"); Serial.print(NFCcard.sectorSize); Serial.println(" bytes");
    Serial.print("Number of Blocks/pages:"); Serial.println(NFCcard.blockNumber);
  }
  else {
    //Serial.println("no card!");
  }
  delay(2000);
}
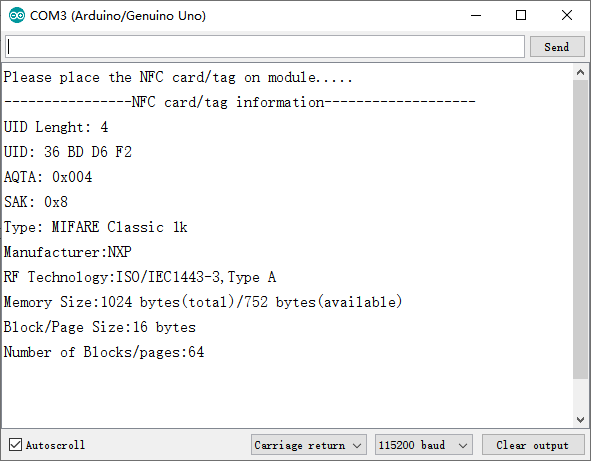
Results
- Basic info such as the size and protocol of the NFC card is displayed. Currently supported NFC cards/tags include:
- MIFARE Classic S50/S70
- MIFARE Ultralight
- NTAG213/215/216
Read and Write MIFARE Classic S50 NFC Card with IIC
- According to the first connection diagram, connect UNO to the NFC module through IIC, and turn the switch to IIC.
- Download and install the DFRobot_PN532 library and upload the codes below.
- Open the Serial Monitor and set the baud rate to 115200.
- Place the attached NFC card on the sensing area and observe the data printed to the serial.
/*!
    @flie MifareClassic_ReadWrite.ino
    @Copyright   [DFRobot](https://www.dfrobot.com), 2016
    @Copyright   GNU Lesser General Public License
    @version  V1.0
    @date  07/03/2019

    @brief This demo runs on the arduino platform.
           Download this demo to learn how to wirte data to card.
           We can read the data on the card to see if the write is successful.

    This demo and related libraries are for DFRobot Gravity: I2C NFC Module
    Product(CH): https://www.dfrobot.com.cn/goods-2029.html
    Product(EN): https://www.dfrobot.com/product-1905.html
*/
#include <DFRobot_PN532.h>

#define BLOCK_SIZE      16
#define  PN532_IRQ      (2)
#define  INTERRUPT      (1)
#define  POLLING        (0)
//use this line for a breakout or shield with an I2C connection
//check the card by polling
DFRobot_PN532_IIC  nfc(PN532_IRQ, POLLING);
uint8_t dataWrite[BLOCK_SIZE] = {"DFRobot NFC"};
uint8_t dataRead[16] = {0};
struct card NFCcard;

void setup() {

  Serial.begin(115200);
  while (!nfc.begin()) {
    Serial.println("initial failure");
    delay (1000);
  }
  Serial.println("Waiting for a card......");
}
void loop() {
  //Scan, write and read NFC card every 2s
  //Print all what is to be written and read
  if (nfc.scan()) {
    NFCcard = nfc.getInformation();
    if ((NFCcard.AQTA[1] == 0x02 || NFCcard.AQTA[1] == 0x04)) {
      Serial.print("Data to be written(string):");
      Serial.println((char *)dataWrite);
      Serial.print("Data to be written(HEX):");
      for (int i = 0; i < BLOCK_SIZE; i++) {
        Serial.print(dataWrite[i], HEX);
        Serial.print(" ");
      }
      Serial.println();
      //Write data(16 bytes) to sector 1
      if (nfc.writeData(2, dataWrite) != 1) {
        Serial.println("write failure!");
      }

      //Read sector 1 to verify the write results
      nfc.readData(dataRead, 2);
      Serial.print("Data read(string):");
      Serial.println((char *)dataRead);
      Serial.print("Data read(HEX):");
      for (int i = 0; i < BLOCK_SIZE; i++) {
        Serial.print(dataRead[i], HEX);
        Serial.print(" ");
        dataRead[i] = 0;
      }
      Serial.println();
    }
    else {
      Serial.println("The card type is not mifareclassic...");
    }
  }
  else {
    //Serial.println("no card");
  }
  delay(2000);
}
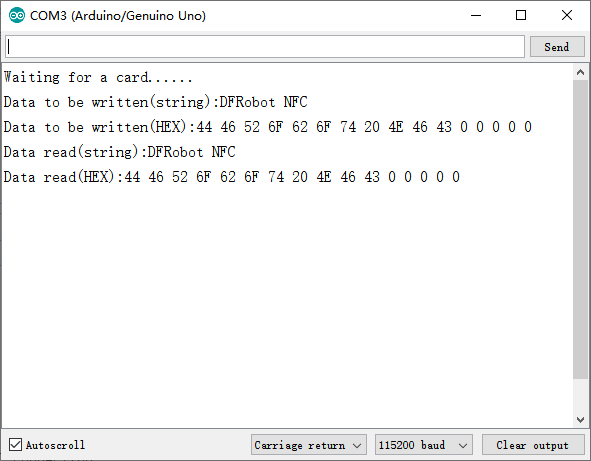
Results
- A string is written to the cards and then read out.
Read and Write MIFARE Classic S50 NFC Card with IIC and Interrupt
- According to the first connection diagram, connect UNO to the NFC module through IIC, and turn the switch to IIC. Connect D2 of UNO to the pin IRQ of NFC module
- Download and install the DFRobot_PN532 library and upload the codes below.
- Open the Serial Monitor and set the baud rate to 115200.
- Place the attached NFC card on the sensing area and observe the data printed to the serial.
/*!
    @flie read_S50_INTERRUPT.ino
    @Copyright   [DFRobot](https://www.dfrobot.com), 2016
    @Copyright   GNU Lesser General Public License
    @version  V1.0
    @date  07/03/2019

    @brief This demo runs on the arduino uno platform
           Download this demo to learn how to read data on card and read data by interrupt.

           We can read the data on the card to see if the write is successful

    This demo and related libraries are for DFRobot Gravity: I2C&UART NFC Module
    Product(CH): https://www.dfrobot.com.cn/goods-2029.html
    Product(EN): https://www.dfrobot.com/product-1905.html
*/
#include <DFRobot_PN532.h>

#define BLOCK_SIZE      16
#define  PN532_IRQ      (2)
#define  INTERRUPT      (1)
#define  POLLING        (0)
//use this line for a breakout or shield with an I2C connection
//check the card by interruption
DFRobot_PN532_IIC  nfc(PN532_IRQ, INTERRUPT);
uint8_t dataWrite[BLOCK_SIZE] = {"DFRobot NFC"};
uint8_t dataRead[16] = {0};
struct card NFCcard ;

void setup() {
  Serial.begin(115200);
  while (!nfc.begin()) {
    Serial.println("initial failure");
    delay (1000);
  }
  Serial.println("Waiting for a card......");
}

void loop() {
  //Print all what is to be written and read
  if (nfc.scan() == true) {

    NFCcard = nfc.getInformation();
    if (NFCcard.AQTA[1] == 0x02 || NFCcard.AQTA[1] == 0x04) {
      Serial.print("Data to be written(string):");
      Serial.println((char *)dataWrite);
      Serial.print("Data to be written(HEX):");
      for (int i = 0; i < BLOCK_SIZE; i++) {
        Serial.print(dataWrite[i], HEX);
        Serial.print(" ");
      }
      Serial.println();
      //Write data(16 bytes) to sector 1
      if (nfc.writeData(2, dataWrite) != 1) {
        Serial.println("write failure!");
      }

      //Read sector 1 to verify the write results
      nfc.readData(dataRead, 2);
      Serial.print("Data read(string):");
      Serial.println((char *)dataRead);
      Serial.print("Data read(HEX):");
      for (int i = 0; i < BLOCK_SIZE; i++) {
        //data[i] =  dataRead[i];
        Serial.print(dataRead[i], HEX);
        Serial.print(" ");
        dataRead[i] = 0;
      }
    }
    else {
      Serial.println("The card type is not mifareclassic...");
    }
  }
  else {
    //Serial.println("no card");
  }
  delay(1000);
}
Results
- A string is written to the cards and then read out.

Read and Write MIFARE Classic S50 NFC Card with UART
- According to the first connection diagram, connect UNO to the NFC module through UART, and turn the switch to UART.
- Download and install the DFRobot_PN532 library and upload the codes below.
- Open the Serial Monitor and set the baud rate to 115200.
- Place the attached NFC card on the sensing area and observe the data printed to the serial.
/*!
    @flie read_S50_uart.ino
    @Copyright   [DFRobot](https://www.dfrobot.com), 2016
    @Copyright   GNU Lesser General Public License
    @version  V1.0
    @date  07/03/2019

    @brief This demo runs on the Arduino MEGA2560 platform.
           Download this demo to learn how to read data on card and read data through serial ports.
           Read the data on the card to see if the write is successful.

    This demo and related libraries are for DFRobot Gravity: I2C&UART NFC Module
    Product(CH): https://www.dfrobot.com.cn/goods-2029.html
    Product(EN): https://www.dfrobot.com/product-1905.html
*/
#include <DFRobot_PN532.h>

#define BLOCK_SIZE 16
//Initialize MEGA2560
DFRobot_PN532_UART  nfc;
struct card NFCcard ;

void setup() {
  Serial.begin(115200);
  while (!nfc.begin(&Serial3)) {
    Serial.println("initial failure");
    delay (1000);
  }
  Serial.println("Waiting for a card......");
}

uint8_t dataWrite[BLOCK_SIZE] = {"DFRobot NFC"};   /*Write data page */
uint8_t dataRead[16] = {0};

void loop() {
  //Scan, write and read NFC card every 2s
  //Print all what is to be written and read

  if (nfc.scan() == true) {

    NFCcard = nfc.getInformation();
    if (NFCcard.AQTA[1] == 0x02 || NFCcard.AQTA[1] == 0x04) {
      Serial.print("Data to be written(string):");
      Serial.println((char *)dataWrite);
      Serial.print("Data to be written(HEX):");
      for (int i = 0; i < BLOCK_SIZE; i++) {
        Serial.print(dataWrite[i], HEX);
        Serial.print(" ");
      }
      Serial.println();
      //Write data(16 bytes) to sector 1
      if (nfc.writeData(2, dataWrite) != 1) {
        Serial.println("write failure!");
      }

      //Read sector 1 to verify the write results
      nfc.readData(dataRead, 2);
      Serial.print("Data read(string):");
      Serial.println((char *)dataRead);
      Serial.print("Data read(HEX):");
      for (int i = 0; i < BLOCK_SIZE; i++) {
        //data[i] =  dataRead[i];
        Serial.print(dataRead[i], HEX);
        Serial.print(" ");
      }
    }
    else {
      Serial.println("The card type is not mifareclassic...");
    }
  }
  else {
    //Serial.println("no card");
  }
  delay(2000);
}
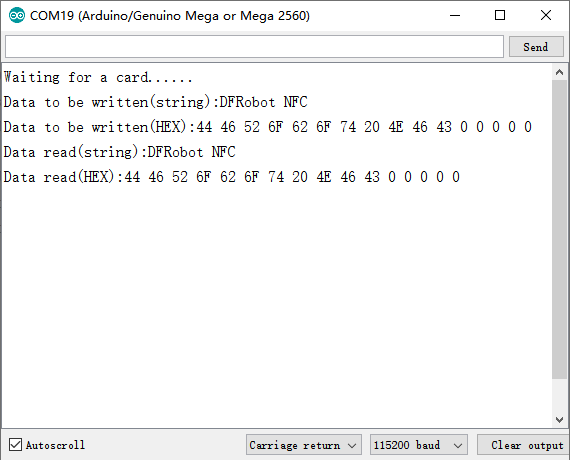
Results
- A string is written to the cards and then read out.
FAQ
For any questions, advice or cool ideas to share, please visit the DFRobot Forum.
