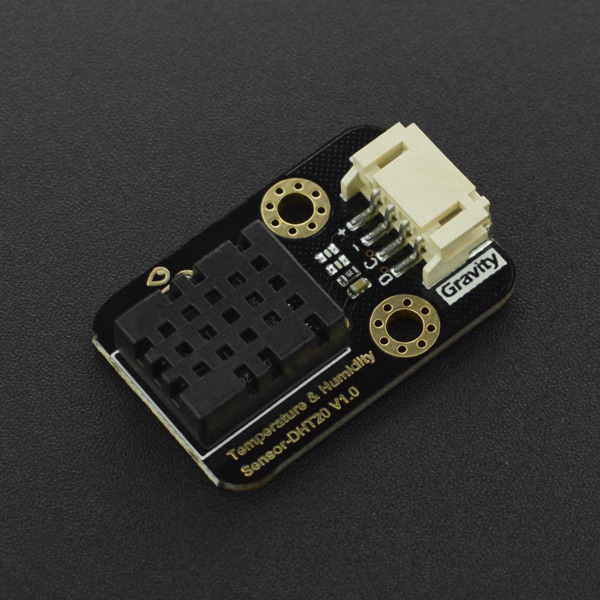
Introduction
The DHT20 temperature & humidity sensor is the newly upgraded version of the DHT11. The DHT20 features a brand-new ASIC dedicated chip, an improved MEMS semiconductor capacitive humidity sensor element and a standard on-chip temperature element. All sensors are factory calibrated and characterized by low power, high precision & stability, fast response, and strong anti-interference. Moreover, the DHT20 performance parameters of accuracy, power supply voltage, measurement range and response time have been enhanced greatly over the previous generation, making it more cost-effective. Besides that, the DHT20 temperature & humidity sensor employs I2C digital output protocol, which is very suitable for HVAC, automobiles, data loggers, weather stations, home appliances, and other related temperature and humidity detection and controlled areas.
Features
- Compatible with 3.3~5.5 V main controller.
- Factory calibration
- I2C digital output
- An excellent long-term stability
- Quick response, strong anti-interference ability
- Low power, low cost
- Compatible with mainboards like Arduino, micro:bit, ESP-32, control board and Raspberry Pi.
Specification
- Operating Voltage: 3.3V ~ 5.5V DC
- Operating Current: <1mA
- Output Signal: I2C (0×38)
- Temperature Range: -40 ~ +80°C ± 0.5°C
- Humidity Range: 0 ~ 100%RH ± 3%RH (25°C)
- Resolution: 0.01 ℃, 0.024%RH
- Storage Condition: 10°C-50°C, 20-60%RH
- Circuit Board Dimension: 22×33mm/0.87×1.30"
- Mounting Hole Size: Inner diameter 3.1 mm (0.12")/Outer diameter 6mm (0.24")
Board Overview

| Num | Label | Description |
|---|---|---|
| 1 | D | I2C data line SDA |
| 2 | C | I2C clock line SCL |
| 3 | - | GND power negative |
| 4 | + | Power positive |
Tutorial for Arduino
Download the program to UNO, open the serial monitor to check temperature and humidity.
Requirements
-
Hardware
- DFRduino UNO R3 (or similar) x 1
- SEN0497 Temperature and Humidity Sensor - DHT20 ×1
- Gravity 4Pin Sensor Connector ×1
-
Software
- Arduino IDE
- Download and install the DFRobot DHT20 Library. (About how to install the library?)
Read Sensor Data
Connection Diagram

Sample Code
-
Connect the module with Arduino according to the diagram above. Of course, you can also use it with Gravity I/O Expansion Shield, which can complete the project prototype more conveniently and quickly.
-
Download and install the DFRobot DHT20 Library. (About how to install the library?)
-
Open Arduino IDE, upload the code below to Arduino UNO.
-
Open the serial monitor of Arduino IDE, set the baud rate to 115200, then observe the result printed by the serial port.
/*!
 *@file getData.ino
 *@brief Read ambient temperature and relative humidity and print them to serial port.
 *@copyright   Copyright (c) 2010 DFRobot Co.Ltd (http://www.dfrobot.com)
 *@licence     The MIT License (MIT)
 *@author [fengli]([email protected])
 *@version  V1.0
 *@date  2021-6-24
 *@get from https://www.dfrobot.com
 *@https://github.com/DFRobot/DFRobot_DHT20
*/

#include <DFRobot_DHT20.h>
/*!
 * @brief Construct the function
 * @param pWire IC bus pointer object and construction device, can both pass or not pass parameters, Wire in default.
 * @param address Chip IIC address, 0x38 in default.
 */
DFRobot_DHT20 dht20;
void setup(){

  Serial.begin(115200);
  //Initialize sensor
  while(dht20.begin()){
    Serial.println("Initialize sensor failed");
    delay(1000);
  }
}

void loop(){
  //Get ambient temperature
  Serial.print("temperature:"); Serial.print(dht20.getTemperature());Serial.print("C");
  //Get relative humidity
  Serial.print("  humidity:"); Serial.print(dht20.getHumidity()*100);Serial.println(" %RH");

  delay(1000);

}
Expected Results
Open the serial monitor and set the baud rate to 115000, then you can see the temperature and humidity data.

FAQ
| Q1: After uploading the code, there is no data output or the output value is obviously wrong? |
|---|
| A: Caused by power fluctuations,first connect the sensor to the controller, and then supply power to the entire system to solve the problem |
For any questions, advice or cool ideas to share, please visit the DFRobot Forum.
