Introduction
This wind speed sensor is a professional meteorological instrument used to measure horizontal wind speed within 0~32.4m/s. It integrates a hall sensor inside. The shell and wind cups are made of aluminum alloy material and use special mold precision die casting process, featuring small dimension tolerance and high surface accuracy. The sensor internal circuit is protected, which makes the sensor have the properties of high strength, weather resistance, anti-corrosion, and waterproof. The cable connector adopts corrosion-resistant military plug that ensures the long service life of the product.
A low-inertia anemometer is used to sense the wind speed. When the wind blows the wind cup to rotate, it drives the axle magnet to rotate through the shaft, then the accurate wind speed information can be obtained after calculation. This high-cost performance sensor can be widely used in meteorology, ocean, environment, airports, ports, laboratories, industry, agriculture and transportation.
Features
- Compact size, easy to carry, easy to install
- The surface of aluminum alloy material is sprayed with plastic. Corrosion and high temperature resistance
- Imported bearings, low resistance, low start-up wind speed
- High measurement accuracy, wide range, good stability
- Reasonable structure design, good appearance quality
- Long signal transmission distance, strong anti-interference ability
Specification
- Measuring range: 0~32.4m/s
- Start-up wind speed: 0.2-0.4m/s
- Accuracy: ±0.3m/s
- Lead length: 2.5m/98.43”
- Power voltage: 7-24V
- Communication protocol: RS485 interface Modbus protocol
Dimension

Tutorial
1. Wire Color Description
| Color | Function |
|---|---|
| Red | Positive |
| Black | Negative |
| Yellow | RS485+/A/T+ |
| Green | RS485-/B/T- |
2. Modbus Protocol
-
The default communication parameters are: baud rate 9600bps, one start bit, 8 data bits, no parity, and one stop bit.
-
Modbus Register
| Parameter | Register Add | Function Type | Function No. | Parameter Range & Description | Default Value |
|---|---|---|---|---|---|
| Wind Direction Value | 0x0000 | INT16 RO | 0x03/reading | 0-324 | None |
| Modbus Slave Address | 0x1000 | INT16 reading-and-writing | 0x03/reading0x10/writing | 0-255 | 2 |
- Modbus Register Parameter Instruction
| Wind Direction Value | ||
|---|---|---|
| Parameter Range | 0-324 | Default Value: none |
| Parameter Storage | None |
Meaning: wind direction measuring value
Example: If the returned value is 00 25 (hexadecimal, original code) = 0x0025 = 37, then the wind speed measuring value is 37/10=3.7m/s
| Modbus Slave Add (ADDRESS) | ||
|---|---|---|
| Parameter Range | 0-255 | Default Value: 2 |
| Parameter Storage | Save immediately |
- Example
- Read register 0x0000, that is the measuring value of the wind direction
Host query frame (hexadecimal): 02 03 02 00 00 00 01 84 39 (8byt)
| Slave Add | Function Code | Register Start Add | Length of Register | High Bit of Check Code | Low Bit of Check Code |
|---|---|---|---|---|---|
| 1byt | 1byt | 2byt | 2byt | 1byt | 1byt |
| 0×02 | 0x03 | 0x00 0x00 | 0x00 0x01 | 0x84 | 0x39 |
Slave response frame (hexadecimal): 02 03 02 00 25 3D 9F (7byt)
| Slave Add | Function Code | Number of Valid Bytes | Data Aera | High Bit of Check Code | Low Bit of Check Code |
|---|---|---|---|---|---|
| 1byt | 1byt | 1byt | 2byt | 1byt | 1byt |
| 0×02 | 0x03 | 0x02 | 0x00 0x25 | 0x3D | 0x9F |
The wind speed value is (hexadecimal, original code) 00 25 = 0x0025 = 37, then the wind speed measuring value is 37/10 = 3.7m/s
- Modify register 0x1000, which is the Modbus slave address (ADDRESS)
Modify the Modbus slave address to 03
Host query frame (hexadecimal): 00 10 10 00 00 01 02 00 03 FA 00 (11byt)
| Slave Add | Function Code | Register Start Add | Length of Register | Number of Valid Bytes | Slave Address Written-in | High Bit of Check Code | Low Bit of Check Code |
|---|---|---|---|---|---|---|---|
| 1byt | 1byt | 2byt | 2byt | 1byt | 2byt | 1byt | 1byt |
| 0x00 | 0x10 | 0x10 0x00 | 0x00 0x01 | 0x02 | 0x00 0x03 | FA | 00 |
Slave response frame (hexadecimal): 00 10 10 00 00 01 04 D8 (7byt), that is, the modification is successful. After setting, you need to re-power on and restart the transmitter to make this address take effect.
Using in Raspberry Pi
1. Connection
Here USB to RS485 Module is used.

2. Install libraries and download routines
Type the following commands in the terminal one by one
cd /tmp
wget https://project-downloads.drogon.net/wiringpi-latest.deb   //Download wiringpi library
sudo dpkg -i wiringpi-latest.deb  //Install wiringpi library
cd .....                                                     //Enter the content you want to save file in
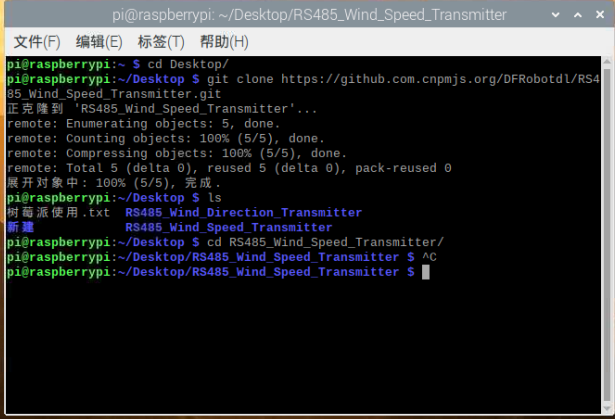
git clone https://github.com/DFRobotdl/RS485_Wind_Speed_Transmitter.git     //Download program in github
cd RS485_Wind_Speed_Transmitter/

3. API Function List
    /**
      @brief  initialize serial port
      @param  device Address of serial port,In Linux, it is the directory where the device is located.
      @return  Return 1 for initialization failure, and return 0 for initialization success
    */
    unsigned char Init(char *device);

    /**
      @brief  Modify address
      @param  Address1 For the current address, you can set any address with 0 address
      @param  Address2 The modified address.
      @return  A return value of 1 indicates success, and a return value of 0 indicates failure
    */
    unsigned char ModifyAddress(unsigned char Address1, unsigned char Address2);

    /**
      @brief  Read wind speed
      @param  Address The address where you want to read the data
      @return  The return value ≥0 indicates successful reading, the return value is wind speed, and the return value -1 indicates failed reading
    */
    float readWindSpeed(unsigned char Address);
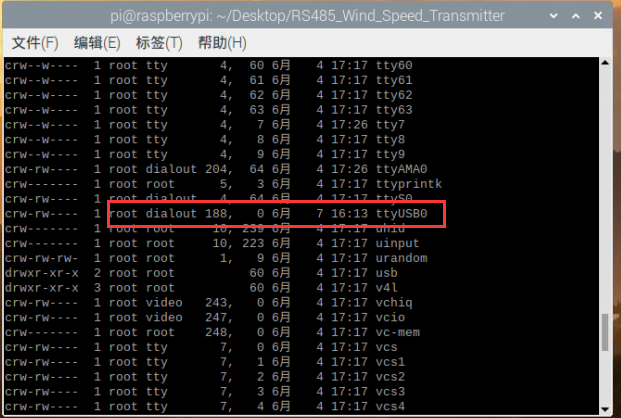
4. Check the device
Type this in the terminal:
sudo ls -l /dev
Find out the device you just connected in.

5. Open the previously downloaded min.c file, change the device port in the program to the actual one and save it

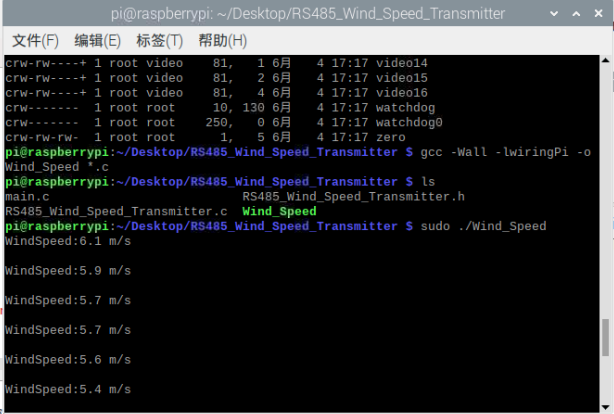
6. Use the terminal to open the folder where the program is located, compile and run
gcc -Wall -lwiringPi -o Wind_Speed *.c
sudo ./Wind_Speed
You can see the accurate wind speed information
 S
S
FAQ
For any questions, advice or cool ideas to share, please visit the DFRobot Forum.
