Introduction
The micro thermal printer uses thermal technology, does not need to add toner or ink, has stable performance, is compact and saves space. Micro thermal printers are widely used in instrumentation, food testing, shopping terminals and other scenarios. It is used in ATM machines, lockers, POS, supermarket electronic scales and takeaway machines in life. The printer uses a 9~24V wide voltage power supply method. The higher the voltage, the clearer the printing effect. It is suitable for thermal paper rolls with a width of 58MM and a printing life of up to 50 kilometers. It supports Arduino, Raspberry Pi and Windows serial port and driver printing. We can refer to the instruction set and use the USB serial port or TTL communication interface to send corresponding instructions to the thermal printer. The printer can instantly print out the text, characters, barcodes, QR codes and even black and white pictures you need according to the instructions; We can connect it to the Arduino controller or Raspberry Pi using the serial port. When used with various sensors, you can DIY practical instruments and equipment such as electronic scales, blood pressure index measuring instruments, soil element analyzers and driving recorders. We can also make a receipt printer of our own. The content on the receipt is up to you to define. After development, it can even realize remote printing function;
 NOTE:
NOTE:
The higher the voltage of the embedded thermal printer, the faster the printing speed, and the clearer the printed documents (the voltage range is 9-24V). At the same time, the normal working current of the product fluctuates between 0.5-2.5A. The instantaneous current can reach up to 2.5A. If the weather is cold, the current ampere requirement will also increase accordingly. The power consumption of printing graphics is generally large. If graphics are involved in printing receipts, it is recommended to choose a suitable power supply!
If you want to use Arduino to print Chinese characters, you need to create a C file, which cannot be compiled under Arduino IDE (the IDE development environment cannot input Chinese, use the clipboard to paste, and Chinese is also UTF8, which is garbled when printed). Write the relevant array data in the C file for calling.
Specification
- Working voltage: DC9~24V
- Working current: 0.5~2.5A
- Standby current: 0.02A
- Communication interface: TTL+USB+485+RS232
- Printing method: Line thermal printing
- Printing mode: Receipt printing/label printing
- Printing color: Black and white output
- Resolution: 203DPI (8 dots/mm, 0.125mm/dot, 384 dots per line)
- Consumables: Thermal receipt paper roll, thermal label paper roll
- Paper roll specifications: Paper roll width (58mm±0.5mm), paper roll diameter (30mm)
- Printing content: Support text , graphics, one-dimensional barcode, two-dimensional code, curve, etc.
- Printing width: 48mm (effective printing width)
- Printing life: 50 kilometers
- Printing speed: 70mm/s
- Printing characters: GB18030 Chinese character library (2424 international first and second level character library), 1224 standard ASCII code, and can enlarge Chinese characters and characters by 1-4 times
- Working temperature: -5℃~50℃
- Working humidity: 25%~50%RH
- Storage temperature: -20~70%°C
- Storage humidity: 5~95%RH
- Printing command: ESC/POS compatible command set (see "Printer Command Set" for details
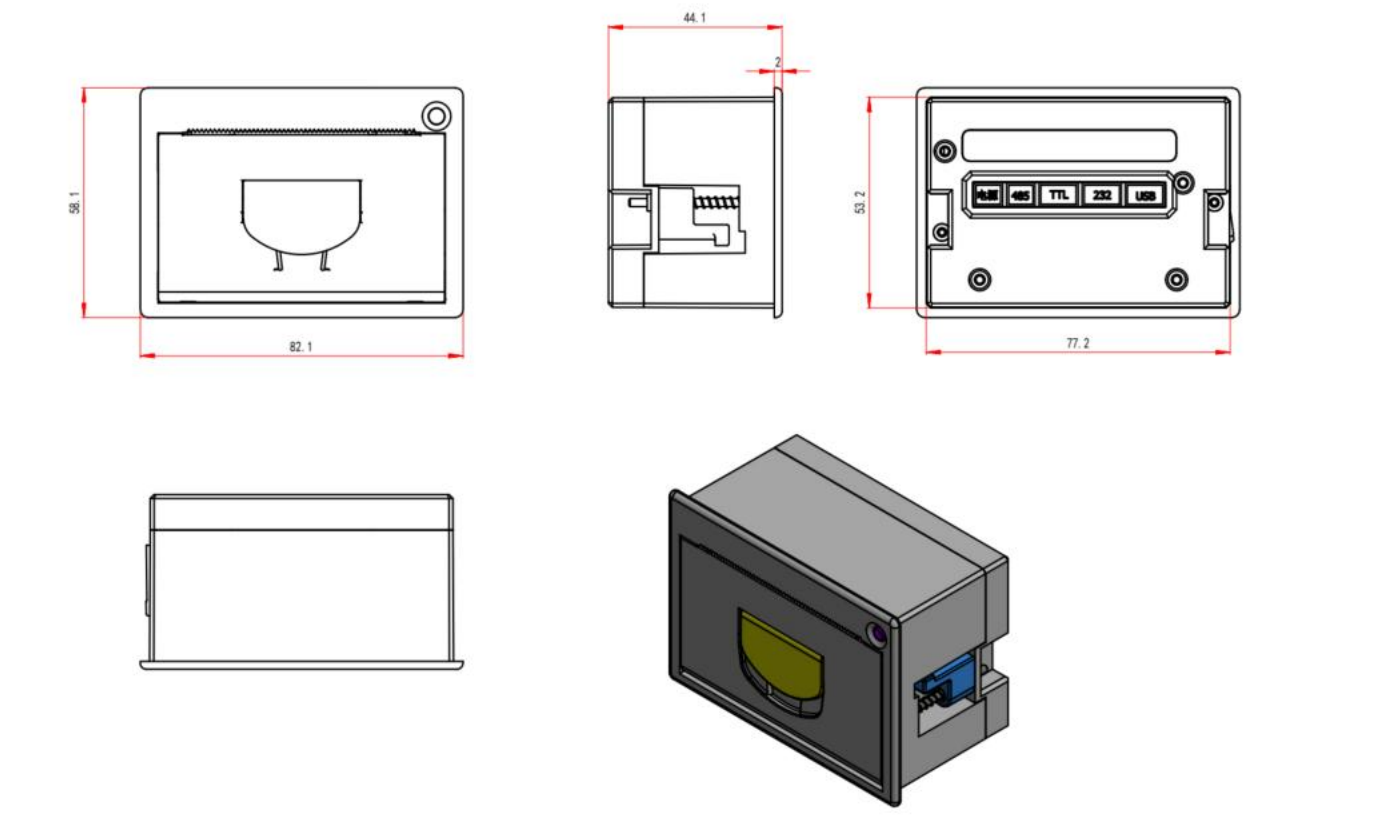
- Appearance size: 82x58x44 mm
- Installation size: 77x53x42 mm
Board Overview

Interface Description
| Power Port | RS232/TTL Serial Port | USB Port | 485 Serial Port |
|---|---|---|---|
| XH2.54 2Pin | PH2.0 4Pin | PH2.0 4Pin | PH2.0 2Pin |
Interface Configuration
| Serial Port Communication | Baud Rate | Parity | Data Bit | Stop Bit |
|---|---|---|---|---|
| USB Port (Default Virtual Printer Port Mode, Can Be Virtualized as Serial Port Mode) | 115200 | None | 8 | 1 |
Dimensional Drawing
Tutorial
Requirements
Hardware
- DFRduino UNO R3 (or similar) x 1
- Embedded_Thermal_Printer_V2.0 x1
- 9-24V adapter or power supply x1
Software
Connection Diagram
TTL interface wiring method
| Printer | Arduino UNO |
|---|---|
| DTR red line | Floating |
| TXD black line | Pin 10 |
| RXD blue line | Pin 11 |
| GND green line | GND |

- The figure shows how to load thermal printing paper.

Sample Code
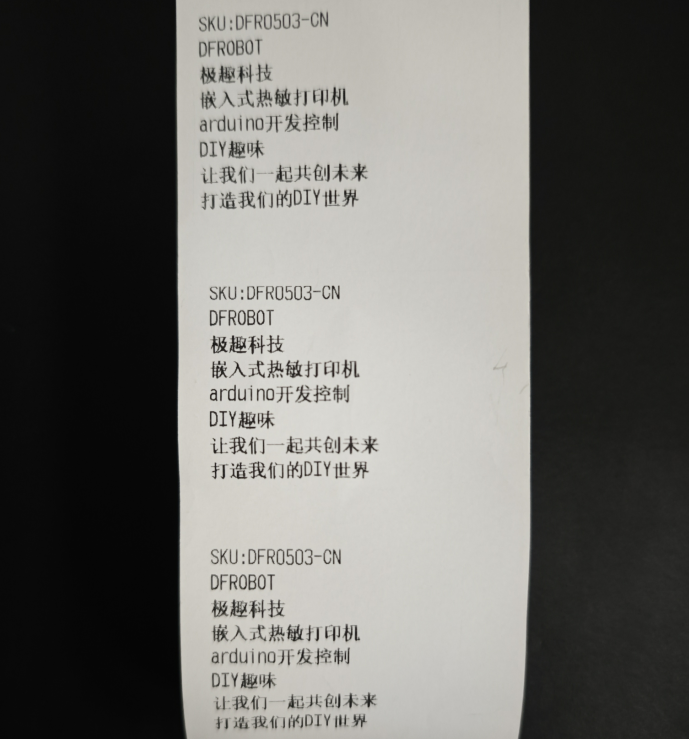
Printing characters in receipt mode
You can directly use the print statement to print non-Chinese characters, such as English letters, numbers, punctuation marks, etc. To print Chinese characters, you need to take the following approach: Create a hz.c file, the content of which is to create a character array (about how to create a new .c file: create a .txt file, then change the suffix to .c, open it with Notepad, then select Save As, select ANSI encoding and save it.). constchar hz[][32] actually declares a string array, each string cannot exceed 32 bytes (16 Chinese characters encoded in GB2312). If the Chinese characters you want to display are particularly long, please modify the number 32; this method actually puts all Chinese characters into an array. This method is easy to implement the international version of the program, that is, switching arrays can achieve display in different languages; [Note]: The purpose of creating this plug-in file is to solve the problem that the GB2312 internal code Chinese characters cannot be edited using the IDE programming environment. Do not use the IDE programming environment to open and edit this file, as this operation will rewrite this file into a UTF8 internal code file!
const char hz[][32]={
"DFROBOT",           //0
"极趣科技",          //1
"嵌入式热敏打印机",  //2
"arduino开发控制",   //3
"DIY趣味",             //4
"让我们一起共创未来",     //5
"打造我们的DIY世界",    //6
};
#include"E:\ces\hz.c" //Reference the newly created hz.c file. The quotation marks are the index address of the hz.c file. It needs to be modified according to the actual location of hz.c
#include <SoftwareSerial.h>
uint8_t Com[7] = { 0x1F, 0x2F, 0x0B, 0x00, 0x01, 0x00, 0x00}; //Switch to receipt mode
SoftwareSerial mySerial(10, 11); // RX, TX
void setup()
{
mySerial.begin(115200);
mySerial.write(Com, 7);//Switch to receipt mode
}
void loop()
{
mySerial.println("SKU:DFR0503-CN");
mySerial.println(hz[0]);
mySerial.println(hz[1]);
mySerial.println(hz[2]);
mySerial.println(hz[3]);
mySerial.println(hz[4]);
mySerial.println(hz[5]);
mySerial.println(hz[6]);
delay(10000);
}Example result:
Print the following content every 10 seconds
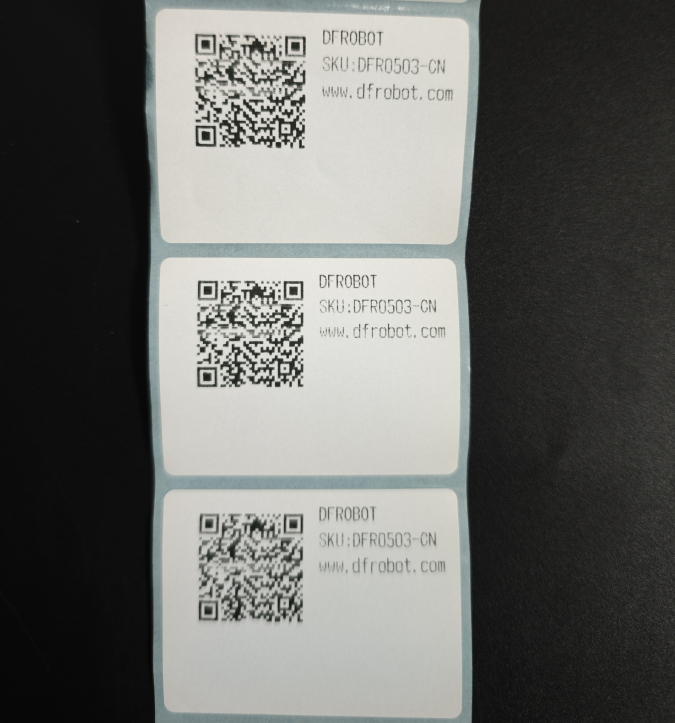
Label mode print characters
#include <SoftwareSerial.h>
SoftwareSerial mySerial(10, 11);                                // RX, TX
uint8_t Com[7] = { 0x1F, 0x2F, 0x0B, 0x00, 0x01, 0x01, 0x01 };  //Switch to tab mode
uint8_t Com1[2] = { 0x1F, 0x63 };//Label verification
const char QRx[200] = {
0x1B,0x40,

0x1A,0x5B,0x01,0x00,0x00,0x00,0x00,0x90,0x01,0x40,0x01,0x02,

0x1A,0x31,0x00,0x05,0x02,0x1E,0x00,0x1E,0x00,0x04,0x00,0x77,0x77,0x77,0x2E,0x64,0x66,0x72,0x6F,0x62,0x6F,0x74,0x2E,0x63,0x6F,0x6D,0x00,

0x1A,0x54,0x01,0xC8,0x00,0x14,0x00,0x18,0x00,0x00,0x11,0x44,0x46,0x52,0x4F,0x42,0x4F,0x54,0x00,

0x1A,0x54,0x01,0xC8,0x00,0x37,0x00,0x18,0x00,0x00,0x11,0x53,0x4B,0x55,0x3A,0x44,0x46,0x52,0x30,0x35,0x30,0x33,0x2D,0x43,0x4E,0x00,

0x1A,0x54,0x01,0xC8,0x00,0x5A,0x00,0x18,0x00,0x00,0x11,0x77,0x77,0x77,0x2E,0x64,0x66,0x72,0x6F,0x62,0x6F,0x74,0x2E,0x63,0x6F,0x6D,0x00,

0x1A,0x5D,0x00,

0x1A,0x4F,0x00
};

void setup() {
  mySerial.begin(115200);
  Serial.begin(9600);
  mySerial.write(Com, 7);  //Switch to tab mode
  delay(1000);
  mySerial.write(Com1, 2);
  while (Serial.read() >= 0) {}
}
void loop() {
  mySerial.println();
  mySerial.write(QRx, 200);  //Send a print command to the printer
  mySerial.println();
  delay(10000);
}
Example result:
Print the following content every 10 seconds