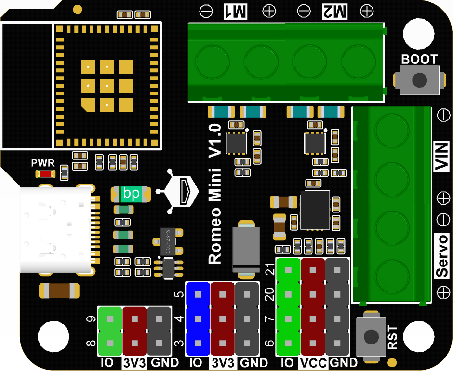
Romeo mini Control Board(ESP32-C3)

Introduction

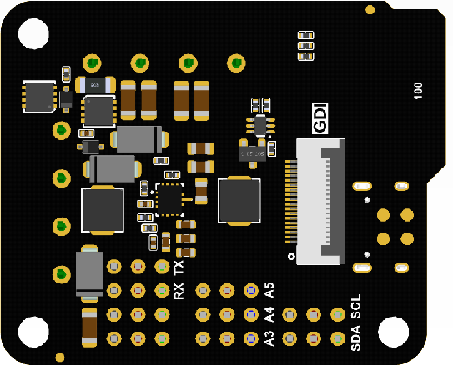
The Romeo mini robot controller is the ESP32 version of the Romeo BLE mini. It features an onboard ESP32-C3 module, supporting Wi-Fi and Bluetooth 5 dual-mode communication, and has two channels of 1.7A motor drivers.

Romeo mini has 9 IO interfaces (supporting analog, digital, UART, and I2C), with each interface compatible with the Gravity standard. It can be connected to various Gravity sensor modules. The servo interface can provide stable power supply through the servo power port for servos and other high-current devices. Additionally, it has a built-in GDI interface on the back for connecting an IPS display screen to show project-related information. The controller can meet the control requirements for robot motors and servos.

Features

Specification

Basic Parameters:

Interface Pins:

Board Overview

引脚示意图 引脚示意图
Name Function Description
VIN Power input for motor driver and controller: 5-15V. This port must be connected for M1/M2 motors to work.
Servo Power input for digital ports: 5-12V. If using high-current peripherals with voltage higher than 5V on digital output port (VCC end), connect to this interface to avoid damaging the Type-C USB port.
M1/M2 Ports Two motor control ports:
M1: GPIO1 (direction control), GPIO0 (PWM control)
M2: GPIO10 (direction control), GPIO2 (PWM control)
I2C Standard I2C interface: SDA (8), SCL (9), VCC (3.3V), GND
A-3.3V-GND Standard analog interface:
A (blue): analog ports 3, 4, 5
3.3V (red): power supply positive terminal
GND (black): power supply negative terminal
D-VCC-GND Standard digital interface:
D (green): digital ports 6, 7, 20, 21
VCC (red): power supply positive terminal (When the Servo port is not powered, VCC is 5V; when the Servo port is powered, VCC is the input power for the Servo port.)
GND (black): power supply negative terminal
UART RX (20), TX (21), VCC (5V), GND
Note: The UART interface shares two IO ports with servo ports, so UART cannot be used when servos are used.
RST Controller reset button
BOOT Controller download button

Dimension Drawing

尺寸图

Tutorial

1. Arduino Environment Configuration

When using the ESP32-C3 development board for the first time, it is important to follow these steps:

Note: If your computer fails to recognize the Romeo Mini module when connected via USB, please press and hold the BOOT button, then press the RST button. Finally, release both the BOOT and RST buttons simultaneously.

1.Add the JSON link to the IDE. 2.Download the core of the main controller. 3.Select the development board and serial port. 4.Open the sample program and upload it. 5.Familiarize yourself with the Serial Monitor.

Beetle ESP32-C3

Beetle ESP32-C3 Beetle ESP32-C3 Beetle ESP32-C3 Beetle ESP32-C3 Beetle ESP32-C3 Beetle ESP32-C3 Beetle ESP32-C3

Beetle ESP32-C3

Beetle ESP32-C3 Beetle ESP32-C3

2. PWM-driven DC Motors

Requirements

Connection Diagram

The module is powered by 5-15V. Choose an appropriate power supply voltage based on the motors.

Motor Connection Diagram

Control Modes

EN PH Function
H H Forward
H L Reverse
PWM L Forward
PWM H Reverse

Sample Code

int EN1 = 0; // PWM control for motor M1
int PH1 = 1; // Direction control for motor M1
int EN2 = 2; // PWM control for motor M2
int PH2 = 10; // Direction control for motor M2

void setup() {
  pinMode(EN1, OUTPUT);
  pinMode(PH1, OUTPUT);
  pinMode(EN2, OUTPUT);
  pinMode(PH2, OUTPUT);
}

void loop() {
  M1_Forward(200); // Motor M1 moves forward with adjustable PWM
  M2_Forward(200); // Motor M2 moves forward with adjustable PWM
  delay(5000);
  M1_Backward(200); // Motor M1 moves backward with adjustable PWM
  M2_Backward(200); // Motor M2 moves backward with adjustable PWM
  delay(5000);
}

void M1_Forward(int Speed1) // Forward fast decay mode for M1 motor, larger Speed1 value results in faster motor rotation
{
  analogWrite(EN1, Speed1);
  digitalWrite(PH1, LOW);
}

void M1_Backward

Example Result: Execute the sample program by commanding simultaneous rapid forward rotation of motors M1 and M2, followed by simultaneous slow reverse rotation of motors M1 and M2.

3. PWM-Driven Servo Motor

Prerequisites:

Connection Diagram:

If you need to operate a servo motor or peripheral device with a voltage higher than 5V, connect the Servon terminal to the power supply. The power supply range should be between 5-12V. The VCC terminal voltage is equal to the input voltage at the Servon terminal. When the Servon terminal is not connected, the default VCC terminal voltage is 5V.

Motor Connection Diagram

Sample Code

void setup() {
ledcSetup(0, 5000, 10); // Configure channel 0 with a frequency of 5KHz and 10-bit resolution
ledcAttachPin(6, 0); // Assign pin 6 as the output pin for channel 0
}

void loop() {
ledcWrite(0, 125); // Set the output of channel 0 to 125, producing a PWM output of 0 to 100% (0 to 1024)
delay(1000);
ledcWrite(0, 25);
delay(1000);
}

Example Result: Burn the sample program to cyclically rotate Servo 1 in the range of 0-180°.

4. Driving an SPI Display

Prerequisites:

Connection Diagram:

显示屏连接图

Sample Code

#include "DFRobot_GDL.h"
#define TFT_DC 8
#define TFT_CS 7
#define TFT_RST 9

DFRobot_ST7789_172x320_HW_SPI screen(/dc=/TFT_DC,/cs=/TFT_CS,/rst=/TFT_RST);
/* M0 mainboard DMA transfer */
//DFRobot_ST7789_172x320_DMA_SPI screen(/dc=/TFT_DC,/cs=/TFT_CS,/rst=/TFT_RST);

void setup() {
screen.begin();
screen.setTextSize(2);
screen.fillScreen(COLOR_RGB565_BLACK); // Set the background color
screen.setFont(&FreeMono24pt7b); // Set the font size (9, 12, 18, 24)
screen.setCursor(/x=/32, /y=/200); // Set the text position
screen.setTextColor(COLOR_RGB565_LIGHTGRAY); // Set the text color
screen.setTextWrap(true);
screen.print("DF"); // Display the English characters
}

void loop() {
// Empty loop as no further actions are required for this example
}

Example Result: Burn the sample program to display the gray English characters "DF" on the screen.

屏幕点亮示意图

Frequently Asked Questions

Burn Error

Cause

Solution

Press and hold the BOOT button, then click the RST button, and finally release the BOOT button.

No Serial Output

Solution

More