Introduction
Based on the principle of tipping bucket rainfall, the rainfall sensor provides users with rainfall values in millimeters and system operating time. The sensor has no electronic components inside and features a hollow bottom design that allows rainwater to automatically drain, making it more stable and sensitive.
It supports I2C and UART data outputs, compatible with micro:bit, Arduino, ESP32, Raspberry Pi. Integrated with the easy-to-use Gravity interface, this rainfall sensor can be used to set up a rain monitoring system easily with the provided ready-to-go libraries. The tipping bucket rainfall sensor can provide high-quality rainfall data for weather stations, environmental monitoring stations, or smart farms.
What is tipping bucket rain gauge?
The tipping bucket rain gauge is most commonly used in meteorological monitoring. The tipping bucket rain gauge is composed of measuring parts and rain receiver parts. When it rains, rainwater enters the water receiver from the uppermost water-receiving port, falls into the water-receiving funnel, and flows into the tipping bucket through the funnel mouth. When the water accumulation reaches a certain height, the tipping bucket loses balance and overturns. And every time the bucket dumps, the switch turns on the circuit and sends a pulse signal to the recorder. The recorder controls the self-recording pen to record the rainfall so that the rainfall process can be measured back and forth.
Note: The signal adapter board is not waterproof. Do not expose the signal adapter board to rain.
Specification
- Working Voltage: 3.3-5.5V DC
- Working Current: <3mA
- Output Signal: I2C/UART
- Resolution: 0.28mm
- Operating Temperature: -40 to 85°C
- PCB Size: 32mm x 37mm
- Flipper Size: 118mm x 59mm x 80mm
- Mounting Hole Size: 3.1mm
- Weight: 119g (Tipping bucket), 5.3g (PCB)
Board Overview

| Num | Label | Description |
|---|---|---|
| 1 | D/T | I2C data line SDA/UART data transmit-TX |
| 2 | C/R | I2C clock line SCL/UART data receive-RX |
| 3 | - | GND |
| 4 | + | 3.3V/5V |
Tutorial
Download program to Arduino UNO and check rainfall data in serial monitor.
Read Sensor Data via I2C
Requirements
-
Hardware
- DFRduino UNO R3 (or similar) x 1
- Gravity: Tipping Bucket Rainfall Sensor x 1
- M-M/F-M/F-F Jumper wires
-
Software
- Arduino IDE
- Download and install the Rainfall Library. (About how to install the library?)
Connection Diagram

Sample Code
-
Connect the module to Arduino according to the wiring diagram above. Of course, you can also use the Gravity I/O expansion board to make the project prototype construction more convenient and faster.
-
Set the selection switch on the sensor to the I2C side.
-
Open the Arduino IDE and upload the following code to the Arduino UNO.
#include "DFRobot_RainfallSensor.h"

//#define MODE_UART
#ifdef MODE_UART //UART communication

   #include "SoftwareSerial.h"
   SoftwareSerial mySerial(/*rx =*/10, /*tx =*/11);
   DFRobot_RainfallSensor_UART Sensor(/*Stream *=*/&mySerial);

#else //I2C communication
  DFRobot_RainfallSensor_I2C Sensor(&Wire);
#endif

void setup(void)
{
#ifdef MODE_UART
    mySerial.begin(9600);
#endif
  Serial.begin(115200);

  delay(1000);
  while(!Sensor.begin()){
    Serial.println("Sensor init err!!!");
    delay(1000);
  }
  Serial.print("vid:\t");
  Serial.println(Sensor.vid,HEX);
  Serial.print("pid:\t");
  Serial.println(Sensor.pid,HEX);
  Serial.print("Version:\t");
  Serial.println(Sensor.getFirmwareVersion());
  //Set the rain accumulated value, unit: mm
  //Sensor.setRainAccumulatedValue(0.2794);
}

void loop()
{
  //Get the sensor working time, unit: hour
  Serial.print("Sensor WorkingTime:\t");
  Serial.print(Sensor.getSensorWorkingTime());
  Serial.println(" H");
  //Get the accumulated rainfall during the sensor working time
  Serial.print("Rainfall:\t");
  Serial.println(Sensor.getRainfall());
  //Get the accumulated rainfall within 1 hour of the system (function parameter optional 1-24)
  Serial.print("1 Hour Rainfall:\t");
  Serial.print(Sensor.getRainfall(1));
  Serial.println(" mm");
  //Get the raw data, the number of tipping buckets for rainfall, unit: times
  Serial.print("rainfall raw:\t");
  Serial.println(Sensor.getRawData());
  delay(1000);
}
Expected Result
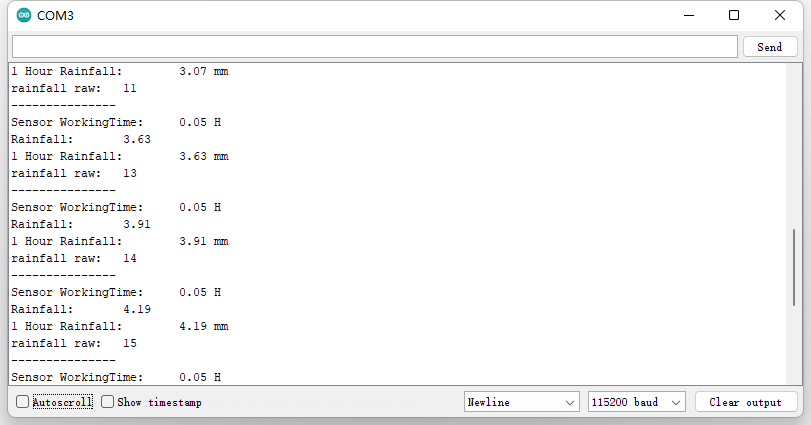
Open serial monitor to get the final data.

Read Sensor Data via UART
Requirements
-
Hardware
- DFRduino UNO R3 (or similar) x 1
- Gravity: Tipping Bucket Rainfall Sensor x 1
- M-M/F-M/F-F Jumper wires
-
Software
- Arduino IDE
- Download and install the Rainfall Library. (About how to install the library?)
Connection Diagram

Sample Code
-
Connect the module to the Arduino according to the wiring diagram above. Of course, you can also use it with the Gravity I/O expansion board to complete the project prototype more conveniently and quickly.
-
Set the selection switch on the sensor to the UART side.
-
Open Arduino IDE and upload the code below to Arduino UNO.
#include "DFRobot_RainfallSensor.h"

#define MODE_UART
#ifdef MODE_UART //UART communication

#include "SoftwareSerial.h"
SoftwareSerial mySerial(/*rx =*/10, /*tx =*/11);
DFRobot_RainfallSensor_UART Sensor(/*Stream *=*/&mySerial);

#else //I2C communication
  DFRobot_RainfallSensor_I2C Sensor(&Wire);
#endif

void setup(void)
{
#ifdef MODE_UART
    mySerial.begin(9600);
#endif
  Serial.begin(115200);

  delay(1000);
  while(!Sensor.begin()){
    Serial.println("Sensor init err!!!");
    delay(1000);
  }
  Serial.print("vid:\t");
  Serial.println(Sensor.vid,HEX);
  Serial.print("pid:\t");
  Serial.println(Sensor.pid,HEX);
  Serial.print("Version:\t");
  Serial.println(Sensor.getFirmwareVersion());
  //Set the accumulated rainfall value, unit: mm
  //Sensor.setRainAccumulatedValue(0.2794);
}

void loop()
{
  // Get the sensor operating time, unit: hour
  Serial.print("Sensor WorkingTime:\t");
  Serial.print(Sensor.getSensorWorkingTime());
  Serial.println(" H");
  //Get the accumulated rainfall during the sensor operating time
  Serial.print("Rainfall:\t");
  Serial.println(Sensor.getRainfall());
  //Get the accumulated rainfall in the past 1 hour (function parameter can be 1-24)
  Serial.print("1 Hour Rainfall:\t");
  Serial.print(Sensor.getRainfall(1));
  Serial.println(" mm");
  // Get the raw data, number of tipping bucket counts
  Serial.print("rainfall raw:\t");
  Serial.println(Sensor.getRawData());
  delay(1000);
}
Expected Results
Open serial monitor to get the final data.

FAQ
For any questions, advice or cool ideas to share, please visit the DFRobot Forum.
