Introduction
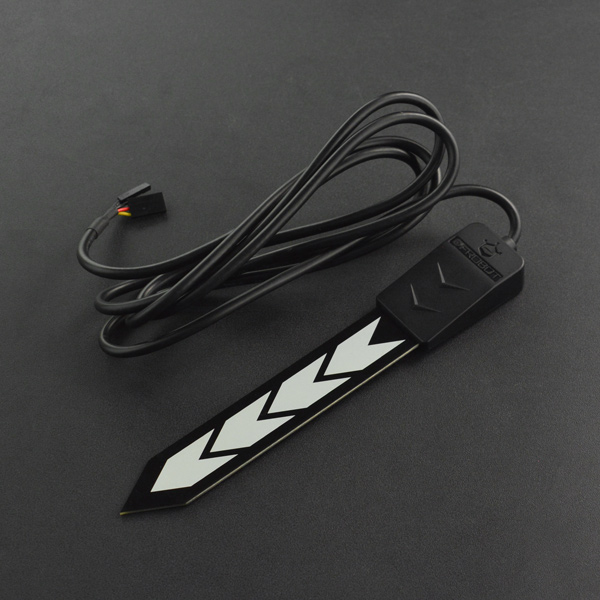
This is a new type of waterproof soil moisture sensor introduced by DFRobot. Compared with the previous version of the soil moisture sensor, it has increased waterproof performance, optimized corrosion resistance, increased plate length and optimized circuit performance.
Compared with the resistive sensor, the capacitive soil moisture sensor solves the problem that the resistive sensor is easily corroded, and can be inserted into the soil for a long time without being corroded. The sensor has increased waterproof performance, and the sensor can still be used normally after being immersed in water; the length of the capacitive electrode plate is increased, and the soil moisture information can be measured more accurately. The sensor has a wide input voltage and can work in a wide voltage range of 3.3V-5.5V. Compatible with Arduino, ESP32, micro:bit, control board, Raspberry Pi and other common control boards. The standard designed DFRobot-Gravity interface can be directly connected to the Gavity IO expansion board. A micro PC such as a Raspberry Pi requires an external ADC (analog signal to digital signal) module to work.
Features
- Analog output
- Capacitive sensor
- Waterproof & anti-corrosion
- Suitable for 3.3V/5V main control board
Specification
- Operating Voltage: 3.3 ~ 5.5 VDC
- Output Voltage: 0 ~ 2.9VDC
- Interface: 2.54-3P + 2.54-1P
- Dimensions: 6.89 x 1.18 inches or 175 x 30 mm (L x W)
- Weight: 15g
Tutorial
Requirements
- Hardware
- DFRduino UNO x1
- Waterproof Capacitive Soil Moisture Sensor x1
- Software
- Arduino IDE Click to Download Arduino IDE
Connection Diagram
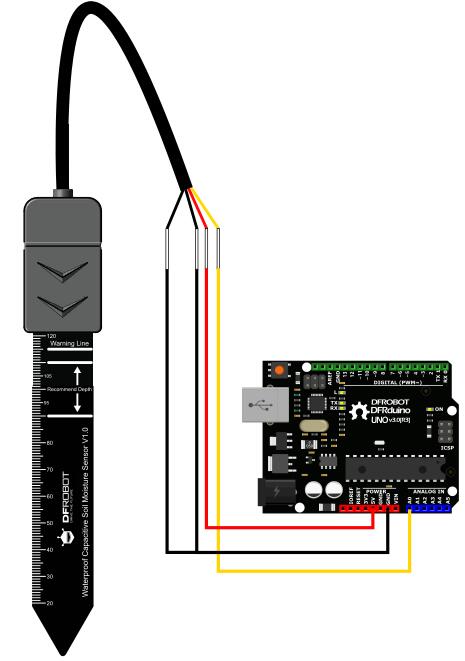
Connect the sensor and the main control board according to the picture and wiring comparison table below.
| Color | port |
|---|---|
| Red | VCC |
| Black | GND |
| Yellow | Signal |
| Black | GND |

Test Code
Before using the sensor, we need to calibrate to get the measurement range of the sensor.
    void setup() {
      Serial.begin(9600); // open serial port, set the baud rate to 9600 bps
    }
    void loop() {
      Serial.println(analogRead(A0)); //connect sensor and print the value to serial
      delay(100);
    }
Calibration
Calibration Range
-
Open the serial port monitor and set the baud rate to 9600
-
Record the sensor value when the probe is exposed to the air as "Value 1". This is the boundary value of dry soil “Humidity: 0%RH”. Due to different humidity in the air, this value range is generally between 520-640.
-
Take a cup of water and insert the probe into it. The recommended depth is between "Recommend Depth" and not more than the "Warning Line" on the board.
-
When the sensor value is 0, it is the boundary value of moist soil “Humidity: 100%RH”. At this time, according to the scale on the board, record the depth of the sensor's insertion into the water. When used in soil, it is also recommended to insert this depth.
Section Settings
The range can be divided into three sections: dry, wet, water. Their related values are:
Because the value of the sensor will be affected by the depth of the soil and the tightness of the soil, only the relative humidity of the soil can be detected. We divided the range of humidity into three equal parts, indicating dry, wet, and very humid. The two data recorded before are the humidity interval. For example: the reading in the air is 540, and the reading in the water is 0, so that it can be divided into three sections: dry, wet and very wet. Their related values are:
-
Dry: (570, 380]
-
Wet: (380, 190]
-
Very wet: (190, 0]
-
Attention
-
Since this sensor will detect soil moisture based on the principle of capacitive sensing, it will show different humidity when placed in different soil moisture, different tightness, and different insertion depth. Even in the same place and at the same depth, when the second insertion is made, since the first extraction has caused loosening of the soil, the humidity may be lower than the first reading.
-
Humidity is inversely proportional to the reading.
-
Due to the different air humidity in different regions and different weathers, and there may be differences between individual sensors, the feedback value in the air may be between 660-500 (DC5V, 10-bit ADC).
-
Test Code
Bring the data from the air just recorded to line 17 of the test code below.
const int AirValue = ; //you need to change this value that you had recorded in the air
Bring the data from the water just recorded to line 18 of the test code below.
const int WaterValue = ; //you need to change this value that you had recorded in the water
Test Code:
    /***************************************************
     This example reads Analog Waterproof Capacitive Soil Moisture Sensor.

     Created 2019-10-25
     By Felix Fu <[email protected]>

     GNU Lesser General Public License.
     See <http://www.gnu.org/licenses/> for details.
     All above must be included in any redistribution
     ****************************************************/

    /***********Notice and Trouble shooting***************
     1.Connection and Diagram can be found here
     2.This code is tested on Arduino Uno.
     ****************************************************/

    const int AirValue = 570;   //you need to change this value that you had recorded in the air
    const int WaterValue = 0;  //you need to change this value that you had recorded in the water

    int intervals = (AirValue - WaterValue)/3;
    int soilMoistureValue = 0;
    void setup() {
      Serial.begin(9600); // open serial port, set the baud rate to 9600 bps
    }
    void loop() {
    soilMoistureValue = analogRead(A0);  //put Sensor insert into soil
    if(soilMoistureValue > WaterValue && soilMoistureValue < (WaterValue + intervals))
    {
      Serial.println("Very Wet");
    }
    else if(soilMoistureValue > (WaterValue + intervals) && soilMoistureValue < (AirValue - intervals))
    {
      Serial.println("Wet");
    }
    else if(soilMoistureValue < AirValue && soilMoistureValue > (AirValue - intervals))
    {
      Serial.println("Dry");
    }
    delay(100);
    }
FAQ
There are no questions about this product yet.
For any questions/advice/cool ideas to share with us, please visit DFRobot Forum.
