Introduction
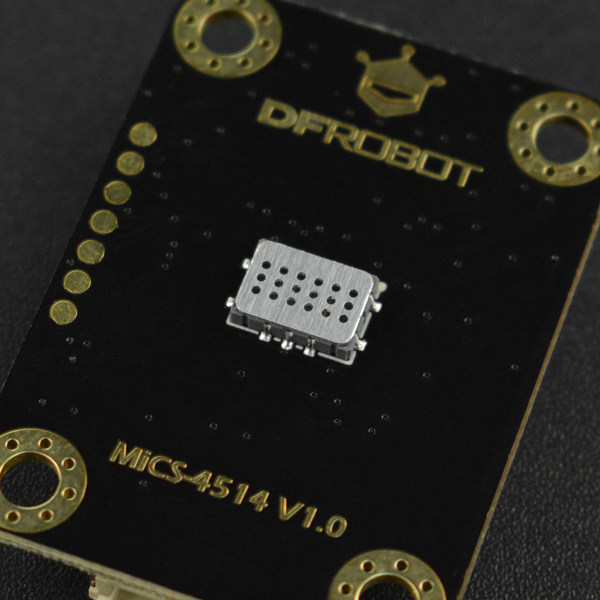
This is a 3.3/5V compatible MEMS gas concentration sensor from DFRobot. This sensor supports the detection of various gas concentrations like CO, C2H5OH (Alcohol), H2, NO2, NH3, and integrates various gas concentration conversion formulas in the code to facilitate the testing and use of sensors. With I2C output and 3.3~5.5V wide voltage input, it is compatible with Arduino, ESP32, Raspberry Pi and other mainstream controllers.
Features
- Support detection of a variety of harmful gas
- Integrate the calculation formulas of various gas concentration
- Low power consumption
- I2C digital output
- Compatible with the 3.3~5.5V master controller
Specification
- Detection of Physical Quantities: gas concentration of CO,C2H5OH(Alcohol), H2, NO2, NH3, CH4
- Operating Voltage: 3.3~5.5V DC
- Power Dissipation: 0.45W(5V)
- Output Signal: I2C(0~3V)
- Measuring Range:
- 1 – 1000ppm(Carbon monoxide CO )
- 0.05 – 10ppm(Nitrogen dioxide NO2 )
- 10 – 500ppm( Ethanol C2H5OH )
- 1 – 1000ppm(Hydrogen H2)
- 1 – 500ppm(Ammonia NH3 )
- >1000ppm(Methane CH4 )
- Working Temperature: -30~85℃
- Working Humidity: 5~95%RH (No condensation)
- Storage Temperature: -40~85℃
- Lifespan: >2 years (in the air)
- Circuit Board Size: 27mm*37mm
- Mounting Hole Size: inner diameter 3.1mm/outer diameter 6mm
- Weight:
Board Overview
| No. | Name | Functions |
|---|---|---|
| 1 | SDA | I2C data wire SDA |
| 2 | SCL | I2C clock line SCL |
| 3 | GND | negative pole of power supply |
| 4 | VCC | positive pole of power supply |
Tutorial for Arduino
Download the program to the UNO, open Serial Port Monitor to view the gas concentration, raw data, and other parameters.
Software and hardware preparation
- Hardware
- DFRuino UNO R3 x1
- SEN0377 Gravity MEMS Gas Sensor x1
- Dupont Wires
- Software
- Arduino IDE Arduino IDE
- Download and install DFRobot_MICS Library (About how to install the library?)
Sample 1 - Read the gas concentration (PPM) data as calculated by the sensor
Download the sample program to the Arduino UNO, open Serial Port Monitor to view the gas concentration (PPM) data.
Connection Diagram
Steps
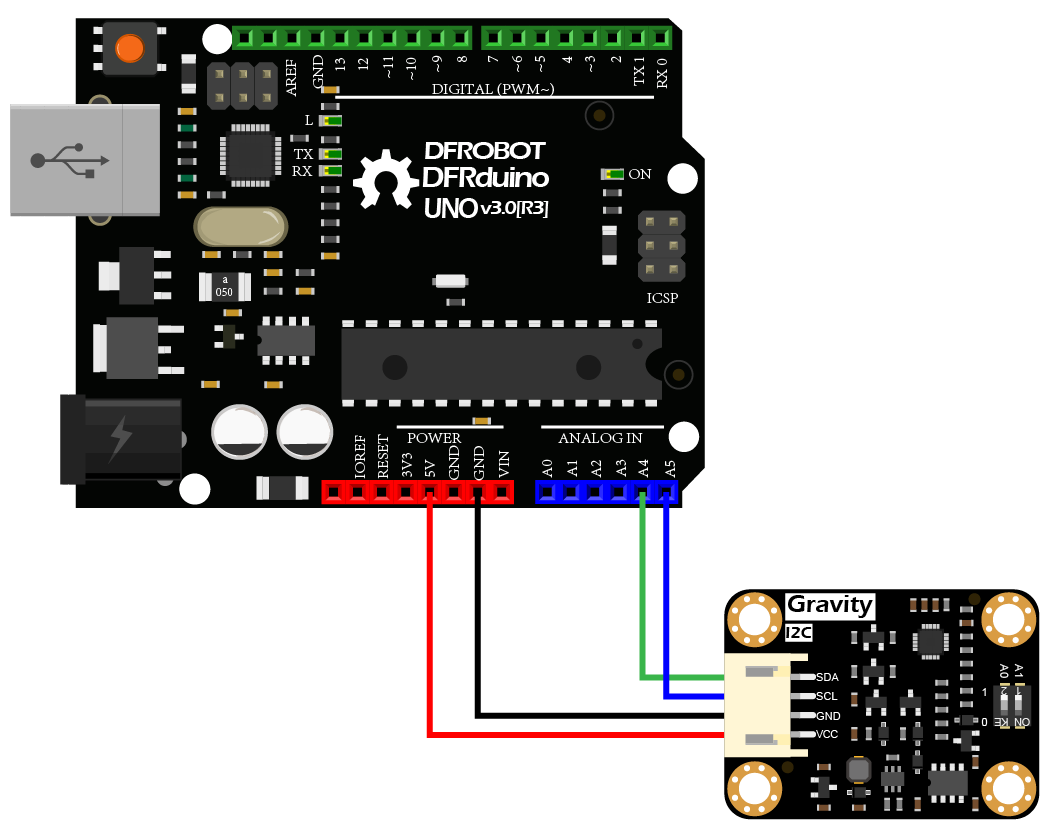
- Connect the module to Arduino by the connection diagram above. You can certainly use with Gravity I/O to complete the project prototype in a more convenient and faster way.
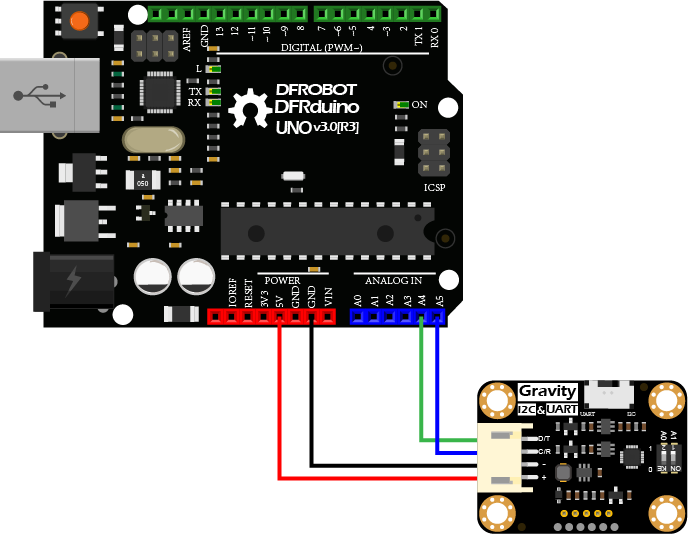
- Turn the selector switch to the I2C side.
- The I2C address defaults to 0x78, corresponding to the ADDRESS_3 in the code. If you need to modify the I2C address, you can first configure the hardware I2C address via the dial-up switch on the module, and modify the definition ADDRESS_X of the I2C address in the sample code. The correspondence between the dial switch and the I2C address parameter is as follows:
- ADDRESS_0:0x75, A0=0, A1=0(Default Address)
- ADDRESS_1:0x76, A0=1, A1=0
- ADDRESS_2:0x77, A0=0, A1=1
- ADDRESS_3:0x78, A0=1, A1=1
- Download and install DFRobot_MICS Library (About how to install the library?)
- Open Arduino IDE
- Upload the following sample code to the Arduino UNO.
- Or open the code getGasPPM.ino in the library file sample, and burn to Arduino UNO。
- Open the serial port monitor of the Arduino IDE, adjust the baud rate to 115200, and observe print results.
 /*!
  * @file  getGasPPM.ino
  * @brief Reading Gas concentration, A concentration of one part per million (PPM).
  * @n When using IIC device, select I2C address, set the dialing switch A0, A1 (Address_0 is [0 0]), (Address_1 is [1 0]), (Address_2 is [0 1]), (Address_3 is [1 1]).
  * @n When using the Breakout version, connect the adcPin and PowerPin
  * @copyright   Copyright (c) 2010 DFRobot Co.Ltd (http://www.dfrobot.com)
  * @licence     The MIT License (MIT)
  * @author      ZhixinLiu([email protected])
  * @version     V1.1
  * @date        2021-04-19
  * @get         from https://www.dfrobot.com
  * @url         https://github.com/dfrobot/DFRobot_MICS
  */
#include "DFRobot_MICS.h"

#define CALIBRATION_TIME   3                      // Default calibration time is three minutes

// When using I2C communication, use the following program to construct an object by DFRobot_MICS_I2C
/**!
    iic slave Address, The default is ADDRESS_3
       ADDRESS_0               0x75             // i2c device address
       ADDRESS_1               0x76
       ADDRESS_2               0x77
       ADDRESS_3               0x78
*/
#define Mics_I2C_ADDRESS ADDRESS_3
DFRobot_MICS_I2C mics(&Wire, Mics_I2C_ADDRESS);

// When using the Breakout version, use the following program to construct an object from DFRobot_MICS_ADC
/**!
  adcPin is A0~A5
  powerPin is General IO
*/
#define ADC_PIN   A0
#define POWER_PIN 10
//DFRobot_MICS_ADC mics(/*adcPin*/ADC_PIN, /*powerPin*/POWER_PIN);

void setup()
{
  Serial.begin(115200);
  while(!Serial);
  while(!mics.begin()){
    Serial.println("NO Deivces !");
    delay(1000);
  } Serial.println("Device connected successfully !");

  /**!
    Gets the power mode of the sensor
    The sensor is in sleep mode when power is on,so it needs to wake up the sensor.
    The data obtained in sleep mode is wrong
   */
  uint8_t mode = mics.getPowerState();
  if(mode == SLEEP_MODE){
    mics.wakeUpMode();
    Serial.println("wake up sensor success!");
  }else{
    Serial.println("The sensor is wake up mode");
  }

  /**!
     Do not touch the sensor probe when preheating the sensor.
     Place the sensor in clean air.
     The default calibration time is 3 minutes.
  */
  while(!mics.warmUpTime(CALIBRATION_TIME)){
    Serial.println("Please wait until the warm-up time is over!");
    delay(1000);
  }
}

void loop()
{
  /**!
    Gas type:
    MICS-4514 You can get all gas concentration
    MICS-5524 You can get the concentration of CH4, C2H5OH, H2, NH3, CO
    MICS-2714 You can get the concentration of NO2
      Methane          (CH4)    (1000 - 25000)PPM
      Ethanol          (C2H5OH) (10   - 500)PPM
      Hydrogen         (H2)     (1    - 1000)PPM
      Ammonia          (NH3)    (1    - 500)PPM
      Carbon Monoxide  (CO)     (1    - 1000)PPM
      Nitrogen Dioxide (NO2)    (0.1  - 10)PPM
  */
  float gasdata = mics.getGasData(C2H5OH);
  Serial.print(gasdata,1);
  Serial.println(" PPM");
  delay(1000);
  //mics.sleepMode();
}
Result
Open the serial port monitor and warm up for approximately 3 minutes to obtain the alcohol gas concentration data.
Notes:
- If you need to detect other gases, you should modify the detected gas settings in the sample code.
- The sensor takes 3 minutes to warm up.
Sample 2:Detection for the gas leakage
The MEMS chip MiCS-4514 reacts to a variety of gases, but the linearity of some gas concentration feedback value is poor. Therefore, the concentration value does not have a reference value, but can be used as the determination basis of the gas leakage.
If you need a leak detection of the relevant gas, you can download the sample program to the Arduino UNO, open Serial Port monitor to see if the set gas is leaking.
Connection Diagram
Steps
- Connect the module to Arduino by the connection diagram above. You can an certainly use with Gravity I/Oto complete the project prototype in a more convenient and faster way.
- Turn the selector switch to the I2C side.
- The I2C address defaults to 0x78, corresponding to the ADDRESS_3 in the code. If you need to modify the I2C address, you can first configure the hardware I2C address via the dial-up switch on the module, and modify the definition ADDRESS_X of the I2C address in the sample code. The correspondence between the dial switch and the I2C address parameter is as follows:
- ADDRESS_0:0x75, A0=0, A1=0(Default Address)
- ADDRESS_1:0x76, A0=1, A1=0
- ADDRESS_2:0x77, A0=0, A1=1
- ADDRESS_3:0x78, A0=1, A1=1
- Download and install DFRobot_MICS Library (About how to install the library?)
- Open Arduino IDE
- Upload the following sample code to the Arduino UNO.
- Or open the code getGasExist.ino in the library file sample, and burn to Arduino UNO。
- Open the serial port monitor of the Arduino IDE, adjust the baud rate to 115200, and observe the print results.
 /*!
  * @file  getGasExist.ino
  * @brief Reading Gas concentration, A concentration of one part per million (PPM).
  * @n When using IIC device, select I2C address, set the dialing switch A0, A1 (Address_0 is [0 0]), (Address_1 is [1 0]), (Address_2 is [0 1]), (Address_3 is [1 1]).
  * @n When using the Breakout version, connect the adcPin and PowerPin
  * @copyright   Copyright (c) 2010 DFRobot Co.Ltd (http://www.dfrobot.com)
  * @licence     The MIT License (MIT)
  * @author      ZhixinLiu([email protected])
  * @version     V1.1
  * @date        2021-04-19
  * @get         from https://www.dfrobot.com
  * @url         https://github.com/dfrobot/DFRobot_MICS
  */

#include "DFRobot_MICS.h"

#define CALIBRATION_TIME   3                      // Default calibration time is three minutes

// When using I2C communication, use the following program to construct an object by DFRobot_MICS_I2C
/**!
    iic slave Address, The default is ADDRESS_3
       ADDRESS_0               0x75             // i2c device address
       ADDRESS_1               0x76
       ADDRESS_2               0x77
       ADDRESS_3               0x78
*/
#define Mics_I2C_ADDRESS ADDRESS_3
DFRobot_MICS_I2C mics(&Wire, Mics_I2C_ADDRESS);

// When using the Breakout version, use the following program to construct an object from DFRobot_MICS_ADC
/**!
  adcPin is A0~A5
  powerPin is General IO
*/
#define ADC_PIN   A0
#define POWER_PIN 10
//DFRobot_MICS_ADC mics(/*adcPin*/ADC_PIN, /*powerPin*/POWER_PIN);

void setup()
{
  Serial.begin(115200);
  while(!Serial);
  while(!mics.begin()){
    Serial.println("NO Deivces !");
    delay(1000);
  } Serial.println("Device connected successfully !");

  /**!
    Gets the power mode of the sensor
    The sensor is in sleep mode when power is on,so it needs to wake up the sensor.
    The data obtained in sleep mode is wrong
   */
  uint8_t mode = mics.getPowerState();
  if(mode == SLEEP_MODE){
    mics.wakeUpMode();
    Serial.println("wake up sensor success!");
  }else{
    Serial.println("The sensor is wake up mode");
  }

  /**!
     Do not touch the sensor probe when preheating the sensor.
     Place the sensor in clean air.
     The default calibration time is 3 minutes.
  */
  while(!mics.warmUpTime(CALIBRATION_TIME)){
    Serial.println("Please wait until the warm-up time is over!");
    delay(1000);
  }
}

void loop()
{
  /**!
    Type of detection gas
    MICS-4514 You can get all gas state
    MICS-5524 You can get the state of CO, CH4, C2H5OH, C3H8, C4H10, H2, H2S, NH3
    MICS-2714 You can get the state of NO2, H2 ,NO
      CO       = 0x01  (Carbon Monoxide)
      CH4      = 0x02  (Methane)
      C2H5OH   = 0x03  (Ethanol)
      C3H8     = 0x04  (Propane)
      C4H10    = 0x05  (Iso Butane)
      H2       = 0x06  (Hydrogen)
      H2S      = 0x07  (Hydrothion)
      NH3      = 0x08  (Ammonia)
      NO       = 0x09  (Nitric Oxide)
      NO2      = 0x0A  (Nitrogen Dioxide)
  */
  int8_t gasFlag = mics.getGasExist(CO);
  if(gasFlag == EXIST){
    Serial.println("The gas exists!");
  }else{
    Serial.println("The gas does not exist!");
  }
  delay(1000);
  //mics.sleepMode();
}
Result
Open the serial port monitor and warm up for about 3 minutes, you can detect carbon monoxide (CO)leakage in real time.
Notes:
- If you need to detect other gases, modify the detected gas settings in the sample code yourself.
- The sensor takes 3 minutes to warm up.
Sample Code 3 - Obtain Sensor Analog Value
If you want to obtain the original sensor data, calculate the gas concentration or add your own temperature compensation functions, you can download the sample program to the Arduino UNO, open serial port monitor to view the original voltage output of the MEMS chip MiCS-4514.
Connection Diagram
Steps
- Connect the module to Arduino by the connection diagram above. You can certainly use with Gravity I/Ofor a more convenient and faster completion of the project prototype.
- Turn the selector switch to the I2C side.
- The I2C address defaults to 0x78, corresponding to the ADDRESS_3 in the code. If you need to modify the I2C address, you can first configure the hardware I2C address via the dial-up switch on the module, and modify the definition ADDRESS_X of the I2C address in the sample code. The correspondence between the dial switch and the I2C address parameter is as follows:
- ADDRESS_0:0x75, A0=0, A1=0(Default Address)
- ADDRESS_1:0x76, A0=1, A1=0
- ADDRESS_2:0x77, A0=0, A1=1
- ADDRESS_3:0x78, A0=1, A1=1
- Download and install DFRobot_MICS Library (About how to install the library?)
- Open Arduino IDE
- Upload the following sample code to the Arduino UNO。
- Or open the code getGasExist.ino in the library file sample,and burn to Arduino UNO。
- Open the serial port monitor of the Arduino IDE, adjust the baud rate to 115200, and observe the print results.
 /*!
  * @file  getADCData.ino
  * @brief Reading MICS sensor ADC original value
  * @n When using IIC device, select I2C address, set the dialing switch A0, A1 (Address_0 is [0 0]), (Address_1 is [1 0]), (Address_2 is [0 1]), (Address_3 is [1 1]).
  * @n When using the Breakout version, connect the adcPin and PowerPin
  * @copyright   Copyright (c) 2010 DFRobot Co.Ltd (http://www.dfrobot.com)
  * @licence     The MIT License (MIT)
  * @author      ZhixinLiu([email protected])
  * @version     V1.1
  * @date        2021-04-19
  * @get         from https://www.dfrobot.com
  * @url         https://github.com/dfrobot/DFRobot_MICS
  */

#include "DFRobot_MICS.h"

// When using I2C communication, use the following program to construct an object by DFRobot_MICS_I2C
/**!
    iic slave Address, The default is ADDRESS_3
       ADDRESS_0               0x75             // i2c device address
       ADDRESS_1               0x76
       ADDRESS_2               0x77
       ADDRESS_3               0x78
*/
#define Mics_I2C_ADDRESS ADDRESS_3
DFRobot_MICS_I2C mics(&Wire, Mics_I2C_ADDRESS);

// When using the Breakout version, use the following program to construct an object from DFRobot_MICS_ADC
/**!
  adcPin is A0~A5
  powerPin is General IO
*/
#define ADC_PIN   A0
#define POWER_PIN 10
//DFRobot_MICS_ADC mics(/*adcPin*/ADC_PIN, /*powerPin*/POWER_PIN);

void setup()
{
  Serial.begin(115200);
  while(!Serial);
  while(!mics.begin()){
    Serial.println("NO Deivces !");
    delay(1000);
  } Serial.println("Device connected successfully !");

  /**!
    Gets the power mode of the sensor
    The sensor is in sleep mode when power is on,so it needs to wake up the sensor.
    The data obtained in sleep mode is wrong
   */
  uint8_t mode = mics.getPowerState();
  if(mode == SLEEP_MODE){
    mics.wakeUpMode();
    Serial.println("wake up sensor success!");
  }else{
    Serial.println("The sensor is wake up mode");
  }
}

void loop()
{
  int16_t ox_data  = 0;
  int16_t red_data = 0;
  /**!
    MICS-5524 Only OX_MODE ADC data can be obtained
    MICS-2714 Only RED_MODE ADC data can be obtained
    MICS-4514 Gravity can obtain AllMode ADC data
  */
  ox_data  = mics.getADCData(OX_MODE);
  //red_data = mics.getADCData(RED_MODE);
  Serial.print("ox  data = ");
  Serial.println(ox_data);
  //Serial.print("red data = ");
  //Serial.println(red_data);
  delay(1000);
}
Result
Open the serial port monitor and warm up for about 3 minutes, you can obtain the MEMS chip MiCS-4514 raw data.
Notes:
- Two detection units(ox and red) are integrated in MiCS-4514 to calculate the concentration data of different gas. For specific curves, please refer to the sensor data curve in the wiki.
- The sensor takes 3 minutes to warm up.
Precautions for use
- Do not expose the sensor to high concentrations of organic solvents, silicone vapor or cigarette smoke to avoid poisoning the sensitive layer.
- For stable performance, preheat the module for about 3 minutes before testing.
- Sensors shall be placed in a filtered enclosure to protect them from water and dust.
Sensor Data Curve
Two detection units are integrated in the MiCS-4514, into ox and red, to calculate the concentration data for different gases.
FAQ
For any questions, advice or cool ideas to share, please visit the DFRobot Forum.


