Introduction
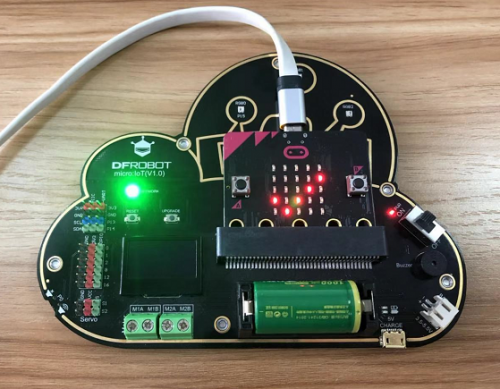
With the development of IoT, there are so many mature IoT platforms emerging in both domestic and overseas, but most of them are mainly designed for the professional, which could be very hard for the non-experts to get started. Therefore, we specifically developed this Micro: IoT, a micro:bit-based IoT expansion board. Use the board together with DFRobot Easy IoT platform, lower the barrier of using IoT.
This micro: IoT board is pretty cute and delicate, on which we integrated Wi-Fi, OLED, 2-way motor drive, 6-way IO port, 2-way IIC, 1-way serial port, 1-way buzzer, 3-way RGB, 2-way servo, Li-ion battery holder, charging circuit, emergency power interface etc. So many resources for you to programme! Even without complicated background knowledge, you can build you IoT applications in few steps!
We designed the board as cloud shape to make it more suitable for the theme of IoT. As for power supply, we selected CR123A 3.6V lithium rechargeable battery of 1000mA. This kind of battery features small size, high capacity and high safety. What’s more, we add short circuit and reverse connection protection for the product to further improve the safety in using Li-ion Battery.
Supports makecode and Mind+ graphical programming platforms.
Specification
- Battery Type: CR123A 3.6V Rechargeable Li-ion Battery (Note: do not use 3V CR123A battery and non-rechargeable. Recharging the non-rechargeable battery is dangerous.)
- Onboard charging circuit
- Interface: 2-way IIC, 1-way serial
- Micro:bit Interface: P0 P1 P2 P8 P12 P16
- Other Interface: two DC motor ports, two servo ports
- Standard Gravity Pins
- On-board 3-way RGB LED
- On-board buzzer and Switch
- On-board OLED display
- Dimension: 148×112mm/5.83×4.41”
- Weight: 104g
- Programming Platforms: makecode, Mind+
Overview
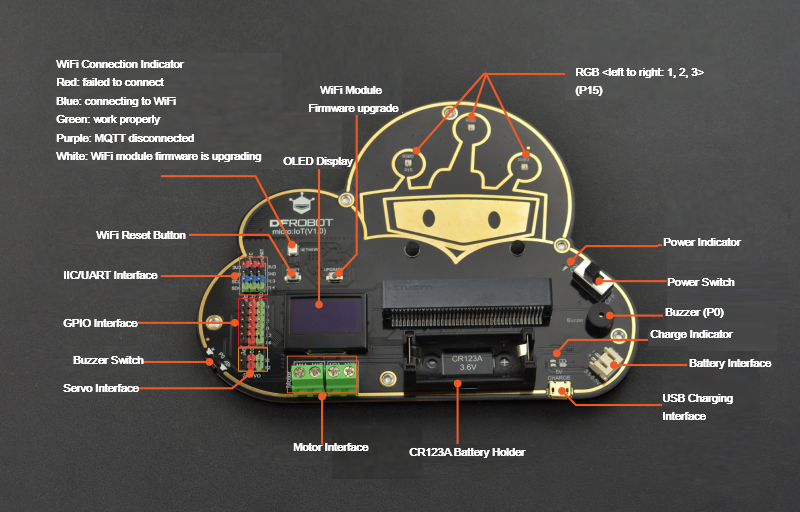
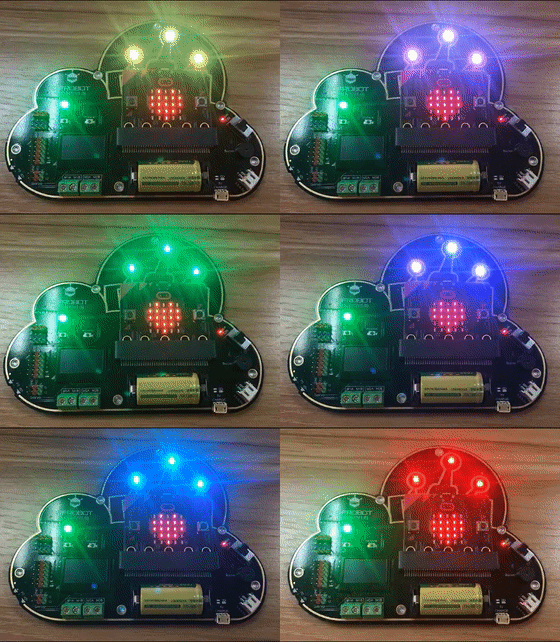
| Color | Indication |
|---|---|
| Red | failed to connect |
| Blue | connecting to WiFi |
| Green | Work properly |
| Purple | MQTT disconnected |
| White | WiFi module firmware upgrading |
Note: when the indicator turns purple, it means that MQTT is disconnected, and please check if the id account is correct.
Makecode Online Graphical Programming
Makecode basic operation tutorial: https://wiki.dfrobot.com/Makecode%20Get-started%20Tutorial
Micro:IoT library address: https://github.com/DFRobot/pxt-microIoT. How to install an library?
Easy IoT Platform
- Easy IoT from DFRobot is dedicated to simple solutions for Internet of Things.
- Features Included:
- Get started in 10 minutes, plug and operate
- OBLOQ supported, serial port transmission
- Real time monitoring, data analysis
Sign in and Setting Easy IoT
- Open the easy IoT website:http://iot.dfrobot.com.cn/

-
With a micro:bit board, a micro:bit IoT expansion board and Easy IoT, a whole IoT system will be ready.
-
Sign up and Sign In
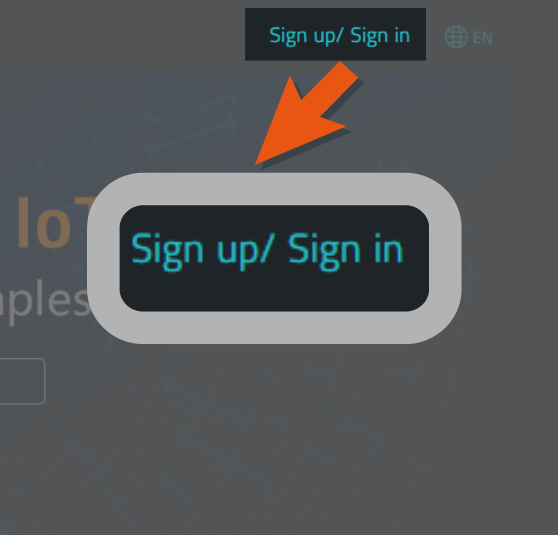
- Click the Sign up/Sign in at the upper right corner of the webpage to register a account.
- Fill in the black with your personal information, you can register via phone or email.
- Sign in the Easy IoT, then it will enter into Workshop interface. You need to add a new device to match your micro:bit.

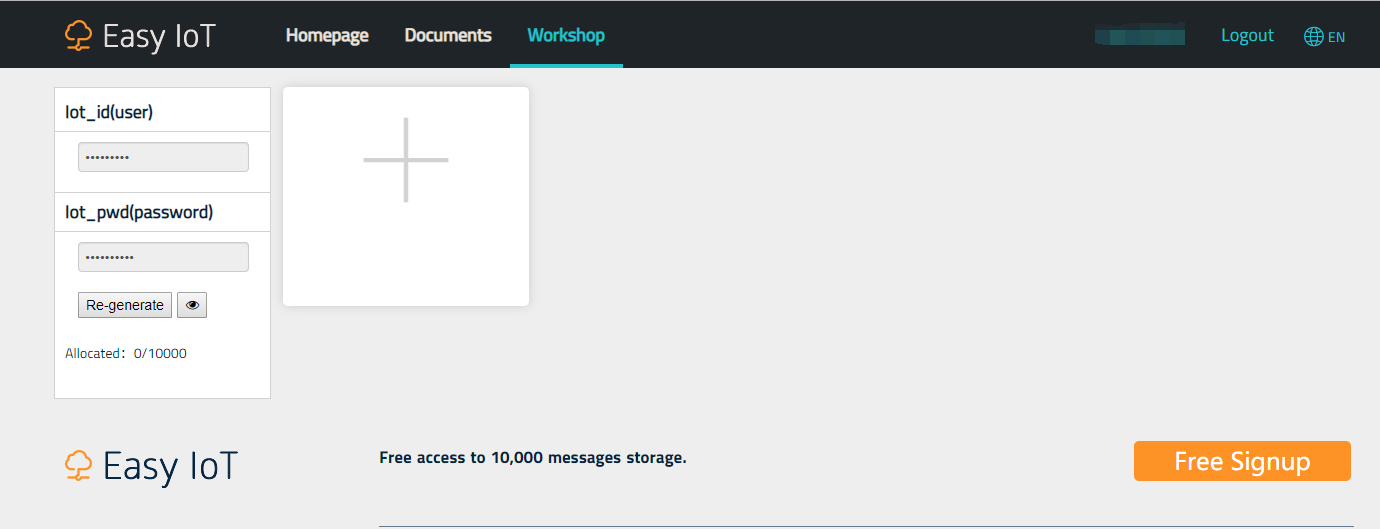
- Easy IoT Setting
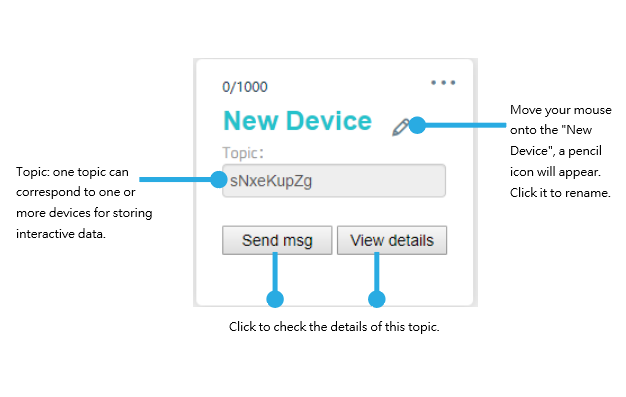
- When added a new device, a device topic Topic: elJA7JHZg will be generated randomly, and you can click the device name to change it.
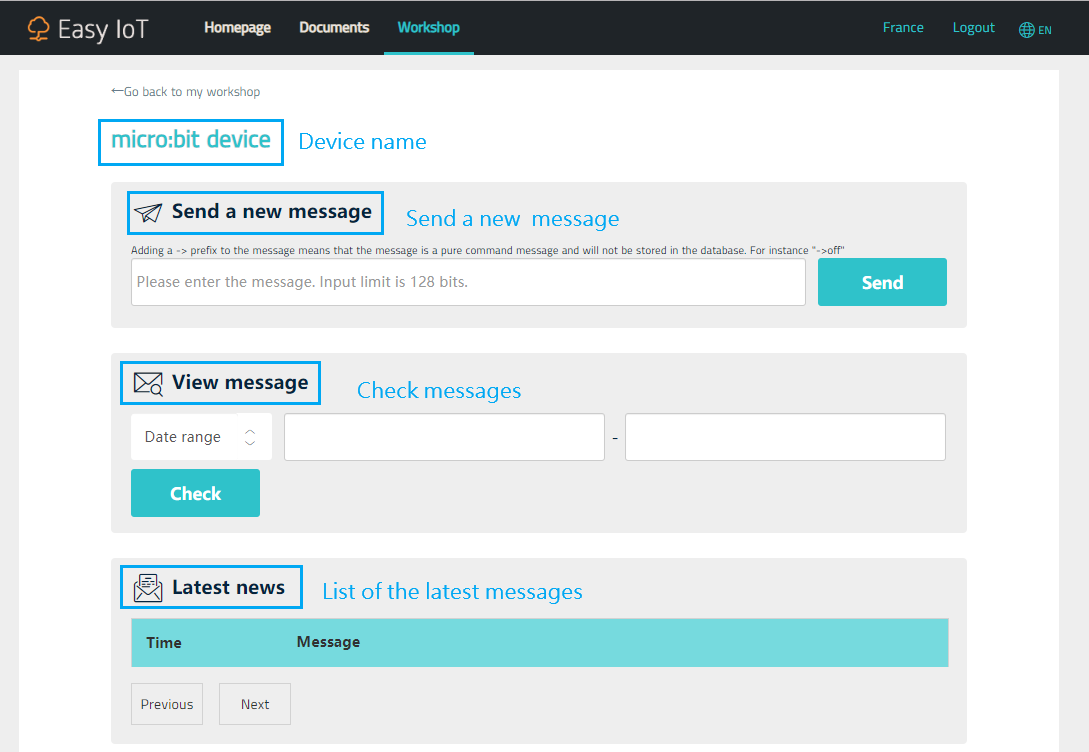
- Click "send message", then the webpage of message receiving and transmitting will appear. You can find the details of the received data.
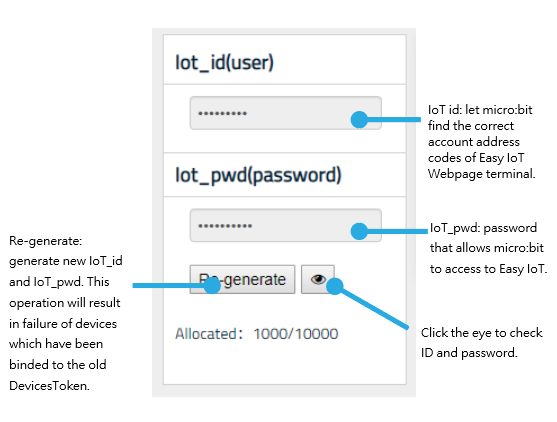
- Get to know other information in this page- ID account interface
Easy IoT Basic Tutorial
Smart Emojis
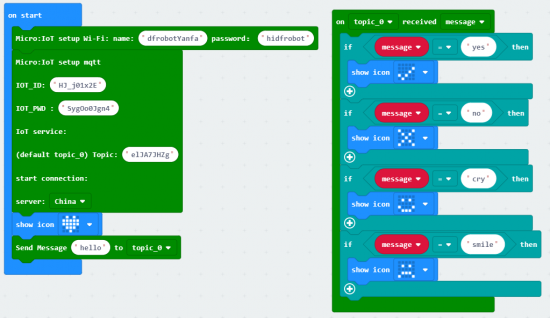
Makecode Program: smart emojis
Function: display your current feeling. For example, if you are not in the mood, you can send a message to micro:bit through Easy IoT to let micro:bit board display the set pattern.
Programs for reference
Program Effects:
- Enter Easy IoT webpage to send message to micro:bit and find the related Topic, click "send message".
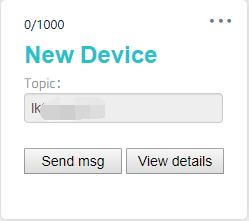
- Input your command into the blank, and send it out. Send the message "yes", micro:bit displays "√"; "no", "×"; "cry", "crying face pattern"; "smile", "smiley face".

Voting Machine
Makecode programs: voting machine-hosting
Makecode programs: voting machine-voting
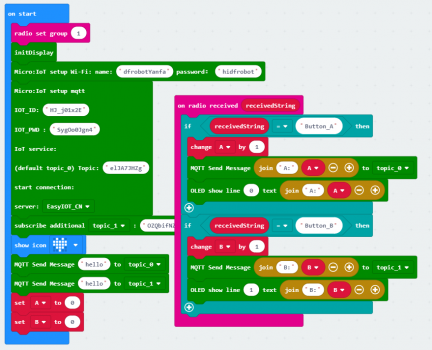
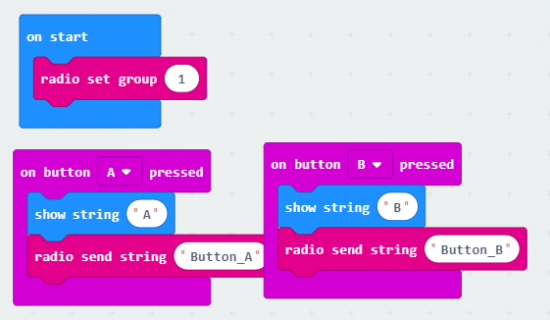
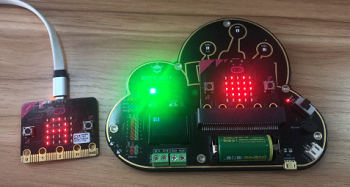
Function description: voting machine utilizes the wireless communication function. The voting machine has hosting post and voting port. The voting port can have abundant devices. When the voter presses the related button, the number of the votes will be displayed on the screen. Meanwhile, the data will be sent to IoT platform.
Programs for reference
Programs Effects:
Press down button A, send a message to topic0 and change A by 1; press down B, send a message to topic1 and change B by 1.


Light and Temperature Monitor
Makecode programs: light and temperature monitor
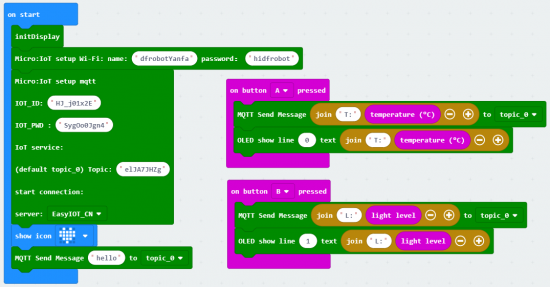
Function description: use micro:bit to detect the light and temperature, and send the data to Easy IoT and OLED by pressing button A and B.
Programs for reference
Programs effects:
Press down button A, send the current temperature value to the workshop; the first line of the OLED screen displays the temperature value. Press down button B, send the current light value to the workshop; the second line of OLED screen displays the light value.
T for temperature; L for Light

Remote Watering System
makecode programs: watering system
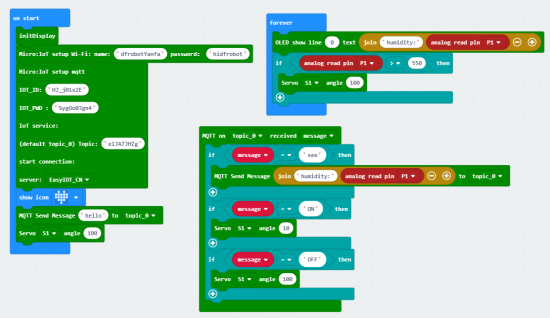
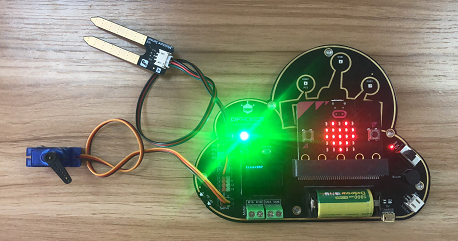
Function description: connect a soil moisture sensor to the module's P1, connect a servo to pin S1. When the internet connected, send the command "see" to Easy IoT to check the soil humidity. We can decide if the plants need to be watered according to the humidity data. In order to avoid we forget to turn off the water system, we should first set that, when the humidity is over than 550, the water system will be turned off automatically.
Components: servo, soil mositure sensor(P1)
Programs for reference
Program Effects:
- Watering plants by remote control: when connected with WiFi, the servo rotates 100 degrees, and the watering system is closed. Send commands to micro:bit via Easy IoT, if the micro:IoT received the command "ON", the servo rotates 10 degrees to enable the watering system. When the micro:IoT received the command "OFF", the servo rotates to 100 degrees, or the humidity is larger than 550, the system will be disabled.
Note: when the servos turns to 100 degrees, the watering system is closed, servo to 10 degrees, the system opened.

Automatic Clothes Hanger
Makecode Programs: automatic clothes hanger
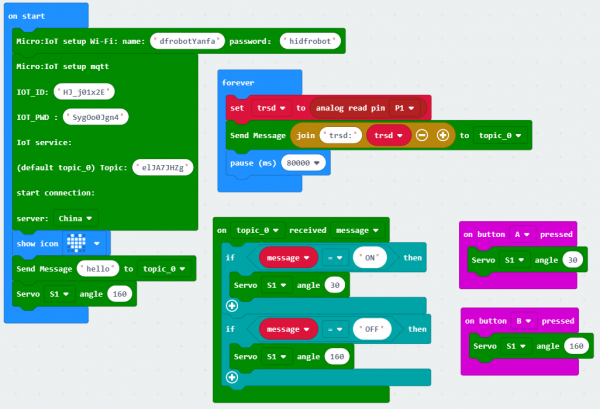
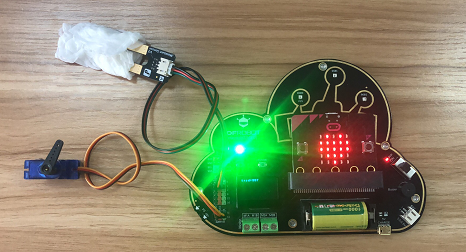
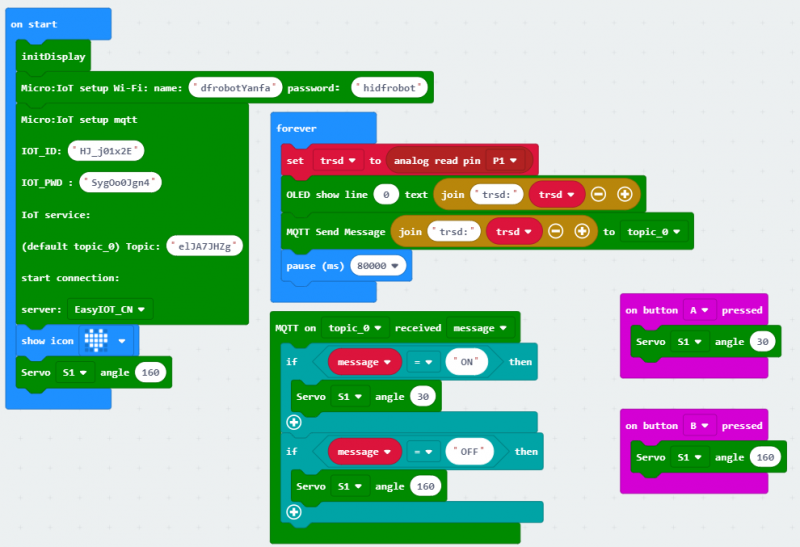
Function Description: send humidity value to Easy IoT every 8 minutes, then user can determine if it is suitable to dry our clothes. When OBLOQ receives "OFF", the servo rotates to a certian degree to retract the clothes hanger; When OBLOQ receives "ON", the servo rotates to another degree to stretch the hanger.
Components: Servo(S1), soil moisture sensor(P1)
Programs for Reference
Program Effects:
When Easy IoT sends "ON", the servo rotates to 160 degrees to stretch the clothes hanger; when Easy IoT sends "OFF", the servo rotates to 30 degrees to retract the clothes hanger. Or we can control it manually by pressing the button A and B.

.png?raw=true)
Remote Entrance Guard System
Makecode programs: remote entrance guard system
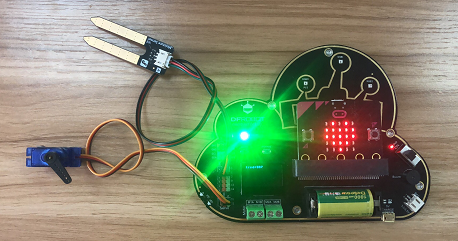
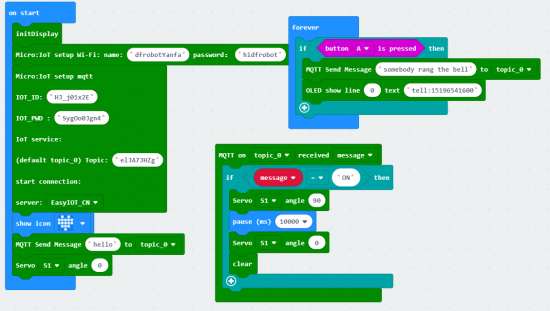
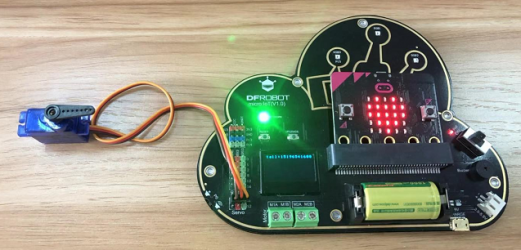
Function description: imagine when you are on business, your friend suddenly calls you and says he is waiting at the door of your house, but you cannot go home immediately. However, you have this remote entrance guard system, so you can just use your phone to open the door and let he enter your house.
Component: servo (S1)
Programs for Reference
Programs Effect:
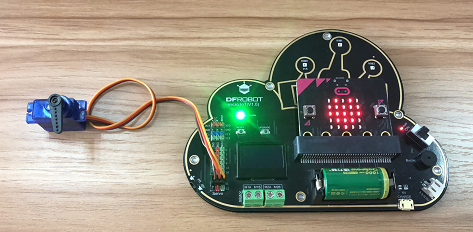
Press down button A, the telephone number will be displayed. If the house master gets the phone call, he will send command "ON" via Easy IoT to the guard system, the servo rotates to 90 degrees to open the door. 1 minute later, the servo rotates to 10 degrees, the door will be closed.

Remote controlled RGB LEDs
Makecode Programs: remote controlled RGB LEDs
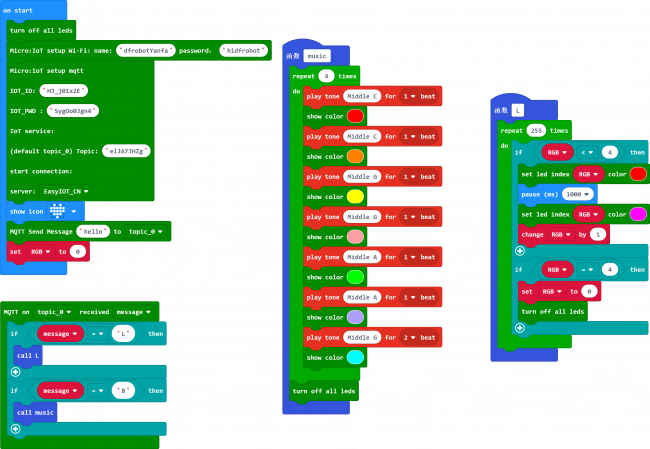
Function Description: you were gonna throw a home party, unfortunately, you have to work overtime, so you told your friends to start the party themselves. They want to turn on the festival lamps but cannot find the remote controller. This time you use you phone to turn the lamp on.
Programs for reference
Programs Effect:
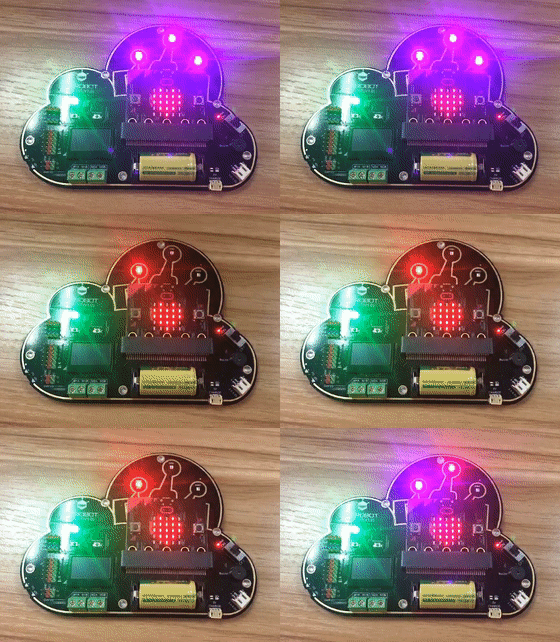
Send a command "L" via Easy IoT, to dispaly an effect of water lamp (alternatively emit red and purple). When the module receives the command "B", it will play the music "twinkle, twinkle, little start" and the RGB shines with the music.

IFFTT IoT Platform
- IFFTT, short for "If this then that", is a free web-based service to create chains of simple conditional statements, called applets.
- IFFTT helps users to connect all of their different apps and devices and let them talk to each other.
- Operation process: if the conditons of this web service are met, then automatically trigger that web service to do a action.

Preparation
-
Enter IFFTT website, register an account. Website: https://ifttt.com
-
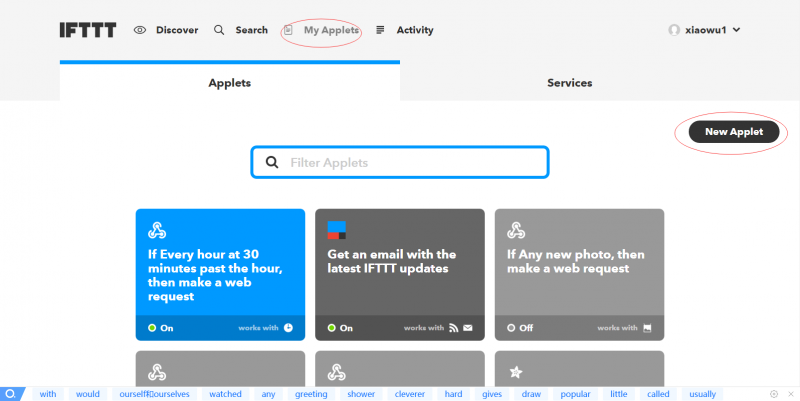
Sign in and enter the My Applets page, click New Applets.
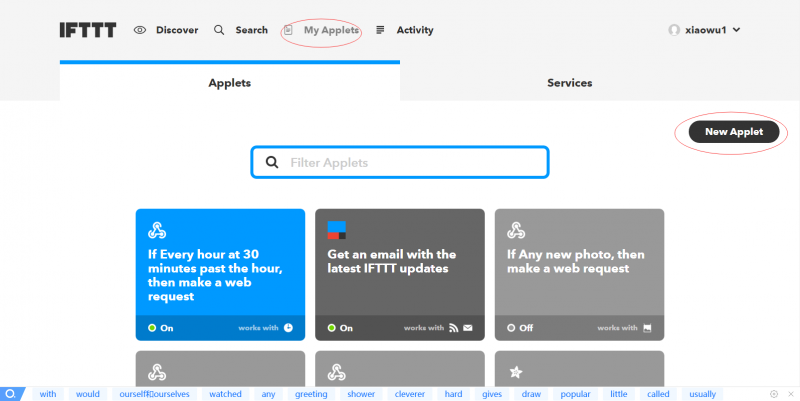
- Create an Applet, enter the Applet interface, click This and input webhooks.
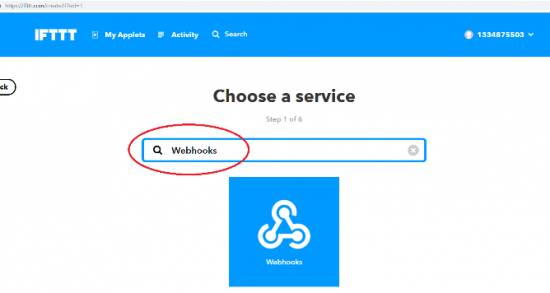
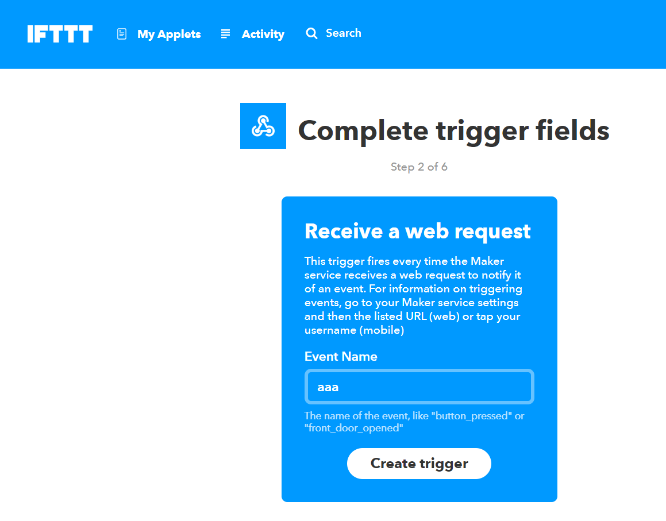
- Fill the Event Name in the next page.
IFFTT Basic Tutorial
Send data to email
Function description: press the button to send a message to email.
- Configure IFFTT, set the event name as "aaa", then webpag will return back automatically. Click "That" and select "Email" in the next page.


- Select "Send me an Email"

- Edit the content, here I chose the default one. Then click "creation action"

- To check the password, click HOME to enter "webhooks" and click "Documentation".


Makecode Programs: Send data to Email

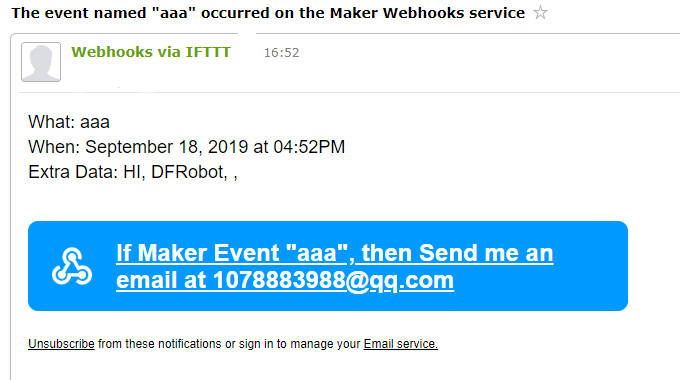
- Result: press down button A, the message "HI DFROBOT" will be sent to the pre-set Email.
Send note to Evernote
Function Description: send note to Evernote
- Create a new This. Click Account->Create->This, and create webhooks and name the Event as "kkk".

- The webpage will back to the last page, then click That and search Evernote.


- Select what you like, I chose Create a note here.

- Select the default form

- Click "Creation action", the password is the same as the previous Email project.
Makecode Programs: send date to Evernote
Programs for reference
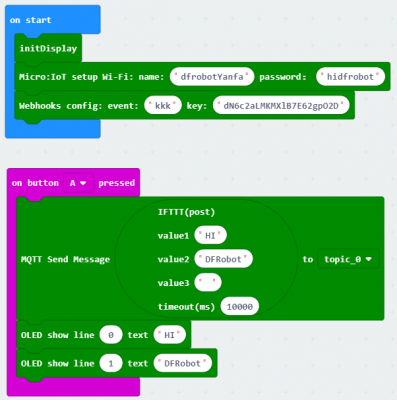
- Result: press down button A, send "HI DFROBOT" to the Evernote.

Send Message to Twitter
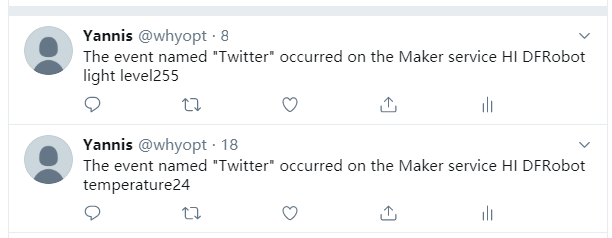
Function description: when you get up in the morning, press down button A and B, send the temperature and light intensity to Twitter.
- Create a new This. Click Account->Create->This, and create webhooks and name the Event as "Twitter".

- The webpage will back to the last page, then click That and search Twitter.


- Select what you like, I chose "post a tweet" here.

- Complete the following steps after that.
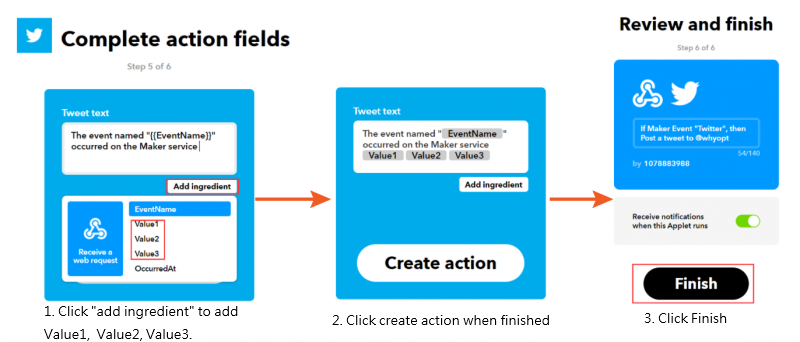
- If accidently selected the default setting, add the Event as the following steps.

Makecode Programs: Send message to Twitter

- Result: press down button A, send the message to Twitter: Hi DFROBOT and the current temperature; Press down button B, send: HI DFROBOT,and the current light intensity.
Send Message to iPhone
Function description: the climate is changeable during the seasonal alterantion. Use the micro:bit to detect temperature. If temperature is more than 30 degree, send a message to iphone to notice the user to pay attention to heatstroke. If temperature is less than 20 degree, send a message to iphone to notice the user to protect themselves from the cold.
- Create a new This. Click Account->Create->This, and create webhooks and name the Event as "Reminder"

- The webpage will back to the last page, then click That and search IOS Reminders

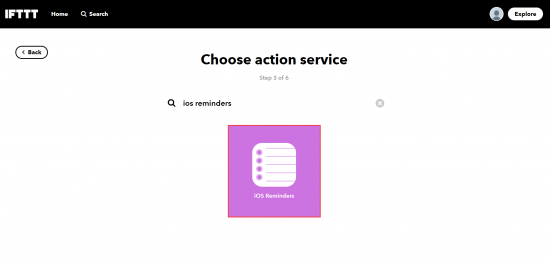
- Select what you like, I chose "add reminder to list" here.

Note: the alarm date can be set according to your actual use.
Makecode: Send a message to iPhone
Programs for reference
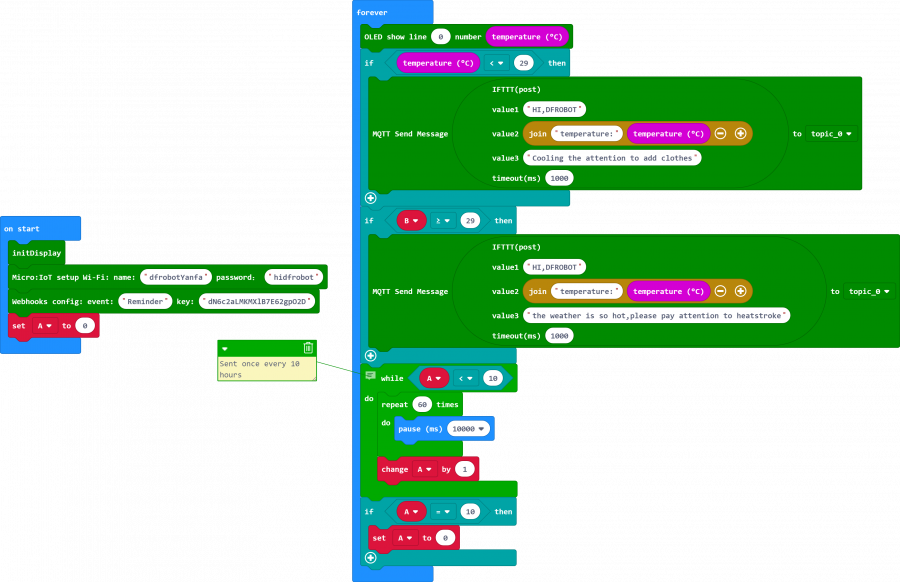
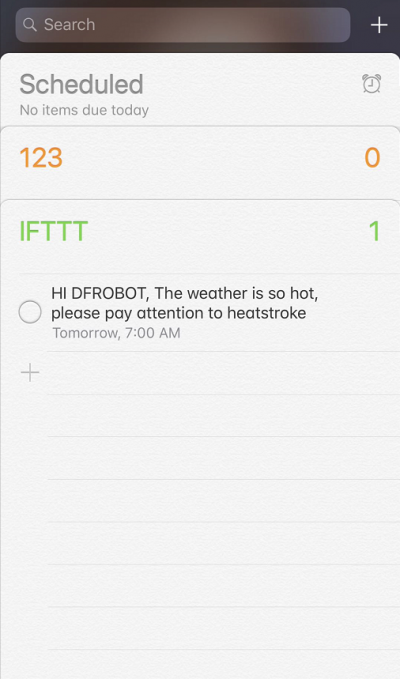
- Result: Send a message to iPhone every 10 hours. When Temperature>30, send: the weather is so hot, please pay attention to heatstroke. When temperature<20, send: Cold outside, please put more clothes on.
Use an Android phone to Send Message
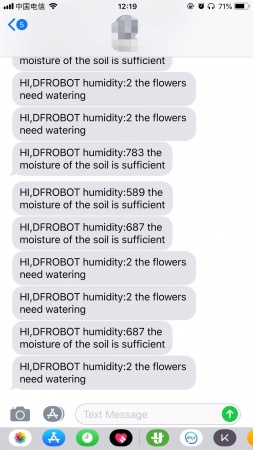
Function description:We often forget to water out plants, sometime, you have to be on business for a long time, but you want someone to take care of your plants. We can use the IoT expansion board to make an application to solve this problem. When the soil moisture is less than 350, the system automatically sends a message to your friend to water the plants. If it is over 520, send a message that the moisture is suitable.
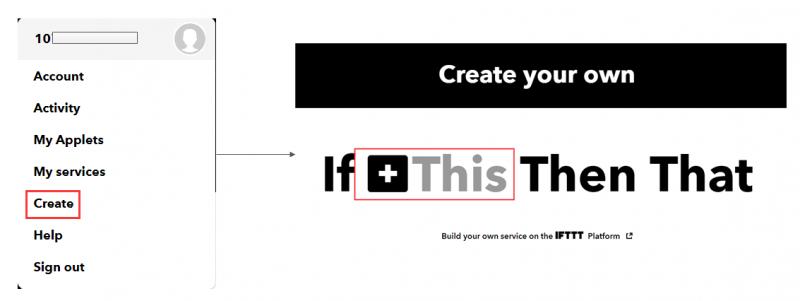
- Create a new This. Click Account->Create->This, and create webhooks and name the Event as "message"
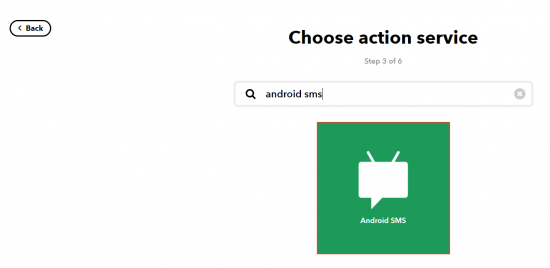
- The webpage will back to the last page, then click That and search "Android sms"

- Select what you like, I chose "send an sms" here.
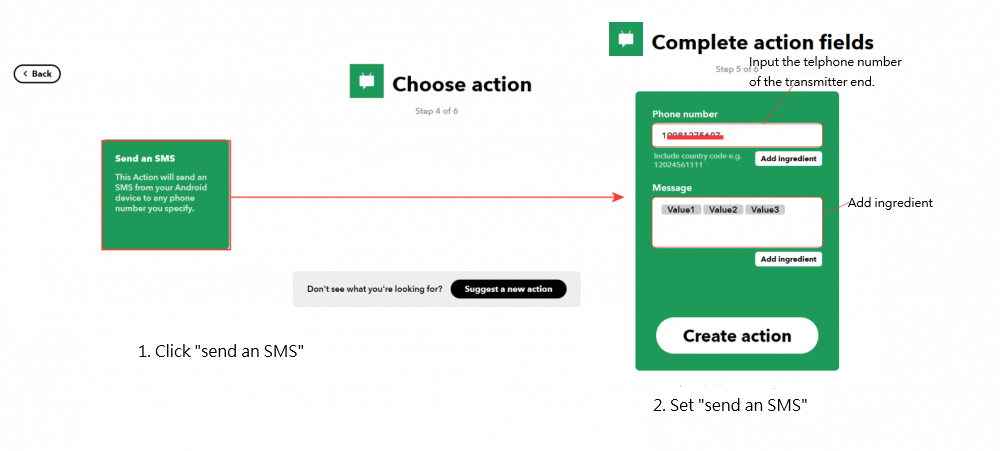
- Set the phone number to receive the message
-Enter->Home->webhooks->add the phone number to receive phone number
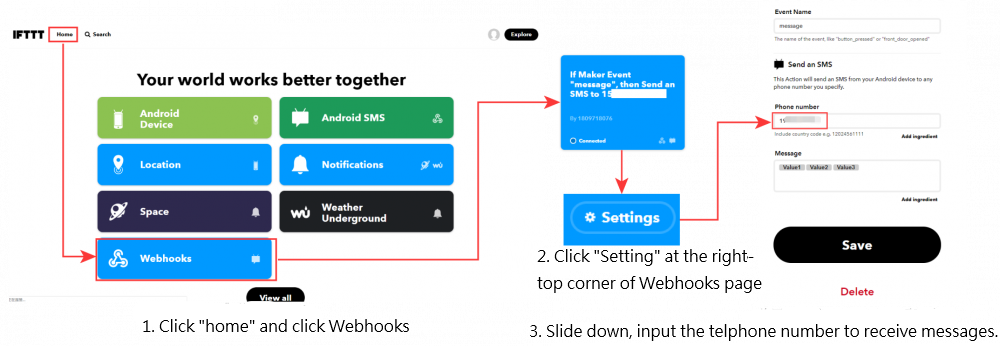
Note: the type of the phone to send messages must be Android, and there should be a IFFTTT app installed on the phone. IFFTTT needs to have the access permission to Message.

Makecode Programs: Send messages to Android phone

- Result: when moisture<350, send: the flowers need watering; When moisture>250, send: the moisture of the soil is sufficient.

Beebotte IoT Platform
-
Beebotte is a Cloud Platform for Real Time Connected Objects
- Connecting anything and everything in real-time using a rich API supporting REST, WebSockets and MQTT
- Designed to empower Internet of Things and real-time communicating applications
- Beebotte brings you a platform as a service connecting thousands of objects and delivering millions of messages
- One platform suited for diverse applications like instant messaging, dashboards, online gaming and score boards, domotics, Internet of Things and reporting
- Seamless scalability to meet your growing demands
-
How to use Beebotte
Send data configuration from MQTT to Beebotte
- Website: https://beebotte.com
- Enter the Website, register an account. Then Back to Homepage and click Get Started For Free

- Enter Create New Interface to create your Channel Name, Channel Description, Resource name, Resource Description. You can create more than one Resource.

- For example, create a humidity channel to receive data
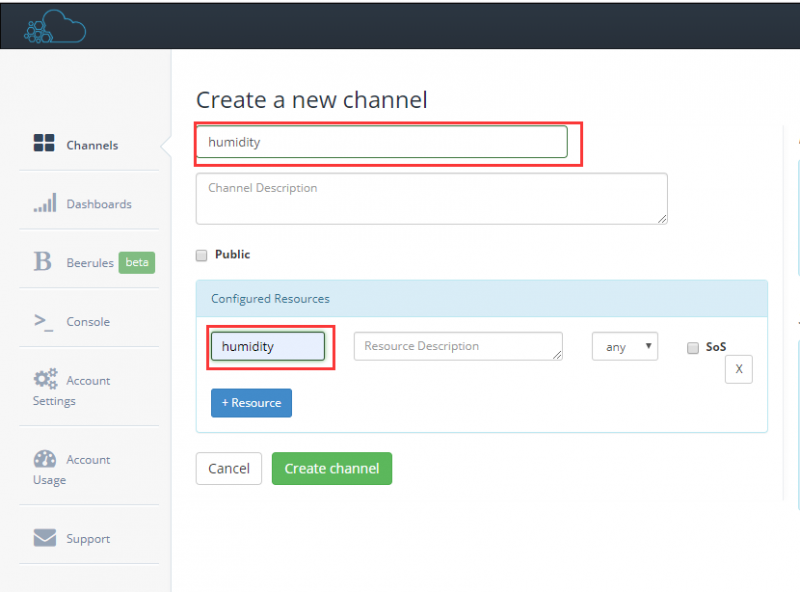
- The following interface will appear when you completed.

- Click Account Settings->Access Management to check the API Key and Secret Key

- Create Dashboards to check the history of the update value.
-Create time table
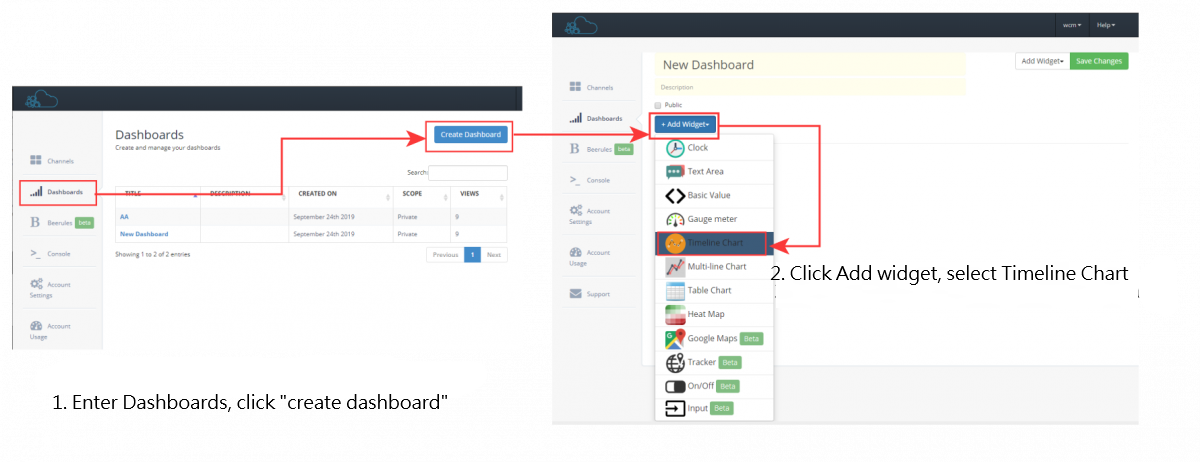

Record the data of the Soil Moisture
Function description: Create a channel-humidity and time table. When connected with Internet, the moisture will be updated to Beebotte platform, and we will check the change of the moisture through the curve graph in Dashboards.
Makecode Programs: Record the data of the Soil Moisture
Programs for reference
Note: IoT_id should be API Key; IoT_pwd should be Secret Key; TOPIC is the name of Channel/Resource, there is a / between them.
Chose Beebotte as the server in the Program.

- Record the data of the Soil Moisture: enter Dashboards, click humidity check the data.

Basic Tutorials
Drive a motor
makecode programs: drive a motor
Programs for reference:
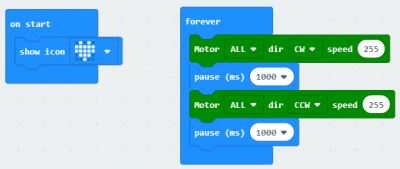
Result: the motor rotates forward at speed of 255 for 1 second, and then rotate backward for 1 second.
Light and Temperature Monitor
makecode programs: light and temperature monitor
Programs for reference:

Function description: use micro:bit to detect the light and temperature value, display the values on the OLED.
Results: OLED displays the current temperature and light in real-time.
FAQ
Q:Encountering I2C address conflicts?
A: For a comprehensive guide on identifying and resolving I2C address conflicts in embedded systems, check out this detailed article: How to Resolve I2C Address Conflicts. It covers practical hardware and software solutions to ensure smooth communication in your IoT devices.
For any questions, advice or cool ideas to share, please visit the DFRobot Forum
