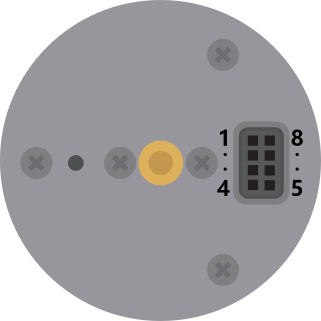
Lark Weather Station

The Earth's atmosphere is a dynamic and intricate system influenced by various factors, with wind speed, wind direction, temperature, humidity, and air pressure being pivotal. A comprehensive understanding of atmospheric movement necessitates precise detection and recording of these elements. Traditionally, acquiring meteorological data involved a cumbersome process of integrating multiple sensors, requiring time-consuming wiring, programming, debugging, and assembly. This posed significant challenges for educators and students interested in meteorological research. Moreover, existing commercial weather stations are often specialized weather monitoring equipment that cannot be developed twice and lack adaptability, thus falling short in meeting the diverse needs of research. To address these issues, we present the Lark Weather Station.

Lark Weather Station is an exceptionally compact weather station that provides key weather data such as wind speed, wind direction, temperature, humidity, and atmospheric pressure. It incorporates high-quality sensors internally to ensure precise and stable data, making it suitable for meteorological research. The data output from Lark is in standard physical quantities, which can be read and processed using controllers like Arduino or directly recorded into its own 16M storage space. The Lark adopts a modular shell design, allowing for the expansion of additional sensors to collect a wider range of meteorological data, meeting diverse user needs for weather exploration.

Product Parameters

Structural Overview

Note: The wind vane can be quickly inserted and removed by pressing. To remove, gently press to pop it out. Do not pull forcefully.

Number Name Function
1 Compass Assists in orientation identification
2 Anemometer Wind speed detection device, works with internal sensor to measure wind speed
3 Anemometer Cover Protects the anemometer cups when stored; should be removed when using the compass
4 Louvere Box Ensures air circulation, used for temperature, humidity, and air pressure detection
5 Wind Vane Wind direction detection device, works with wind direction shaft and internal sensor to measure wind direction
6 Wind Direction Shaft Rotates driven by the wind vane, used for wind direction detection
7 Gravity Interface Supports I2C/UART communication, can interact with development boards like Arduino
8 Type-C Interface Used for configuration or data export
9 Adjustable Tripod Supports the weather station
10 Expansion Port Connects to the battery and data transmission module in the expansion bin
11 1/4 Inch Thread Hole Used to secure the weather station, can be connected to a tripod
12 Firmware Upgrade Upgrades the system firmware

Quick Start

Before You Start

STEP1: Assemble

STEP2: Data Collection

Note: At this time, do not power the weather station directly from a computer. If you connect the computer to the weather station, the weather station will only provide data export functionality and will not be able to store data.

STEP3: Data Export

Function Description

Wind Direction Measurement

Please calibrate the orientation of the weather station each time it is started to ensure accuracy. Adjust the angle of the weather station so that the Type-C interface faces the direction pointed by the S on the compass, i.e., align the Type-C port towards the south. Once the weather station starts normally, the yellow light will turn off, at which point you should rotate the wind vane once to complete the calibration.

You can use the compass on the cover to assist in calibration. When using the compass, remove the cover and keep it at least 10 cm away from the weather station. Be aware of possible magnetic interference from nearby electronic devices like computers and mobile phones.

Parameter Configuration

Connect the weather station to the computer via Type-C, and a 16M USB drive will pop up on the computer. Open the config file in the USB drive.

Name Function Options Default
Communication Set communication mode I2C/UART (115200) I2C
Sample_rate Set data sampling rate 1-60S or 1-60M 30S
Record Set whether to enable data storage ON/OFF ON
Delay_record Set delay start time for storage 10~60 10S
Light_Switch Set whether RGB light is always on ON/OFF OFF
Low_Power Set whether to enable low power mode ON/OFF OFF

Data Storage and Export

Note: When connected to the computer, the weather station only provides data export function and cannot store data.

Firmware Upgrade

Low Power Mode Description

RGB Indicator Light Status Explanation

Explanation: Regardless of whether the Light_Switch is set to ON or OFF, the yellow light will illuminate for 1 second after startup. If there is a system anomaly, the red light will illuminate. When Light_Switch is set to OFF, the indicator light will usually be off after a normal startup and will briefly light up when data is stored. When Light_Switch is set to ON, the indicator light will usually be on continuously and will turn off briefly when data is stored.

System Time Setting

The Lark can set the time through the config file in the USB drive. Add a new line in the config file and enter “Time:2023/7/24/17:56:15”, then save. After restarting the Lark, it will automatically read and update the system time based on the time set in the config.

The system time can also be set through code, as detailed in the UNO Tutorial and UNIHIKER Tutorial sections.

Power Supply & Reserved Communication Port Explanation

img

Number Name Function Number Name Function
1 V_GNSS Independent power supply port for positioning module 5 V_DTU Independent power supply port for communication module
2 VBAT2 Charging port, connect to battery positive 6 GND System ground
3 GND Battery negative terminal 7 SCL I2C clock
4 VBAT1 Battery positive terminal 8 SDA I2C data

A battery installation space is reserved in the expansion bay. If you install the battery yourself without using the expansion bay, pay attention to the direction of the positive and negative terminals. Incorrect connection can cause damage.

When connecting a rechargeable battery yourself, both VBAT1 and VBAT2 should be connected to the battery positive terminal. VBAT1 is for powering the Lark, and VBAT2 is for charging the battery.

UNO Tutorial

Hardware and Software Preparation

Wiring Diagram

img

Code Programming

#include "DFRobot_LarkWeatherStation.h"
#define DEVICE_ADDR                  0x42
DFRobot_LarkWeatherStation_I2C atm(DEVICE_ADDR,&Wire);

void setup(void){
  Serial.begin(115200);
  mySerial.begin(9600);
  delay(1000);
  while(atm.begin()!= 0){
    Serial.println("init error");
    delay(1000);
  }
  Serial.println("init success");
  //atm.setTime(2023,3,1,17,20,0);
}

void loop(void){
    Serial.println(atm.getTimeStamp());
    Serial.print(atm.getValue("Speed"));
    Serial.println(atm.getUnit("Speed"));
    Serial.println(atm.getValue("Dir"));
    Serial.print(atm.getValue("Temp"));
    Serial.println(atm.getUnit("Temp"));
    Serial.print(atm.getValue("Humi"));
    Serial.println(atm.getUnit("Humi"));
    Serial.print(atm.getValue("Pressure"));
    Serial.println(atm.getUnit("Pressure"));
//    Serial.print(atm.getValue("Battery"));//Available when connected to a lithium battery
//    Serial.println(atm.getUnit("Battery")); //Available when connected to a lithium battery
//    Serial.print(atm.getValue("Lat"));//Available when connected to a GNSS module
//    Serial.print(atm.getValue("Lon"));//Available when connected to a GNSS module
    Serial.println("----------------------------");
//    Serial.println(atm.getInformation(true));
    delay(1000);
}

img

Mind+

Load the Mind+ user library: https://gitee.com/liliang9693/ext-yunque

UNIHIKER Tutorial

Mind+

Python Programming

from DFRobot_Atmospherlum import *
from pinpong.board import Board
import time 
Board().begin()
yunque_i2c = DFRobot_Atmospherlum_I2C(0x42)
while (yunque_i2c.begin() != 0):
    print("yunque_i2c initialize failed!!")
    time.sleep(1)
print("Sensor initialize success!!")
yunque_i2c.set_local_time()
time.sleep(1)
while  True:
    print((yunque_i2c.get_time_stamp()))
    print((str((yunque_i2c.get_value("Speed"))) + str((yunque_i2c.get_unit("Speed")))))
    print((yunque_i2c.get_value("Dir")))
    print((str((yunque_i2c.get_value("Temp"))) + str((yunque_i2c.get_unit("Temp")))))
    print((str((yunque_i2c.get_value("Humi"))) + str((yunque_i2c.get_unit("Humi")))))
    print((str((yunque_i2c.get_value("Pressure"))) + str((yunque_i2c.get_unit("Pressure")))))
    time.sleep(1)

Makecode Tutorial

Wiring Diagram

Graphical Programming

Execution Result

img

Sensor Expansion

The Lark Weather Station comes with two built-in Gravity I2C expansion interfaces, allowing for the connection of additional sensors to gather a wider range of meteorological data. This provides users with more flexible options to choose sensors according to their needs and integrate them easily into the system.

Operating Procedure

  1. Remove the two screws in the middle of the bottom of the weather station.

img

  1. Pull out the connection line from the bottom.

img

  1. Unscrew the three screws under the Venetian blind by about 5mm and remove the entire Venetian blind.

img

  1. Connect the sensors you want to expand to the expansion interfaces.

img

  1. When reassembling, make sure the side of the wind direction shaft with the magnet faces towards the base.

Expandable Sensor List

SKU Sensor Physical Quantity Name Tag Typical Data Device Address Version
SEN0228 Digital Ambient Light Sensor Ambient Light Light Light: 125.47 lx 0x10 V1.0.0
SEN0322 Oxygen Sensor Oxygen Concentration O2 O2: 20.01 %vol 0x72
A0A1:10
V1.0.0
SEN0321 Ozone Sensor Ozone Concentration O3 O3: 1544 ppb 0x70
0x71
0x73
V1.0.0
SEN0514 Air Quality Sensor Air Quality
TVOC
ECO2
AQI
TVOC
ECO2
AQI: 1
TVOC: 88 ppb
ECO2: 529 ppm
0x52
0x53
V1.0.0
SEN0529 Three-Axis Magnetometer Direction
X-axis Magnetism
Y-axis Magnetism
Z-axis Magnetism
Angle_N
Mag_X
Mag_Y
Mag_Z
Angle_N: 157.38 °
Mag_X: 20 uT
Mag_Y: -48 uT
Mag_Z: -14 uT
0x13
A0A1:11
V1.0.0
SEN0364 Visible Light Spectrometer Spectrum 405-425nm
435-455nm
...
405-425nm: 11
435-455nm: 61
...
0x39 V1.0.0
SEN0460 PM2.5 Air Quality Sensor PM1.0
PM2.5
PM10
PM1.0
PM2.5
PM10
PM1.0: 43 ug/m³
PM2.5: 77 ug/m³
PM10: 93 ug/m³
0x19 V1.0.0
SEN0206 Infrared Temperature Sensor Temperature Temp Temp: 22.41 ℃ 0x5A V1.0.0
SEN0536 Carbon Dioxide Sensor Carbon Dioxide Concentration CO2 CO2: 401.37 ppm 0x62 V1.0.0
TEL0157 Satellite Positioning Latitude
Longitude
Altitude
Lat
Lon
Altitude
Lat: dd.dddddd
Lon: dd.dddddd
Altitude: 522.9 m
0x20 V1.0.0

Data Acquisition

Here, we demonstrate acquiring oxygen concentration data using SEN0322 as an example. Simply write the physical quantity's name tag into the getValue and getUnit functions.

#include "DFRobot_LarkWeatherStation.h"
#define DEVICE_ADDR                  0x42
DFRobot_LarkWeatherStation_I2C atm(DEVICE_ADDR,&Wire);
void setup(void){
  Serial.begin(115200);
  //Serial1.begin(115200);
  delay(1000);
  while(atm.begin()!= 0){
    Serial.println("init error");
    delay(1000);
  }
  Serial.println("init success");
  //atm.setTime(2023,3,1,17,20,0);
}

void loop(void){
    Serial.println(atm.getTimeStamp());
    Serial.print(atm.getValue("Speed"));
    Serial.println(atm.getUnit("Speed"));
    Serial.print(atm.getValue("O2"));
    Serial.println(atm.getUnit("O2"));  
    Serial.println("----------------------------");
    delay(1000);
}

FAQ

For any questions, advice or cool ideas to share, please visit the DFRobot Forum.

More Documents

DFshopping_car1.png Get Lark Weather Station from DFRobot Store or DFRobot Distributor.

Turn to the Top