1. Software and Hardware Introduction
1.1 Introduction to Arduino IDE
Arduino IDE (Integrated Development Environment) is a programming software specifically designed for the Arduino open-source hardware platform, used to write, compile, and upload programs to Arduino main control boards (such as UNO, MEGA, Nano, ESP32, etc.). It is the core tool for the development of all Arduino projects.
Arduino IDE official website: https://www.arduino.cc/en/software/
1.2 Introduction to UNIHIKER K10
UNIHIKER K10 is a development learning board specifically designed for quick experience and learning of artificial intelligence. It adopts 100% domestic chips with independent intellectual property rights, meeting the teaching needs of programming, Internet of Things, and artificial intelligence in information technology courses. The board integrates an LCD color screen, Wi-Fi and Bluetooth, a camera, microphone, speaker, RGB indicator light, various sensors, and rich expansion interfaces. With highly integrated onboard resources, it enables easy implementation of sensor control, IoT applications, and AI projects such as face recognition, voice recognition, and voice synthesis without requiring additional equipment during teaching.
UNIHIKER K10 mall purchase link: https://www.dfrobot.com.cn/goods-4014.html
2. Hardware Connection
Materials Needed
- Hardware
- UNIHIKER K10 x 1
- HUSKYLENS 2 x 1
- Type-C USB cable x2
- 4-pin Connection Cable x1
Prepare one USB data cable and one 4-pin white silicone wire. Connect the computer and UNIHIKER K10 with the USB data cable. Use the 4-pin white silicone wire to connect UNIHIKER K10 and HUSKYLENS 2 first, then use an additional USB data cable to connect the USB-C interface of HUSKYLENS 2 to the power supply to power HUSKYLENS 2. Refer to the wiring diagram below for reference.

3. Programming Preparation
3.1 Install UNIHIKER K10 SDK
Step 1: Download Arduino IDE from the official website: https://www.arduino.cc/en/software.
Install Arduino IDE SDK
After downloading, UNIHIKER K10 will be integrated into Arduino IDE as an SDK (Software Development Kit).
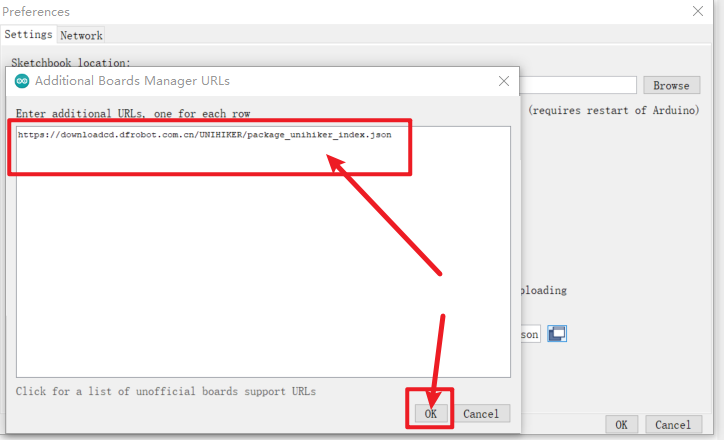
SDK URL: https://downloadcd.dfrobot.com.cn/UNIHIKER/package_unihiker_index.json
- In the Arduino IDE, open "File->Preference"
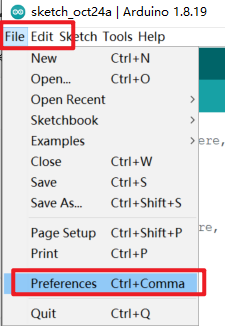
Set "Compiler warnings" to none.
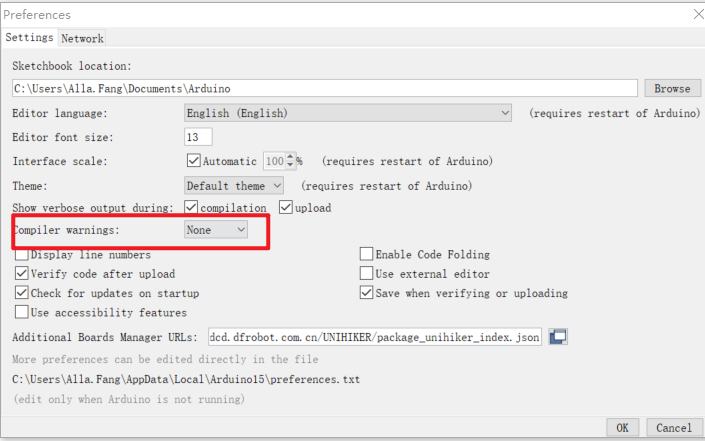
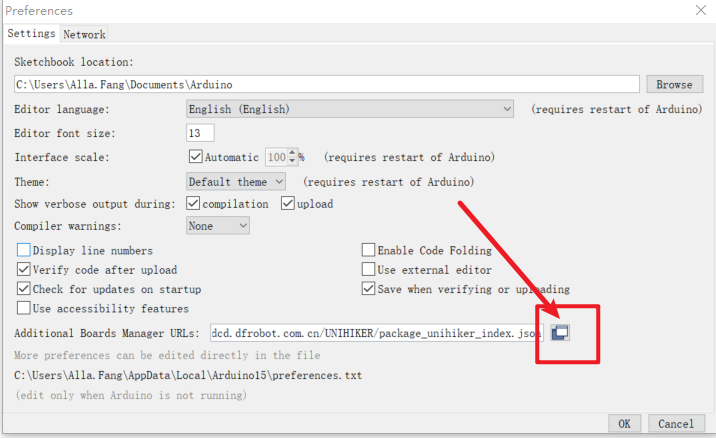
Click the button indicated by the arrow in the image below to add the SDK URL.
Please add the SDK URL above this document on a new line in the dialog box.
The provided download link is: https://downloadcd.dfrobot.com.cn/UNIHIKER/package_unihiker_index.json. Finally, click OK.
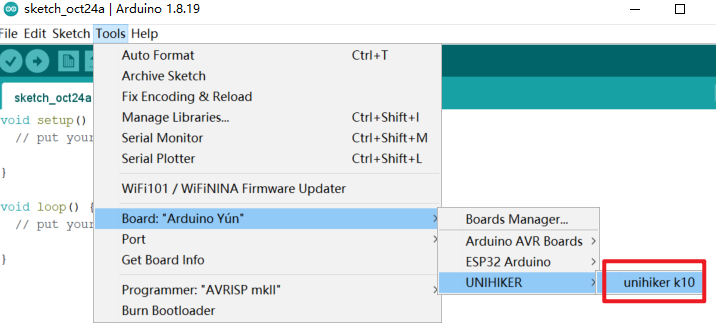
Open "Tools->Board->Boards Manager"
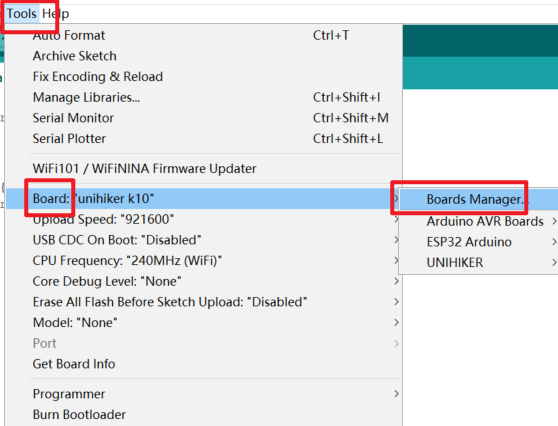
Search for "unihiker" in the dialog box and click Install to install.

Once installation is complete, select UNIHIKER K10 in the Arduino IDE to begin development.
3.2 Loading HUSKYLENS 2 Library
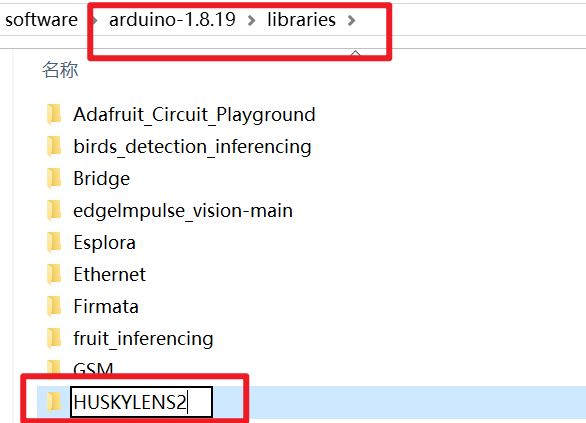
Step 1: First, download the HUSKYLENS Arduino Library.
Click here to download
Step 2: Unzip the downloaded file and place it in the "libraries" folder directory of your Arduino IDE installation, then rename the extracted folder to "HUSKYLENS2".
4. Face Recognition Code Example
4.1 Output Relevant Data of Face Recognition
For Face Recognition, when a face appears on the HUSKYLENS 2 screen, it will be detected and framed, allowing you to obtain the total number of detected faces and relevant data of specified faces.
The example program below.
#include "unihiker_k10.h"
#include "DFRobot_HuskylensV2.h"
// Create objects
HuskylensV2  huskylens;
UNIHIKER_K10 k10;
uint8_t      screen_dir=2;


// Main program starts
void setup() {
  k10.begin();
  Wire.begin();
  while (!huskylens.begin(Wire)) {
    delay(100);
  }
  k10.initScreen(screen_dir);
  k10.creatCanvas();
  huskylens.switchAlgorithm(ALGORITHM_FACE_RECOGNITION);
}
void loop() {
  huskylens.getResult(ALGORITHM_FACE_RECOGNITION);
  if ((huskylens.available(ALGORITHM_FACE_RECOGNITION))) {
    if (((huskylens.getCachedResultByID(ALGORITHM_FACE_RECOGNITION, 1) != NULL))) {
      k10.canvas->canvasText((String("Total faces: ") + String((huskylens.getCachedResultNum(ALGORITHM_FACE_RECOGNITION)))), 1, 0xFF0000);
      k10.canvas->canvasText((String("Center face ID: ") + String((RET_ITEM_NUM(huskylens.getCachedCenterResult(ALGORITHM_FACE_RECOGNITION), Result, ID)))), 3, 0xFF0000);
      k10.canvas->canvasText((String("First face ID: ") + String((RET_ITEM_NUM(huskylens.getCachedResultByIndex(ALGORITHM_FACE_RECOGNITION, 1-1), Result, ID)))), 5, 0xFF0000);
      k10.canvas->updateCanvas();
    }
  }
}
Point the HuskyLens 2 camera at each face in the scene to learn them individually. For detailed operation on how to learn faces, please refer to:HUSKYLENS 2 WIKI
After learning is complete, point the camera at the learned face, and you will see the output result on the UNIHIKER K10 screen.
**Running results: **As follows, you can retrieve the total number of faces detected in the scene, whether they have been learned or not; you can specify to retrieve the ID of the face closest to the center of the screen, and the ID of the first detected face (unlearned faces have ID 0).

4.2 Acquire Face Key-Point Data of a Specified Face
This feature enables capturing key-point and positional data of a specified face, including: Face ID, Face Name, Face width, Face height, Face center (X, Y) coordinates, Left eye (X, Y) coordinates, Right eye (X, Y) coordinates, Left mouth corner (X, Y) coordinates, Right mouth corner (X, Y) coordinates, and Nose (X, Y) coordinates.
For example, the sample program below can capture key-point data of a face positioned near the center of the camera view. This function also works for unlearned faces.
#include "unihiker_k10.h"
#include "DFRobot_HuskylensV2.h"
// Create objects
HuskylensV2  huskylens;
UNIHIKER_K10 k10;
uint8_t      screen_dir=2;


// Main program starts
void setup() {
  k10.begin();
  Wire.begin();
  while (!huskylens.begin(Wire)) {
    delay(100);
  }
  k10.initScreen(screen_dir);
  k10.creatCanvas();
  huskylens.switchAlgorithm(ALGORITHM_FACE_RECOGNITION);
}
void loop() {
  huskylens.getResult(ALGORITHM_FACE_RECOGNITION);
  if ((huskylens.available(ALGORITHM_FACE_RECOGNITION))) {
    k10.canvas->canvasText((String("Center face ID: ") + String((RET_ITEM_NUM(huskylens.getCachedCenterResult(ALGORITHM_FACE_RECOGNITION), Result, ID)))), 1, 0xFF0000);
    k10.canvas->canvasText((String("Left eye: ") + String((String((RET_ITEM_NUM(huskylens.getCachedCenterResult(ALGORITHM_FACE_RECOGNITION), FaceResult, leye_x))) + String((String(",") + String((RET_ITEM_NUM(huskylens.getCachedCenterResult(ALGORITHM_FACE_RECOGNITION), FaceResult, leye_y)))))))), 3, 0xFF0000);
    k10.canvas->canvasText((String("Right eye: ") + String((String((RET_ITEM_NUM(huskylens.getCachedCenterResult(ALGORITHM_FACE_RECOGNITION), FaceResult, reye_x))) + String((String(",") + String((RET_ITEM_NUM(huskylens.getCachedCenterResult(ALGORITHM_FACE_RECOGNITION), FaceResult, reye_y)))))))), 5, 0xFF0000);
    k10.canvas->canvasText((String("Left mouth: ") + String((String((RET_ITEM_NUM(huskylens.getCachedCenterResult(ALGORITHM_FACE_RECOGNITION), FaceResult, lmouth_x))) + String((String(",") + String((RET_ITEM_NUM(huskylens.getCachedCenterResult(ALGORITHM_FACE_RECOGNITION), FaceResult, lmouth_y)))))))), 7, 0xFF0000);
    k10.canvas->canvasText((String("Right mouth: ") + String((String((RET_ITEM_NUM(huskylens.getCachedCenterResult(ALGORITHM_FACE_RECOGNITION), FaceResult, rmouth_x))) + String((String(",") + String((RET_ITEM_NUM(huskylens.getCachedCenterResult(ALGORITHM_FACE_RECOGNITION), FaceResult, rmouth_y)))))))), 9, 0xFF0000);
    k10.canvas->canvasText((String("Nose: ") + String((String((RET_ITEM_NUM(huskylens.getCachedCenterResult(ALGORITHM_FACE_RECOGNITION), FaceResult, nose_x))) + String((String(",") + String((RET_ITEM_NUM(huskylens.getCachedCenterResult(ALGORITHM_FACE_RECOGNITION), FaceResult, nose_y)))))))), 11, 0xFF0000);
    k10.canvas->updateCanvas();
  }
}
Running Result: As shown in the following figure, running the program, the UNIHIKER K10 screen displays the face ID and the coordinate data of the facial features. Since this face has not been trained, the face ID is 0.

4.3 Acquire Relevant Data of a Specified Face
In addition to the data mentioned above, more facial information can be obtained, such as the total count of a specified face in the scene, the name of that face, and the relevant data of the first detected instance of that face. (Unlearned faces can also retrieve the above data)
For an example using a learned face, the sample program is as follows:
/*!
 * MindPlus
 * esp32s3bit
 *
 */
#include "unihiker_k10.h"
#include "DFRobot_HuskylensV2.h"
// Create objects
HuskylensV2  huskylens;
UNIHIKER_K10 k10;
uint8_t      screen_dir = 2;


// Main program initialization
void setup() {
  k10.begin();
  Wire.begin();
  // Wait for Huskylens connection (retry every 100ms)
  while (!huskylens.begin(Wire)) {
    delay(100);
  }
  k10.initScreen(screen_dir);
  k10.creatCanvas();
  huskylens.switchAlgorithm(ALGORITHM_FACE_RECOGNITION);
}

void loop() {
  huskylens.getResult(ALGORITHM_FACE_RECOGNITION);
  if (huskylens.available(ALGORITHM_FACE_RECOGNITION)) {
    // Check if face with ID 1 exists
    if (huskylens.getCachedResultByID(ALGORITHM_FACE_RECOGNITION, 1) != NULL) {
      k10.canvas->canvasText(String("ID1 face count: ") + String(huskylens.getCachedResultNumByID(ALGORITHM_FACE_RECOGNITION, 1)), 1, 0xFF0000);
      k10.canvas->canvasText(String("ID1 face name: ") + String(RET_ITEM_STR(huskylens.getCachedResultByID(ALGORITHM_FACE_RECOGNITION, 1), Result, name)), 3, 0xFF0000);
      k10.canvas->canvasText("First ID1 face", 5, 0xFF0000);
      // Simplify coordinate string concatenation and replace 1-1 with 0 (same meaning)
      k10.canvas->canvasText(String("Coords: ") + String(RET_ITEM_NUM(huskylens.getCachedIndexResultByID(ALGORITHM_FACE_RECOGNITION, 1, 0), Result, xCenter)) + String(",") + String(RET_ITEM_NUM(huskylens.getCachedIndexResultByID(ALGORITHM_FACE_RECOGNITION, 1, 0), Result, yCenter)), 6, 0xFF0000);
      k10.canvas->updateCanvas();
    }
  }
}
Running Result: As shown in the figure, after running the program, the UNIHIKER K10 screen displays the total count of ID1 faces in the scene, the name of that face, and the (XY) center coordinates of the first detected ID1 face.

5. Object Recognition Code Example
5.1 Output Related Data for Object Recognition
HUSKYLENS 2 can identify objects within its view (must be one of the 80 fixed identifiable categories, see Object Recognition Function Introduction for details: HUSKYLENS 2 WIKI. It can obtain object-related data, including: total number of identifiable objects in the view, ID number of the object closest to the center of the HUSKYLENS 2 camera view, and the first detected object.
The example program is as follows.
#include "unihiker_k10.h"
#include "DFRobot_HuskylensV2.h"
// Create objects
HuskylensV2  huskylens;
UNIHIKER_K10 k10;
uint8_t      screen_dir = 2;


// Main program starts
void setup() {
  k10.begin();
  Wire.begin();
  while (!huskylens.begin(Wire)) {
    delay(100);
  }
  k10.initScreen(screen_dir);
  k10.creatCanvas();
  huskylens.switchAlgorithm(ALGORITHM_OBJECT_RECOGNITION);
}
void loop() {
  huskylens.getResult(ALGORITHM_OBJECT_RECOGNITION);
  if (huskylens.available(ALGORITHM_OBJECT_RECOGNITION)) {
    k10.canvas->canvasText(String("Total objects: ") + String(huskylens.getCachedResultNum(ALGORITHM_OBJECT_RECOGNITION)), 1, 0x0000FF);
    k10.canvas->canvasText(String("Center object: "), 3, 0x0000FF);
    k10.canvas->canvasText((RET_ITEM_STR(huskylens.getCachedCenterResult(ALGORITHM_OBJECT_RECOGNITION), Result, name)), 5, 0x0000FF);
    k10.canvas->canvasText(String("First object ID: ") + String(RET_ITEM_NUM(huskylens.getCachedResultByIndex(ALGORITHM_OBJECT_RECOGNITION, 1 - 1), Result, ID)), 7, 0x0000FF);
  }
  k10.canvas->updateCanvas();
  delay(50);
}
After the program is successfully uploaded, HuskyLens 2 enters Object Recognition mode. Align HuskyLens 2's camera with the objects in the view and perform individual learning.
Once learning is complete, align the camera with the target object, and the output results will be displayed on the UNIHIKER K10 screen.
**Running Result: ** The total number of recognized objects can be output, with corresponding object IDs and names displayed as required. If a target object has not been learned, its ID will be 0.

5.2 Acquiring Relevant Data of Specified Objects
HuskyLens 2 can obtain relevant data of the specified object in the image after recognition. For example, it can determine if a specified object is present in the image, get the name of the specified object, and count how many specified objects of the same type are present in the image. When multiple objects of the same type appear in the image, you can specify to retrieve parameters of one of them, including name, X/Y coordinates, width, and height.
Example program is provided as follows:
#include "unihiker_k10.h"
#include "DFRobot_HuskylensV2.h"
// Create objects
HuskylensV2  huskylens;
UNIHIKER_K10 k10;
uint8_t      screen_dir = 2;


// Main program starts
void setup() {
  k10.begin();
  Wire.begin();
  while (!huskylens.begin(Wire)) {
    delay(100);
  }
  k10.initScreen(screen_dir);
  k10.creatCanvas();
  huskylens.switchAlgorithm(ALGORITHM_OBJECT_RECOGNITION);
}
void loop() {
  huskylens.getResult(ALGORITHM_OBJECT_RECOGNITION);
  if (huskylens.available(ALGORITHM_OBJECT_RECOGNITION)) {
    if (huskylens.getCachedResultByID(ALGORITHM_OBJECT_RECOGNITION, 2) != NULL) {
      k10.canvas->canvasText(String("ID2 count: ") + String(huskylens.getCachedResultNumByID(ALGORITHM_OBJECT_RECOGNITION, 2)), 1, 0x0000FF);
      k10.canvas->canvasText(String("ID2 name: ") + String(RET_ITEM_STR(huskylens.getCachedResultByID(ALGORITHM_OBJECT_RECOGNITION, 2), Result, name)), 3, 0x0000FF);
      k10.canvas->canvasText("First ID2 object", 5, 0x0000FF);
      k10.canvas->canvasText(String("Coords: ") + String(RET_ITEM_NUM(huskylens.getCachedIndexResultByID(ALGORITHM_OBJECT_RECOGNITION, 2, 1-1), Result, xCenter)) + String(",") + String(RET_ITEM_NUM(huskylens.getCachedIndexResultByID(ALGORITHM_OBJECT_RECOGNITION, 2, 1-1), Result, yCenter)), 6, 0x0000FF);
    }
  }
  k10.canvas->updateCanvas();
  delay(50);
}
** Running Result:**As shown in the figure, you can obtain the total number of objects in the image, the quantity of the object with ID2 in the image, its name, and the coordinates of the first object with ID2 detected.

6. Object Tracking Code Example
6.1 Track Object Output Related Data
When HUSKYLENS 2 detects a trackable target object, related tracking data can be obtained. The available data includes: object ID, name, xy coordinates, width, and height.
Example program is as follows.
#include "unihiker_k10.h"
#include "DFRobot_HuskylensV2.h"

// Create objects: Huskylens (tracking) & UNIHIKER K10 (screen)
HuskylensV2  huskylens;
UNIHIKER_K10 k10;
uint8_t      screen_dir = 2;  // Screen display direction (adjust as needed)


// Main program initialization
void setup() {
  k10.begin();          // Initialize UNIHIKER K10 hardware
  Wire.begin();         // Initialize I2C for Huskylens communication

  // Wait for Huskylens to connect (retry every 100ms until success)
  while (!huskylens.begin(Wire)) {
    delay(100);
  }

  k10.initScreen(screen_dir);       // Initialize screen with set direction
  k10.creatCanvas();                // Create canvas for screen display
  huskylens.switchAlgorithm(ALGORITHM_OBJECT_TRACKING);  // Set Huskylens to tracking mode
}

void loop() {
  huskylens.getResult(ALGORITHM_OBJECT_TRACKING);  // Fetch latest tracking data

  // Check if valid tracking data is available
  if (huskylens.available(ALGORITHM_OBJECT_TRACKING)) {
    // Get center object's data (simplify repeated calls)
    auto centerObj = huskylens.getCachedCenterResult(ALGORITHM_OBJECT_TRACKING);

    // Display object info (blue color: 0x0000FF)
    k10.canvas->canvasText(String("Obj ID: ") + String(RET_ITEM_NUM(centerObj, Result, ID)), 1, 0x0000FF);
    k10.canvas->canvasText(String("Obj Name: ") + String(RET_ITEM_STR(centerObj, Result, name)), 3, 0x0000FF);
    k10.canvas->canvasText(String("(x,y): ") + String(RET_ITEM_NUM(centerObj, Result, xCenter)) + String(","), 5, 0x0000FF);
    k10.canvas->canvasText(String(RET_ITEM_NUM(centerObj, Result, yCenter)), 6, 0x0000FF);  // Split coords to avoid line overflow
    k10.canvas->canvasText(String("(w,h): ") + String(RET_ITEM_NUM(centerObj, Result, width)) + String(","), 7, 0x0000FF);
    k10.canvas->canvasText(String(RET_ITEM_NUM(centerObj, Result, height)), 8, 0x0000FF);   // Split size to avoid line overflow
  }

  k10.canvas->updateCanvas();  // Refresh screen to show latest info
  delay(50);                   // Short delay to stabilize data reading
}
After uploading the program and waiting for completion, align the HUSKYLENS 2 camera with the target object (you must first box the target object, refer to the Object Tracking usage instructions: HUSKYLENS 2 WIKI. Once boxed, aim at the target object to be tracked and observe the output.
** Running Result:** Outputs include the tracked object ID, name, xy coordinates, width, and height. The object name defaults to "Object". You can change the name in Settings.

7. Color Recognition Code Example
7.1 Output Related Data for Color Recognition
HUSKYLENS 2 can recognize color blocks within its field of view and output color block-related data. Readable data includes: the ID number of the color block closest to the center of HUSKYLENS 2's camera view, the total number of detected color blocks, the ID number of the first detected color block, and more.
The example program belows:
#include "unihiker_k10.h"
#include "DFRobot_HuskylensV2.h"
// Create objects (Huskylens for color recognition, UNIHIKER K10 for screen)
HuskylensV2  huskylens;
UNIHIKER_K10 k10;
uint8_t      screen_dir = 2;  // Screen display direction


// Main program initialization
void setup() {
  k10.begin();          // Initialize UNIHIKER K10
  Wire.begin();         // Initialize I2C communication

  // Wait for Huskylens connection (retry every 100ms)
  while (!huskylens.begin(Wire)) {
    delay(100);
  }

  k10.initScreen(screen_dir);       // Init screen with set direction
  k10.creatCanvas();                // Create drawing canvas
  huskylens.switchAlgorithm(ALGORITHM_COLOR_RECOGNITION);  // Set to color recognition mode
}

void loop() {
  huskylens.getResult(ALGORITHM_COLOR_RECOGNITION);  // Get latest color recognition data

  // Check if color recognition data is available
  if (huskylens.available(ALGORITHM_COLOR_RECOGNITION)) {
    // Simplify index: 1-1 → 0 (same meaning, more intuitive)
    k10.canvas->canvasText(String("Center color ID: ") + String(RET_ITEM_NUM(huskylens.getCachedCenterResult(ALGORITHM_COLOR_RECOGNITION), Result, ID)), 1, 0x0000FF);
    k10.canvas->canvasText(String("Total colors: ") + String(huskylens.getCachedResultNum(ALGORITHM_COLOR_RECOGNITION)), 3, 0x0000FF);
    k10.canvas->canvasText(String("First color ID: ") + String(RET_ITEM_NUM(huskylens.getCachedResultByIndex(ALGORITHM_COLOR_RECOGNITION, 0), Result, ID)), 5, 0x0000FF);
  }

  k10.canvas->updateCanvas();  // Refresh screen
  delay(50);                   // 50ms delay for stable data
}
Upload the program and wait for the upload to complete.
Align the crosshair of HUSKYLENS 2 with the color block to learn it. For detailed steps on learning colors, see: Color Recognition: https://wiki.dfrobot.com/_SKU_SEN0638_Gravity_HUSKYLENS_2_AI_Camera_Vision_Sensor
After learning is complete, aim the HUSKYLENS 2 camera at the color block and observe the output.
Running result: The total number of detected color blocks is output. Regardless of whether the color block has been learned, it will be counted if the bounding box outlines it. Output the corresponding color block ID number as required. The color block near the center of the screen is framed with a white box, indicating it is an unlearned color block, so its ID number is 0.

7.2 Acquire Relevant Data of the Specified Color
After HUSKYLENS 2 recognizes a color, it can retrieve relevant data about the specified color in the image. For example, it can: determine if a specified color exists in the image; retrieve the name of the specified color; and count the number of identical color blocks of the specified color in the image. When multiple blocks of the same specified color appear in the image, you can specify to retrieve parameters of one of the blocks, including name, X/Y coordinates, width, and height.
** The example program as follows:**
#include "unihiker_k10.h"
#include "DFRobot_HuskylensV2.h"
// Create objects (Huskylens: color recognition; UNIHIKER K10: screen)
HuskylensV2  huskylens;
UNIHIKER_K10 k10;
uint8_t      screen_dir = 2;  // Screen display direction


// Main program initialization
void setup() {
  k10.begin();          // Initialize UNIHIKER K10
  Wire.begin();         // Initialize I2C communication

  // Wait for Huskylens connection (retry every 100ms)
  while (!huskylens.begin(Wire)) {
    delay(100);
  }

  k10.initScreen(screen_dir);       // Init screen with set direction
  k10.creatCanvas();                // Create drawing canvas
  huskylens.switchAlgorithm(ALGORITHM_COLOR_RECOGNITION);  // Set to color recognition mode
}

void loop() {
  huskylens.getResult(ALGORITHM_COLOR_RECOGNITION);  // Get latest color recognition data

  // Check if data is available and ID1 color block exists
  if (huskylens.available(ALGORITHM_COLOR_RECOGNITION)) {
    if (huskylens.getCachedResultByID(ALGORITHM_COLOR_RECOGNITION, 1) != NULL) {
      // Simplify index: 1-1 → 0 (same meaning, more intuitive)
      k10.canvas->canvasText(String("ID1 color count: ") + String(huskylens.getCachedResultNumByID(ALGORITHM_COLOR_RECOGNITION, 1)), 1, 0x0000FF);
      k10.canvas->canvasText(String("ID1 color name: ") + String(RET_ITEM_STR(huskylens.getCachedResultByID(ALGORITHM_COLOR_RECOGNITION, 1), Result, name)), 3, 0x0000FF);
      k10.canvas->canvasText("First ID1 color", 5, 0x0000FF);
      // Fix line conflict: move coords to row 6 (original row 5 overlapped)
      k10.canvas->canvasText(String("Coords: ") + String(RET_ITEM_NUM(huskylens.getCachedIndexResultByID(ALGORITHM_COLOR_RECOGNITION, 1, 0), Result, xCenter)) + String(","), 6, 0x0000FF);
      k10.canvas->canvasText(String(RET_ITEM_NUM(huskylens.getCachedIndexResultByID(ALGORITHM_COLOR_RECOGNITION, 1, 0), Result, yCenter)), 7, 0x0000FF);
    }
  }

  k10.canvas->updateCanvas();  // Refresh screen
  delay(50);                   // 50ms delay for stable data
}
Running Result: As shown in the figure, you can obtain the total number of ID1 color blocks, their names, and the coordinates of the first detected ID1 color block in the image. (Color names can be customized, defaulting to "color").

8. Self-Learning Classifier Code Examples
8.1 Recognizing Learned Objects
Under the Self-Learning Classifier function, once an object has been learned, HUSKYLENS 2 can recognize it when it encounters the object again. This example program can be used to retrieve the ID and name of the learned object when recognized.
#include "unihiker_k10.h"
#include "DFRobot_HuskylensV2.h"
// Create objects (Huskylens: self-learning classification; UNIHIKER K10: screen)
HuskylensV2  huskylens;
UNIHIKER_K10 k10;
uint8_t      screen_dir = 2;  // Screen display direction


// Main program initialization
void setup() {
  k10.begin();          // Initialize UNIHIKER K10
  Wire.begin();         // Initialize I2C communication

  // Wait for Huskylens connection (retry every 100ms)
  while (!huskylens.begin(Wire)) {
    delay(100);
  }

  k10.initScreen(screen_dir);       // Init screen with set direction
  k10.creatCanvas();                // Create drawing canvas
  huskylens.switchAlgorithm(ALGORITHM_SELF_LEARNING_CLASSIFICATION);  // Set to self-learning classification mode
}

void loop() {
  huskylens.getResult(ALGORITHM_SELF_LEARNING_CLASSIFICATION);  // Get latest self-learning classification data

  // Check if classification data is available
  if (huskylens.available(ALGORITHM_SELF_LEARNING_CLASSIFICATION)) {
    // Simplify by storing center object data
    auto centerObj = huskylens.getCachedCenterResult(ALGORITHM_SELF_LEARNING_CLASSIFICATION);

    k10.canvas->canvasText(String("Obj ID: ") + String(RET_ITEM_NUM(centerObj, Result, ID)), 1, 0x0000FF);
    k10.canvas->canvasText(String("Obj Name: ") + String(RET_ITEM_STR(centerObj, Result, name)), 3, 0x0000FF);
  }

  k10.canvas->updateCanvas();  // Refresh screen
  delay(50);                   // 50ms delay for stable data
}
Upload the program, then wait for the upload to complete.
After HUSKYLENS 2 finishes learning an object, aim its camera at the learned object and observe the output. For detailed operation on object learning, please refer to: HUSKYLENS 2 WIKI
**Running result: **As follows, when a learned object appears in the image, it will be framed and its name, ID, and confidence level will be displayed. If the object's name is not set, the default name will be: Object.

9. Hand Recognition Example Program
9.1 Output Data for Hand Recognition
The HUSKYLENS 2 can detect hands within its field of view and obtain hand recognition data. The readable data includes: total number of detected hands in the image, ID of the hand closest to the center of the HUSKYLENS 2 view, and ID of the first detected hand.
The example program is as follows.
#include "unihiker_k10.h"
#include "DFRobot_HuskylensV2.h"
// Create objects (Huskylens: hand recognition; UNIHIKER K10: screen)
HuskylensV2  huskylens;
UNIHIKER_K10 k10;
uint8_t      screen_dir = 2;  // Screen display direction


// Main program initialization
void setup() {
  k10.begin();          // Initialize UNIHIKER K10
  Wire.begin();         // Initialize I2C communication

  // Wait for Huskylens connection (retry every 100ms)
  while (!huskylens.begin(Wire)) {
    delay(100);
  }

  k10.initScreen(screen_dir);       // Init screen with set direction
  k10.creatCanvas();                // Create drawing canvas
  huskylens.switchAlgorithm(ALGORITHM_HAND_RECOGNITION);  // Set to hand recognition mode
}

void loop() {
  huskylens.getResult(ALGORITHM_HAND_RECOGNITION);  // Get latest hand recognition data

  // Check if hand recognition data is available
  if (huskylens.available(ALGORITHM_HAND_RECOGNITION)) {
    // Simplify index: 1-1 → 0 (more intuitive, same meaning)
    k10.canvas->canvasText(String("Total hands: ") + String(huskylens.getCachedResultNum(ALGORITHM_HAND_RECOGNITION)), 1, 0xFF0000);
    k10.canvas->canvasText(String("Center hand ID: ") + String(RET_ITEM_NUM(huskylens.getCachedCenterResult(ALGORITHM_HAND_RECOGNITION), Result, ID)), 3, 0xFF0000);
    k10.canvas->canvasText(String("First hand ID: ") + String(RET_ITEM_NUM(huskylens.getCachedResultByIndex(ALGORITHM_HAND_RECOGNITION, 0), Result, ID)), 5, 0xFF0000);

    k10.canvas->updateCanvas();  // Refresh screen
    delay(50);
  }
}
After uploading the program, wait for the upload to complete.
HuskyLens 2 enters the Hand Recognition function. Align HuskyLens 2's camera with the gesture in the frame for learning. For detailed steps on how to learn gestures, please refer to: Hand Recognition Function - Learning Gestures: HUSKYLENS 2 WIKI
Running result: The total number of detected gestures can be output. Regardless of whether they are learned gestures or not, all detected gestures (enclosed in a bounding box) will be counted. The corresponding gesture's ID number can be output as required. Learned gestures will be assigned ID numbers in the order of learning, and unlearned gestures will have an ID number of 0.

9.2 Get Hand Gesture Key Point Data
Retrieve ID, name, and key point data for specified hand gestures, including: Gesture ID, Gesture Name, X and Y coordinates of the gesture center point, width, height, wrist X/Y coordinates, and X/Y coordinates of the root, joint, and tip of each finger. Refer to the Hand Recognition blocks documentation for detailed data specifications.
The following example program retrieves X/Y coordinates of the wrist and fingertips for hand gestures positioned near the center of the camera view, including unlearned gestures.
#include "unihiker_k10.h"
#include "DFRobot_HuskylensV2.h"
// Create objects (Huskylens for hand recognition, UNIHIKER K10 for screen)
HuskylensV2  huskylens;
UNIHIKER_K10 k10;
uint8_t      screen_dir = 2;  // Screen display direction


// Main program initialization
void setup() {
  k10.begin();          // Initialize UNIHIKER K10 hardware
  Wire.begin();         // Initialize I2C communication for Huskylens

  // Wait for Huskylens connection (retry every 100ms until success)
  while (!huskylens.begin(Wire)) {
    delay(100);
  }

  k10.initScreen(screen_dir);       // Initialize screen with set direction
  k10.creatCanvas();                // Create canvas for screen display
  huskylens.switchAlgorithm(ALGORITHM_HAND_RECOGNITION);  // Set Huskylens to hand recognition mode
}

void loop() {
  huskylens.getResult(ALGORITHM_HAND_RECOGNITION);  // Fetch latest hand recognition data

  // Check if valid hand recognition data is available
  if (huskylens.available(ALGORITHM_HAND_RECOGNITION)) {
    // Store center hand's data to avoid repeated function calls (improve efficiency)
    auto centerHand = huskylens.getCachedCenterResult(ALGORITHM_HAND_RECOGNITION);

    // Display hand info (red color: 0xFF0000)
    k10.canvas->canvasText(String("Center hand ID: ") + String(RET_ITEM_NUM(centerHand, Result, ID)), 1, 0xFF0000);
    k10.canvas->canvasText(String("Wrist: ") + String(RET_ITEM_NUM(centerHand, HandResult, wrist_x)) + String(",") + String(RET_ITEM_NUM(centerHand, HandResult, wrist_y)), 3, 0xFF0000);
    k10.canvas->canvasText(String("Thumb tip: ") + String(RET_ITEM_NUM(centerHand, HandResult, thumb_tip_x)) + String(",") + String(RET_ITEM_NUM(centerHand, HandResult, thumb_tip_y)), 5, 0xFF0000);
    k10.canvas->canvasText(String("Index tip: ") + String(RET_ITEM_NUM(centerHand, HandResult, index_finger_tip_x)) + String(",") + String(RET_ITEM_NUM(centerHand, HandResult, index_finger_tip_y)), 6, 0xFF0000);
    k10.canvas->canvasText(String("Middle tip: ") + String(RET_ITEM_NUM(centerHand, HandResult, middle_finger_tip_x)) + String(",") + String(RET_ITEM_NUM(centerHand, HandResult, middle_finger_tip_y)), 7, 0xFF0000);
    k10.canvas->canvasText(String("Ring tip: ") + String(RET_ITEM_NUM(centerHand, HandResult, ring_finger_tip_x)) + String(",") + String(RET_ITEM_NUM(centerHand, HandResult, ring_finger_tip_y)), 8, 0xFF0000);
    k10.canvas->canvasText(String("Pinky tip: ") + String(RET_ITEM_NUM(centerHand, HandResult, pinky_finger_tip_x)) + String(",") + String(RET_ITEM_NUM(centerHand, HandResult, pinky_finger_tip_y)), 9, 0xFF0000);

    k10.canvas->updateCanvas();  // Refresh screen to show latest data
  }
}
Result: As shown in the figure, after running the program, the UNIHIKER K10 screen displays the gesture ID and the key point data of this gesture. Since the gesture has been learned first, so the gesture ID is 1.

9.3 Obtaining Relevant Data of Specified Gestures
In addition to the above data, more specified hand gesture data can be obtained. For example, determining if a specified hand gesture appears in the frame, getting the name of the specified gesture, and counting the number of identical gestures in the frame. When multiple identical hand gestures appear, you can specify which one to obtain the relevant parameters of, including name, center X/Y coordinates, width, height, fingertip coordinates, wrist coordinates, etc.
Example program:
#include "unihiker_k10.h"
#include "DFRobot_HuskylensV2.h"
// Create objects (Huskylens: hand recognition; UNIHIKER K10: screen)
HuskylensV2  huskylens;
UNIHIKER_K10 k10;
uint8_t      screen_dir = 2;  // Screen display direction


// Main program initialization
void setup() {
  k10.begin();          // Initialize UNIHIKER K10
  Wire.begin();         // Initialize I2C communication

  // Wait for Huskylens connection (retry every 100ms)
  while (!huskylens.begin(Wire)) {
    delay(100);
  }

  k10.initScreen(screen_dir);       // Init screen with set direction
  k10.creatCanvas();                // Create drawing canvas
  huskylens.switchAlgorithm(ALGORITHM_HAND_RECOGNITION);  // Set to hand recognition mode
}

void loop() {
  huskylens.getResult(ALGORITHM_HAND_RECOGNITION);  // Get latest hand recognition data

  if (huskylens.available(ALGORITHM_HAND_RECOGNITION)) {
    // Display center hand ID
    k10.canvas->canvasText(String("Center hand ID: ") + String(RET_ITEM_NUM(huskylens.getCachedCenterResult(ALGORITHM_HAND_RECOGNITION), Result, ID)), 1, 0xFF0000);

    // Check if ID1 hand exists and display its info
    if (huskylens.getCachedResultByID(ALGORITHM_HAND_RECOGNITION, 1) != NULL) {
      // Simplify index: 1-1 → 0 (more intuitive)
      k10.canvas->canvasText(String("ID1 hand count: ") + String(huskylens.getCachedResultNumByID(ALGORITHM_HAND_RECOGNITION, 1)), 1, 0xFF0000);
      k10.canvas->canvasText(String("ID1 hand name: ") , 3, 0xFF0000);
      k10.canvas->canvasText(String(RET_ITEM_STR(huskylens.getCachedResultByID(ALGORITHM_HAND_RECOGNITION, 1), Result, name)), 4, 0xFF0000);
      k10.canvas->canvasText("First ID1 hand", 5, 0xFF0000);
      k10.canvas->canvasText(String("Coords: ") + String(RET_ITEM_NUM(huskylens.getCachedIndexResultByID(ALGORITHM_HAND_RECOGNITION, 1, 0), Result, xCenter)) + String(",") + String(RET_ITEM_NUM(huskylens.getCachedIndexResultByID(ALGORITHM_HAND_RECOGNITION, 1, 0), Result, yCenter)), 6, 0xFF0000);

      k10.canvas->updateCanvas();  // Refresh screen
    }
  }
}
** Running result**: As shown in the figure, you can obtain the count and name of ID1 gestures in the image, as well as the coordinates of the first detected ID1 gesture.

10. Instance Segmentation Code Example
10.1 Instance Segmentation and Output Related Data
In Instance Segmentation mode, HUSKYLENS can recognize object categories in an image and mark the contours of each individual object. The program can print the following information for HUSKYLENS detected instances: total number of instances, the instance closest to the center, and for the specified ID instance: name, ID, center X/Y coordinates, width, and height.
Theexample program is as follows:
#include "unihiker_k10.h"
#include "DFRobot_HuskylensV2.h"
// Create objects (Huskylens: segment; UNIHIKER K10: screen)
HuskylensV2  huskylens;
UNIHIKER_K10 k10;
uint8_t      screen_dir = 2;  // Screen display direction


// Main program initialization
void setup() {
  k10.begin();          // Initialize UNIHIKER K10
  Wire.begin();         // Initialize I2C communication

  // Wait for Huskylens connection (retry every 100ms)
  while (!huskylens.begin(Wire)) {
    delay(100);
  }

  k10.initScreen(screen_dir);       // Init screen with set direction
  k10.creatCanvas();                // Create drawing canvas
  huskylens.switchAlgorithm(ALGORITHM_SEGMENT);  // Set to segment (image segmentation) mode
}

void loop() {
  huskylens.getResult(ALGORITHM_SEGMENT);  // Get latest segment data

  if (huskylens.available(ALGORITHM_SEGMENT)) {
    // Simplify index: 1-1 → 0 (more intuitive, same meaning)
    k10.canvas->canvasText(String("Total instances: ") + String(huskylens.getCachedResultNum(ALGORITHM_SEGMENT)), 1, 0x0000FF);
    k10.canvas->canvasText(String("Center instance ID: ") , 2, 0x0000FF);
    k10.canvas->canvasText( String(RET_ITEM_NUM(huskylens.getCachedCenterResult(ALGORITHM_SEGMENT), Result, ID)), 3, 0x0000FF);
    k10.canvas->canvasText("1st instance coords", 4, 0x0000FF);
    k10.canvas->canvasText(String(RET_ITEM_NUM(huskylens.getCachedResultByIndex(ALGORITHM_SEGMENT, 0), Result, xCenter)) + String(",") + String(RET_ITEM_NUM(huskylens.getCachedResultByIndex(ALGORITHM_SEGMENT, 0), Result, yCenter)), 5, 0x0000FF);
  }

  k10.canvas->updateCanvas();  // Refresh screen
  delay(500);                  // 500ms delay for stable data reading
}
After the program is successfully uploaded, HUSKYLENS 2 will automatically switch to the Instance Segmentation function. Align HUSKYLENS 2 with the object to be recognized (must be one of the 80 predefined categories), and observe UNIHIKER K10's screen displaying data such as the number of recognized instances, the ID of the target instance, and the center coordinates. Instance Segmentation function instruction : HUSKYLENS WIKI 2

10.2 Get Data of Specified Instance
In Instance Segmentation mode, after HUSKYLENS 2 has been trained, it can obtain relevant data about specified instances in the image. For example: determining if a trained instance exists in the image; getting the name of a specified hand instance; and counting the number of instances of the same category. When multiple instances of the same category appear in the image, specify to get the parameters of a specific instance, including name, X/Y coordinates, width, and height.
The example program is as follows:
#include "unihiker_k10.h"
#include "DFRobot_HuskylensV2.h"
// Create objects (Huskylens: segment; UNIHIKER K10: screen)
HuskylensV2  huskylens;
UNIHIKER_K10 k10;
uint8_t      screen_dir = 2;  // Screen display direction


// Main program initialization
void setup() {
  k10.begin();          // Initialize UNIHIKER K10
  Wire.begin();         // Initialize I2C communication

  // Wait for Huskylens connection (retry every 100ms)
  while (!huskylens.begin(Wire)) {
    delay(100);
  }

  k10.initScreen(screen_dir);       // Init screen with set direction
  k10.creatCanvas();                // Create drawing canvas
  huskylens.switchAlgorithm(ALGORITHM_SEGMENT);  // Set to segment (image segmentation) mode
}

void loop() {
  huskylens.getResult(ALGORITHM_SEGMENT);  // Get latest segment data

  if (huskylens.available(ALGORITHM_SEGMENT)) {
    // Check if ID1 instance exists and display its info
    if (huskylens.getCachedResultByID(ALGORITHM_SEGMENT, 1) != NULL) {
      // Simplify index: 1-1 → 0 (more intuitive, same meaning)
      k10.canvas->canvasText(String("ID1 instance count: ") , 1, 0x0000FF);
      k10.canvas->canvasText(String(huskylens.getCachedResultNumByID(ALGORITHM_SEGMENT, 1)), 2, 0x0000FF);
      k10.canvas->canvasText(String("ID1 instance name: "), 3, 0x0000FF);
        k10.canvas->canvasText(String(RET_ITEM_STR(huskylens.getCachedResultByID(ALGORITHM_SEGMENT, 1), Result, name)), 4, 0x0000FF);
      k10.canvas->canvasText("1st ID1 coords:", 5, 0x0000FF);
      k10.canvas->canvasText(String(RET_ITEM_NUM(huskylens.getCachedIndexResultByID(ALGORITHM_SEGMENT, 1, 0), Result, xCenter)) + String(",") + String(RET_ITEM_NUM(huskylens.getCachedIndexResultByID(ALGORITHM_SEGMENT, 1, 0), Result, yCenter)), 6, 0x0000FF);
    }
  }

  k10.canvas->updateCanvas();  // Refresh screen
  delay(500);                  // 500ms delay for stable data
}
Running Result: After the program is successfully uploaded, HUSKYLENS 2 will automatically switch to the Instance Segmentation function. When multiple instances of the same category appear in the frame, it can recognize the quantity of instances of the same category, and UNIHIKER K10 will display relevant data such as the designated instance's ID, center coordinates, and confidence score.

11. Pose Recognition Example
11.1 Output Data for Human Pose Recognition
HUSKYLENS 2 can recognize human poses within its field of view and acquire related pose data. The identifiable data includes: total number of detected humans, the ID of the human pose closest to the center of the camera's field of view, and the ID of the first detected pose.
Example program is provided below:
#include "DFRobot_HuskylensV2.h"
#include "unihiker_k10.h"  // 补充UNIHIKER_K10类的头文件引用(原代码遗漏,避免编译报错)
// Create objects (Huskylens: pose recognition; UNIHIKER K10: screen)
HuskylensV2  huskylens;
UNIHIKER_K10 k10;
uint8_t      screen_dir = 2;  // Screen display direction


// Main program initialization
void setup() {
  k10.begin();          // Initialize UNIHIKER K10 hardware
  Wire.begin();         // Initialize I2C communication for Huskylens

  // Wait for Huskylens connection (retry every 100ms until success)
  while (!huskylens.begin(Wire)) {
    delay(100);
  }

  k10.initScreen(screen_dir);       // Initialize screen with set direction
  k10.creatCanvas();                // Create canvas for screen display
  huskylens.switchAlgorithm(ALGORITHM_POSE_RECOGNITION);  // Set to pose recognition mode
}

void loop() {
  huskylens.getResult(ALGORITHM_POSE_RECOGNITION);  // Fetch latest pose recognition data

  if (huskylens.available(ALGORITHM_POSE_RECOGNITION)) {
    // Simplify index: 1-1 → 0 (more intuitive, same meaning)
    k10.canvas->canvasText(String("Total poses: ") + String(huskylens.getCachedResultNum(ALGORITHM_POSE_RECOGNITION)), 1, 0xFF0000);
    k10.canvas->canvasText(String("Center pose ID: ") + String(RET_ITEM_NUM(huskylens.getCachedCenterResult(ALGORITHM_POSE_RECOGNITION), Result, ID)), 3, 0xFF0000);
    k10.canvas->canvasText(String("First pose ID: ") + String(RET_ITEM_NUM(huskylens.getCachedResultByIndex(ALGORITHM_POSE_RECOGNITION, 0), Result, ID)), 5, 0xFF0000);

    k10.canvas->updateCanvas();  // Refresh screen to show latest data
  }
}
After uploading the program, HuskyLens 2 will enter the Pose Recognition function. Align the camera of HuskyLens 2 with the human pose in the image and learn it. For detailed steps on learning a pose, please refer to: Pose Recognition - Learning a Pose:HUSKYLENS 2 WIKI
Once learning completes, point the camera at the pose, and you can view the output results on the UNIHIKER K10 screen.
Running Result:: The total number of detected humans and the ID number of a specified human pose can be output. The learned human poses will be assigned IDs in the order of learning, and unlearned poses will have an ID number of 0.

11.2 Acquire Human Key Point Data
Pose Recognition feature can obtain data on key points such as the ID, name, facial features, and body joints of a specified human posture. Detailed data includes: human ID, posture name, center point coordinates (X/Y), width, height, X/Y coordinates of eyes, ears, nose on both sides, and X/Y coordinates of shoulder, elbow, wrist, hip, knee, and ankle joints on both sides. For detailed information, please refer to the Pose Recognition block instructions.
The following example program can obtain the X/Y coordinates of the nose, left shoulder, elbow, hip, knee, and ankle of a human body close to the center of the camera screen. Unlearned human postures can also be recognized and data obtained.
#include "unihiker_k10.h"
#include "DFRobot_HuskylensV2.h"
// Create objects (Huskylens: pose recognition; UNIHIKER K10: screen)
HuskylensV2  huskylens;
UNIHIKER_K10 k10;
uint8_t      screen_dir = 2;  // Screen display direction


// Main program initialization
void setup() {
  k10.begin();          // Initialize UNIHIKER K10
  Wire.begin();         // Initialize I2C communication

  // Wait for Huskylens connection (retry every 100ms)
  while (!huskylens.begin(Wire)) {
    delay(100);
  }

  k10.initScreen(screen_dir);       // Init screen with set direction
  k10.creatCanvas();                // Create drawing canvas
  huskylens.switchAlgorithm(ALGORITHM_POSE_RECOGNITION);  // Set to pose recognition mode
}

void loop() {
  huskylens.getResult(ALGORITHM_POSE_RECOGNITION);  // Get latest pose recognition data

  if (huskylens.available(ALGORITHM_POSE_RECOGNITION)) {
    // Store center pose data to simplify repeated calls (improve efficiency)
    auto centerPose = huskylens.getCachedCenterResult(ALGORITHM_POSE_RECOGNITION);

    // Display pose info (red color: 0xFF0000)
    k10.canvas->canvasText(String("Center pose ID: ") + String(RET_ITEM_NUM(centerPose, Result, ID)), 1, 0xFF0000);
    k10.canvas->canvasText(String("Nose: ") + String(RET_ITEM_NUM(centerPose, PoseResult, nose_x)) + String(",") + String(RET_ITEM_NUM(centerPose, PoseResult, nose_y)), 3, 0xFF0000);
    k10.canvas->canvasText(String("L Shoulder: ") + String(RET_ITEM_NUM(centerPose, PoseResult, lshoulder_x)) + String(",") + String(RET_ITEM_NUM(centerPose, PoseResult, lshoulder_y)), 5, 0xFF0000);
    k10.canvas->canvasText(String("L Elbow: ") + String(RET_ITEM_NUM(centerPose, PoseResult, lelbow_x)) + String(",") + String(RET_ITEM_NUM(centerPose, PoseResult, lelbow_y)), 7, 0xFF0000);
    k10.canvas->canvasText(String("L Hip: ") + String(RET_ITEM_NUM(centerPose, PoseResult, lhip_x)) + String(",") + String(RET_ITEM_NUM(centerPose, PoseResult, lhip_y)), 9, 0xFF0000);
    k10.canvas->canvasText(String("L Knee: ") + String(RET_ITEM_NUM(centerPose, PoseResult, lknee_x)) + String(",") + String(RET_ITEM_NUM(centerPose, PoseResult, lknee_y)), 11, 0xFF0000);
    k10.canvas->canvasText(String("L Ankle: ") + String(RET_ITEM_NUM(centerPose, PoseResult, lankle_x)) + String(",") + String(RET_ITEM_NUM(centerPose, PoseResult, lankle_y)), 13, 0xFF0000);

    k10.canvas->updateCanvas();  // Refresh screen to show latest data
  }
}
Running Result: As shown in the following figure, running the program causes the K10 screen to display the human body ID number and the coordinates of the human's nose and some body key points.

11.3 Obtaining Specified Pose Data
In addition to the above data, more human pose information can be retrieved. For instance, you can determine if a specified ID pose is present in the frame, get the name of the specified pose, and count the number of identical poses in the画面. When multiple instances of the same pose appear, you can specify to obtain the parameters of one of them, including its name, X/Y coordinates, width, height, and human body key point coordinate data.
Example program as follows:
#include "unihiker_k10.h"
#include "DFRobot_HuskylensV2.h"
// Create objects (Huskylens: pose recognition; UNIHIKER K10: screen)
HuskylensV2  huskylens;
UNIHIKER_K10 k10;
uint8_t      screen_dir = 2;  // Screen display direction


// Main program initialization
void setup() {
  k10.begin();          // Initialize UNIHIKER K10
  Wire.begin();         // Initialize I2C communication

  // Wait for Huskylens connection (retry every 100ms)
  while (!huskylens.begin(Wire)) {
    delay(100);
  }

  k10.initScreen(screen_dir);       // Init screen with set direction
  k10.creatCanvas();                // Create drawing canvas
  huskylens.switchAlgorithm(ALGORITHM_POSE_RECOGNITION);  // Set to pose recognition mode
}

void loop() {
  huskylens.getResult(ALGORITHM_POSE_RECOGNITION);  // Get latest pose recognition data

  if (huskylens.available(ALGORITHM_POSE_RECOGNITION)) {
    // Check if ID1 pose exists and display its info
    if (huskylens.getCachedResultByID(ALGORITHM_POSE_RECOGNITION, 1) != NULL) {
      // Simplify index: 1-1 → 0 (more intuitive, same meaning)
      k10.canvas->canvasText(String("ID1 pose count: ") + String(huskylens.getCachedResultNumByID(ALGORITHM_POSE_RECOGNITION, 1)), 1, 0xFF0000);
      k10.canvas->canvasText(String("ID1 pose name: "), 3, 0xFF0000);
      k10.canvas->canvasText(String(RET_ITEM_STR(huskylens.getCachedResultByID(ALGORITHM_POSE_RECOGNITION, 1), Result, name)), 4, 0xFF0000);
      k10.canvas->canvasText("First ID1 pose", 5, 0xFF0000);
      k10.canvas->canvasText(String("Coords: ") + String(RET_ITEM_NUM(huskylens.getCachedIndexResultByID(ALGORITHM_POSE_RECOGNITION, 1, 0), Result, xCenter)) + String(",") + String(RET_ITEM_NUM(huskylens.getCachedIndexResultByID(ALGORITHM_POSE_RECOGNITION, 1, 0), Result, yCenter)), 6, 0xFF0000);

      k10.canvas->updateCanvas();  // Refresh screen to show latest data
    }
  }
}
Running Result: As shown in the figure, the number and name of ID1 posture in the image, as well as the coordinate position of the first detected ID1 posture, can be obtained.

12. License Recognition Example
12.1 Recognize License Plates and Output Relevant Data
When License Recognition is enabled, a license plate appearing on the HUSKYLENS 2 screen will be recognized, framed with a bounding box, and its relevant data will be output. Readable license plate data includes: specified license plate ID, name, content (license plate number), width, height, X/Y coordinate positions of the center point, and the total number of license plates in the image.
Example program follows.
#include "unihiker_k10.h"
#include "DFRobot_HuskylensV2.h"
// Create objects (Huskylens: license recognition; UNIHIKER K10: screen)
HuskylensV2  huskylens;
UNIHIKER_K10 k10;
uint8_t      screen_dir = 2;  // Screen display direction


// Main program initialization
void setup() {
  k10.begin();          // Initialize UNIHIKER K10
  Wire.begin();         // Initialize I2C communication

  // Wait for Huskylens connection (retry every 100ms)
  while (!huskylens.begin(Wire)) {
    delay(100);
  }

  k10.initScreen(screen_dir);       // Init screen with set direction
  k10.creatCanvas();                // Create drawing canvas
  huskylens.switchAlgorithm(ALGORITHM_LICENSE_RECOGNITION);  // Set to license recognition mode
}

void loop() {
  huskylens.getResult(ALGORITHM_LICENSE_RECOGNITION);  // Get latest license recognition data

  if (huskylens.available(ALGORITHM_LICENSE_RECOGNITION)) {
    // Simplify index: 1-1 → 0 (more intuitive, same meaning)
    k10.canvas->canvasText(String("Center license ID: ") + String(RET_ITEM_NUM(huskylens.getCachedCenterResult(ALGORITHM_LICENSE_RECOGNITION), Result, ID)), 1, 0x0000FF);
    k10.canvas->canvasText(String("Total licenses: ") + String(huskylens.getCachedResultNum(ALGORITHM_LICENSE_RECOGNITION)), 3, 0x0000FF);
    k10.canvas->canvasText(String("First license ID: ") + String(RET_ITEM_NUM(huskylens.getCachedResultByIndex(ALGORITHM_LICENSE_RECOGNITION, 0), Result, ID)), 5, 0x0000FF);
  }

  k10.canvas->updateCanvas();  // Refresh screen
  delay(50);                   // 50ms delay for stable data reading
}
Upload the program and wait for the upload to complete.
To learn license plate recognition, aim the HuskyLens 2 camera at the license plate in the camera view. For detailed operation on learning the license plate, please refer to [HuskyLens 2 License Recognition Function Description:HUSKYLENS 2 WIKI
Aim the HUSKYLENS 2 camera at the license plate and observe the data on the UNIHIKER K10 screen.
Running result: As follows, the total number of license plates includes both learned and unlearned ones. If the specified license plate is an unlearned one, the ID number is 0; if it is a learned one, it outputs its corresponding ID number.

12.2 Output Data of License Plates with Specified ID
When multiple license plates with the same ID appear in the frame, you can use the sample program below to count the relevant data of license plates with that specific ID.
#include "unihiker_k10.h"
#include "DFRobot_HuskylensV2.h"
// Create objects (Huskylens: license recognition; UNIHIKER K10: screen)
HuskylensV2  huskylens;
UNIHIKER_K10 k10;
uint8_t      screen_dir = 2;  // Screen display direction


// Main program initialization
void setup() {
  k10.begin();          // Initialize UNIHIKER K10
  Wire.begin();         // Initialize I2C communication

  // Wait for Huskylens connection (retry every 100ms)
  while (!huskylens.begin(Wire)) {
    delay(100);
  }

  k10.initScreen(screen_dir);       // Init screen with set direction
  k10.creatCanvas();                // Create drawing canvas
  huskylens.switchAlgorithm(ALGORITHM_LICENSE_RECOGNITION);  // Set to license recognition mode
}

void loop() {
  huskylens.getResult(ALGORITHM_LICENSE_RECOGNITION);  // Get latest license recognition data

  if (huskylens.available(ALGORITHM_LICENSE_RECOGNITION)) {
    // Check if ID1 license exists and display its info
    if (huskylens.getCachedResultByID(ALGORITHM_LICENSE_RECOGNITION, 1) != NULL) {
      // Simplify index: 1-1 → 0 (more intuitive, same meaning)
      k10.canvas->canvasText(String("ID1 license count: ") + String(huskylens.getCachedResultNumByID(ALGORITHM_LICENSE_RECOGNITION, 1)), 1, 0x0000FF);
      k10.canvas->canvasText("First ID1 license", 3, 0x0000FF);
      k10.canvas->canvasText(String("number: ") + String(RET_ITEM_STR(huskylens.getCachedIndexResultByID(ALGORITHM_LICENSE_RECOGNITION, 1, 0), Result, content)), 4, 0x0000FF);
      k10.canvas->canvasText("First ID1 license", 6, 0x0000FF);
      k10.canvas->canvasText(String("Coords: ") + String(RET_ITEM_NUM(huskylens.getCachedIndexResultByID(ALGORITHM_LICENSE_RECOGNITION, 1, 0), Result, xCenter)) + String(",") + String(RET_ITEM_NUM(huskylens.getCachedIndexResultByID(ALGORITHM_LICENSE_RECOGNITION, 1, 0), Result, yCenter)), 7, 0x0000FF);
    }
  }

  k10.canvas->updateCanvas();  // Refresh screen
  delay(50);                   // 50ms delay for stable data reading
}
Running Result: As follows, when multiple license plates with the specified ID appear in the image, the total count of such license plates, the license plate numbers of the specified ones under this ID, and their coordinates can be obtained.

13. Optical Character Recognition Example
13.1 Recognize Text and Output Relevant Data
Under the Optical Character Recognition (OCR) function, HuskyLens 2 can recognize and frame the regions where text blocks appear in the field of view, and display the recognized text on the screen. Use the following sample program to count the total number of recognizable text blocks in the frame, and obtain the relevant data of the text block closest to the crosshair. The readable data includes: text block ID, name, content, center X and Y coordinates, and text block width and height.
The example program is as follows.
#include "unihiker_k10.h"
#include "DFRobot_HuskylensV2.h"
// Create objects (Huskylens: OCR recognition; UNIHIKER K10: screen)
HuskylensV2  huskylens;
UNIHIKER_K10 k10;
uint8_t      screen_dir = 2;  // Screen display direction


// Main program initialization
void setup() {
  k10.begin();          // Initialize UNIHIKER K10
  Wire.begin();         // Initialize I2C communication

  // Wait for Huskylens connection (retry every 100ms)
  while (!huskylens.begin(Wire)) {
    delay(100);
  }

  k10.initScreen(screen_dir);       // Init screen with set direction
  k10.creatCanvas();                // Create drawing canvas
  huskylens.switchAlgorithm(ALGORITHM_OCR_RECOGNITION);  // Set to OCR text recognition mode
}

void loop() {
  huskylens.getResult(ALGORITHM_OCR_RECOGNITION);  // Get latest OCR recognition data

  if (huskylens.available(ALGORITHM_OCR_RECOGNITION)) {
    // Store center text block data to simplify repeated calls
    auto centerText = huskylens.getCachedCenterResult(ALGORITHM_OCR_RECOGNITION);

    // Display OCR info (blue color: 0x0000FF)
    k10.canvas->canvasText(String("Text block count: ") + String(huskylens.getCachedResultNum(ALGORITHM_OCR_RECOGNITION)), 1, 0x0000FF);
    k10.canvas->canvasText(String("Center text ID: ") + String(RET_ITEM_NUM(centerText, Result, ID)), 3, 0x0000FF);
    k10.canvas->canvasText("Center text content:", 5, 0x0000FF);
    k10.canvas->canvasText(String(RET_ITEM_STR(centerText, Result, content)), 6, 0x0000FF);
    k10.canvas->canvasText("Center text block", 8, 0x0000FF);
    k10.canvas->canvasText(String("Center coords: ") , 9, 0x0000FF);  // 修复参数:坐标用xCenter/yCenter
    k10.canvas->canvasText(String(RET_ITEM_NUM(centerText, Result, xCenter)) + String(",") + String(RET_ITEM_NUM(centerText, Result, yCenter)), 10, 0x0000FF);  // 修复参数:坐标用xCenter/yCenter
    k10.canvas->canvasText("Center text block", 11, 0x0000FF);
    k10.canvas->canvasText(String("Size (w,h): ") + String(RET_ITEM_NUM(centerText, Result, width)) + String(",") + String(RET_ITEM_NUM(centerText, Result, height)), 12, 0x0000FF);  // 修复参数:宽高用width/height
  }

  k10.canvas->updateCanvas();  // Refresh screen
  delay(50);                   // 50ms delay for stable data reading
}
Upload the program and wait for completion.
Align the camera of HUSKYLENS 2 with any optical character and observe the result on the K10 screen.
Running Result: As follows, text blocks that have not been trained will output ID 0 by default.

To align with a learned text block, use the auto-recognition function. For details on how to learn optical characters, please refer to: Optical Character Recognition - Learning Text:HUSKYLENS 2 WIKI
Operation Result: As follows, the output ID for the learned text block matches the ID displayed on the HUSKYLENS 2 screen.
Note: In the Optical Character Recognition function, HUSKYLENS 2 can detect all text block areas in the image and frame them with squares. However, it only recognizes the content of the text block area where the crosshair is positioned and displays the text content in the top-left corner of the square.

14. Line Tracking Code Example
Under the Line Tracking function, HUSKYLENS 2 can mark the trajectory of the route in the image and obtain the current route's length, angle, and X/Y components. When the route has branches, it can obtain the number of branches at the intersection and the corresponding data of each branch counterclockwise.
The example program is as follows.
#include "unihiker_k10.h"
#include "DFRobot_HuskylensV2.h"
// Create objects (Huskylens: line tracking; UNIHIKER K10: screen)
HuskylensV2  huskylens;
UNIHIKER_K10 k10;
uint8_t      screen_dir = 2;  // Screen display direction


// Main program initialization
void setup() {
  k10.begin();          // Initialize UNIHIKER K10
  Wire.begin();         // Initialize I2C communication

  // Wait for Huskylens connection (retry every 100ms)
  while (!huskylens.begin(Wire)) {
    delay(100);
  }

  k10.initScreen(screen_dir);       // Init screen with set direction
  k10.creatCanvas();                // Create drawing canvas
  huskylens.switchAlgorithm(ALGORITHM_LINE_TRACKING);  // Set to line tracking mode
}

void loop() {
  huskylens.getResult(ALGORITHM_LINE_TRACKING);  // Get latest line tracking data

  if (huskylens.available(ALGORITHM_LINE_TRACKING)) {
    // Store current branch data to simplify repeated calls
    auto currentBranch = huskylens.getCurrentBranch(ALGORITHM_LINE_TRACKING);

    // Display line tracking info (blue: 0x0000FF; font: eCNAndENFont24)
    k10.canvas->canvasText(String("Route angle: ") + String(RET_ITEM_NUM(currentBranch, Result, angle)), 0, 0, 0x0000FF, k10.canvas->eCNAndENFont24, 50, true);
    k10.canvas->canvasText(String("Route length: ") + String(RET_ITEM_NUM(currentBranch, Result, length)), 0, 30, 0x0000FF, k10.canvas->eCNAndENFont24, 50, true);
    k10.canvas->canvasText("X & Y components:", 0, 60, 0x0000FF, k10.canvas->eCNAndENFont24, 50, true);
    k10.canvas->canvasText(String(RET_ITEM_NUM(currentBranch, Result, xTarget)) + String(",") + String(RET_ITEM_NUM(currentBranch, Result, yTarget)), 0, 90, 0x0000FF, k10.canvas->eCNAndENFont24, 50, true);
    k10.canvas->canvasText(String("Junction branch ") , 0, 120, 0x0000FF, k10.canvas->eCNAndENFont24, 50, true);
    k10.canvas->canvasText( (String("count: ") +String(huskylens.getUpcomingBranchCount(ALGORITHM_LINE_TRACKING))), 0, 150, 0x0000FF, k10.canvas->eCNAndENFont24, 50, true);

  }

  k10.canvas->updateCanvas();  // Refresh screen
  delay(1000);                 // 1s delay for stable data reading
}
Running Result: As shown in the figure, align the HUSKYLENS with the route map, and observe that the K10 screen displays output data such as the current route length and angle. When the route consists of multiple branches,

15. Face Emotion Recognition Code Example
15.1 Recognize Emotions and Output Relevant Data
Under the Face Emotion Recognition function, HUSKYLENS 2 can recognize 7 specific emotions: Anger (ID 1), Disgust (ID 2), Fear (ID 3), Happiness (ID 4), Neutral (ID 5), Sad (ID 6), and Surprise (ID 7). These emotions are pre-trained into HUSKYLENS 2 at the factory and do not require manual learning by users. For detailed function usage instructions of emotion recognition, please refer to HUSKYLENS 2 WIKI.
The following example program can count the number of all recognized emotions in the current HUSKYLENS 2 camera feed and output the ID of a specified emotion.
The example Code:
#include "unihiker_k10.h"
#include "DFRobot_HuskylensV2.h"
// Create objects (Huskylens: emotion recognition; UNIHIKER K10: screen)
HuskylensV2  huskylens;
UNIHIKER_K10 k10;
uint8_t      screen_dir = 2;  // Screen display direction


// Main program initialization
void setup() {
  k10.begin();          // Initialize UNIHIKER K10
  Wire.begin();         // Initialize I2C communication

  // Wait for Huskylens connection (retry every 100ms)
  while (!huskylens.begin(Wire)) {
    delay(100);
  }

  k10.initScreen(screen_dir);       // Init screen with set direction
  k10.creatCanvas();                // Create drawing canvas
  huskylens.switchAlgorithm(ALGORITHM_EMOTION_RECOGNITION);  // Set to emotion recognition mode
}

void loop() {
  huskylens.getResult(ALGORITHM_EMOTION_RECOGNITION);  // Get latest emotion recognition data

  if (huskylens.available(ALGORITHM_EMOTION_RECOGNITION)) {
    // Simplify index: 1-1 → 0 (more intuitive, same meaning)
    k10.canvas->canvasText(String("Center emotion ID: ") + String(RET_ITEM_NUM(huskylens.getCachedCenterResult(ALGORITHM_EMOTION_RECOGNITION), Result, ID)), 1, 0x0000FF);
    k10.canvas->canvasText(String("Total emotions: ") + String(huskylens.getCachedResultNum(ALGORITHM_EMOTION_RECOGNITION)), 3, 0x0000FF);
    k10.canvas->canvasText(String("First emotion ID: ") + String(RET_ITEM_NUM(huskylens.getCachedResultByIndex(ALGORITHM_EMOTION_RECOGNITION, 0), Result, ID)), 5, 0x0000FF);
  }

  k10.canvas->updateCanvas();  // Refresh screen
  delay(50);                   // 50ms delay for stable data reading
}
Upload the program, then wait for the program upload to complete.
When any of the above seven expressions appear in the camera view, HUSKYLENS 2's screen will frame the expression and display the expression ID, name, and confidence level. Meanwhile, the UNIHIKER K10 screen will show the result data output by the program.
Running result as follows: Outputs the specified expression ID and the total number of expressions in the picture.

15.2 Retrieve Relevant Data of Specified Expressions
When multiple expressions with the same ID appear in the frame, you can use the following sample program to count relevant data of that specific ID expression.
#include "unihiker_k10.h"
#include "DFRobot_HuskylensV2.h"
// Create objects (Huskylens: emotion recognition; UNIHIKER K10: screen)
HuskylensV2  huskylens;
UNIHIKER_K10 k10;
uint8_t      screen_dir = 2;  // Screen display direction


// Main program initialization
void setup() {
  k10.begin();          // Initialize UNIHIKER K10
  Wire.begin();         // Initialize I2C communication

  // Wait for Huskylens connection (retry every 100ms)
  while (!huskylens.begin(Wire)) {
    delay(100);
  }

  k10.initScreen(screen_dir);       // Init screen with set direction
  k10.creatCanvas();                // Create drawing canvas
  huskylens.switchAlgorithm(ALGORITHM_EMOTION_RECOGNITION);  // Set to emotion recognition mode
}

void loop() {
  huskylens.getResult(ALGORITHM_EMOTION_RECOGNITION);  // Get latest emotion recognition data

  // Optimize: Remove redundant "available()" check (keep only one layer)
  if (huskylens.available(ALGORITHM_EMOTION_RECOGNITION)) {
    // Check if ID4 emotion exists and display its info
    if (huskylens.getCachedResultByID(ALGORITHM_EMOTION_RECOGNITION, 4) != NULL) {
      // Simplify index: 1-1 → 0 (more intuitive, same meaning)
      k10.canvas->canvasText(String("ID4 emotion count: ") , 1, 0x0000FF);
      k10.canvas->canvasText(String(huskylens.getCachedResultNumByID(ALGORITHM_EMOTION_RECOGNITION, 4)), 2, 0x0000FF);
      k10.canvas->canvasText(String("ID4 emotion name: "), 3, 0x0000FF);
      k10.canvas->canvasText(String(RET_ITEM_STR(huskylens.getCachedResultByID(ALGORITHM_EMOTION_RECOGNITION, 4), Result, name)), 4, 0x0000FF);
      k10.canvas->canvasText("First ID4 emotion", 5, 0x0000FF);
      k10.canvas->canvasText(String("Coords: ") + String(RET_ITEM_NUM(huskylens.getCachedIndexResultByID(ALGORITHM_EMOTION_RECOGNITION, 4, 0), Result, xCenter)) + String(",") + String(RET_ITEM_NUM(huskylens.getCachedIndexResultByID(ALGORITHM_EMOTION_RECOGNITION, 4, 0), Result, yCenter)), 6, 0x0000FF);
    }
    k10.canvas->updateCanvas();  // Refresh screen when data is available
  }

  delay(50);  // Optimize: Remove redundant delay (keep only one 50ms delay)
}
Running Result: As follows, when multiple specified ID expressions appear in the image, you can obtain data such as the total count of expressions with that ID in the image, their names, and the coordinates of a specific expression under that ID.

16. Tag Recognition Code Example
16.1 Recognizing Tag Output Data
HUSKYLENS 2 can recognize AprilTag labels in the image, and you can retrieve the detected tag-related data through programming. The readable tag data includes: specified tag data, including tag ID, tag content, tag width, tag height, the X and Y coordinates of the tag's center point, and the total number of detected tags.
The example program as follows.
#include "unihiker_k10.h"
#include "DFRobot_HuskylensV2.h"
// Create objects (Huskylens: tag recognition; UNIHIKER K10: screen)
HuskylensV2  huskylens;
UNIHIKER_K10 k10;
uint8_t      screen_dir = 2;  // Screen display direction


// Main program initialization
void setup() {
  k10.begin();          // Initialize UNIHIKER K10
  Wire.begin();         // Initialize I2C communication

  // Wait for Huskylens connection (retry every 100ms)
  while (!huskylens.begin(Wire)) {
    delay(100);
  }

  k10.initScreen(screen_dir);       // Init screen with set direction
  k10.creatCanvas();                // Create drawing canvas
  huskylens.switchAlgorithm(ALGORITHM_TAG_RECOGNITION);  // Set to tag recognition mode
}

void loop() {
  // Fix: Get data FIRST before checking availability (ensure latest data is used)
  huskylens.getResult(ALGORITHM_TAG_RECOGNITION);

  if (huskylens.available(ALGORITHM_TAG_RECOGNITION)) {
    // Simplify index: 1-1 → 0 (more intuitive, same meaning)
    k10.canvas->canvasText(String("Center tag ID: ") + String(RET_ITEM_NUM(huskylens.getCachedCenterResult(ALGORITHM_TAG_RECOGNITION), Result, ID)), 1, 0x0000FF);
    k10.canvas->canvasText(String("Total tags: ") + String(huskylens.getCachedResultNum(ALGORITHM_TAG_RECOGNITION)), 3, 0x0000FF);
    k10.canvas->canvasText(String("First tag ID: ") + String(RET_ITEM_NUM(huskylens.getCachedResultByIndex(ALGORITHM_TAG_RECOGNITION, 0), Result, ID)), 5, 0x0000FF);
  }

  k10.canvas->updateCanvas();  // Refresh screen
  delay(50);                   // 50ms delay for stable data reading
}
After uploading the program, wait for the upload to complete.
Point the HUSKYLENS 2 camera at the tag in the image to learn it. For detailed operation on how to learn tags, please refer to the Tag Recognition function:HUSKYLENS 2 WIKI
Point the HUSKYLENS 2 camera at the tag code and observe the result displayed on the K10 screen.
** Running result: ** As shown, it can output the number of detected tag codes (whether the tag code has been learned or not) and the specified tag ID. Unlearned tag codes will be 0.

16.2 Acquire Relevant Data of the Specified Tag
After HuskyLens 2 recognizes a tag, it can obtain relevant data of the specified tag in the image. For example, you can determine if a tag with a specified ID exists in the image, and you can get the number of tags with the same ID in the image. When multiple tags with the same ID appear in the image, you can specify to get one of them, including name, content, X/Y coordinates, width, and height.
The example program:
#include "unihiker_k10.h"
#include "DFRobot_HuskylensV2.h"
// Create objects (Huskylens: tag recognition; UNIHIKER K10: screen)
HuskylensV2  huskylens;
UNIHIKER_K10 k10;
uint8_t      screen_dir = 2;  // Screen display direction


// Main program initialization
void setup() {
  k10.begin();          // Initialize UNIHIKER K10
  Wire.begin();         // Initialize I2C communication

  // Wait for Huskylens connection (retry every 100ms)
  while (!huskylens.begin(Wire)) {
    delay(100);
  }

  k10.initScreen(screen_dir);       // Init screen with set direction
  k10.creatCanvas();                // Create drawing canvas
  huskylens.switchAlgorithm(ALGORITHM_TAG_RECOGNITION);  // Set to tag recognition mode
}

void loop() {
  // Fix 1: Get latest data FIRST before checking availability (avoid using old data)
  huskylens.getResult(ALGORITHM_TAG_RECOGNITION);

  if (huskylens.available(ALGORITHM_TAG_RECOGNITION)) {
    // Check if ID0 tag exists and display its info
    if (huskylens.getCachedResultByID(ALGORITHM_TAG_RECOGNITION, 0) != NULL) {
      // Fix 2: Simplify index (1-1→0 for 1st tag, 2-1→1 for 2nd tag; more intuitive)
      k10.canvas->canvasText(String("ID0 tag count: ") + String(huskylens.getCachedResultNumByID(ALGORITHM_TAG_RECOGNITION, 0)), 1, 0x0000FF);
      k10.canvas->canvasText("1st ID0 tag", 3, 0x0000FF);
      k10.canvas->canvasText(String("Content: ") + String(RET_ITEM_STR(huskylens.getCachedIndexResultByID(ALGORITHM_TAG_RECOGNITION, 0, 0), Result, content)), 4, 0x0000FF);
      k10.canvas->canvasText("2nd ID0 tag", 6, 0x0000FF);
      k10.canvas->canvasText(String("Coords: ") + String(RET_ITEM_NUM(huskylens.getCachedIndexResultByID(ALGORITHM_TAG_RECOGNITION, 0, 1), Result, xCenter)) + String(",") + String(RET_ITEM_NUM(huskylens.getCachedIndexResultByID(ALGORITHM_TAG_RECOGNITION, 0, 1), Result, yCenter)), 7, 0x0000FF);
    }
  }

  k10.canvas->updateCanvas();  // Refresh screen
  delay(50);                   // 50ms delay for stable data reading
}
Running Result: As shown in the figure, there are two unregistered tag codes (ID 0) in the image. The first ID0 tag is on the left, and its content is 9. The second ID0 tag is on the left, and its coordinates are (247, 163).

17. QR Code Recognition Blocks
17.1 Recognize QR Codes and Output Related Data
HUSKYLENS 2 can recognize QR codes appearing in the image. You can obtain the related data of the detected QR codes through programming. The QR code data that can be read includes: the total number of detected QR codes, and the data of a specified QR code, which includes QR code ID, content, width, height, as well as the X and Y coordinates of the center point.
The example program is as follows.
#include "unihiker_k10.h"
#include "DFRobot_HuskylensV2.h"
// Create objects (Huskylens: QR code recognition; UNIHIKER K10: screen)
HuskylensV2  huskylens;
UNIHIKER_K10 k10;
uint8_t      screen_dir = 2;  // Screen display direction


// Main program initialization
void setup() {
  k10.begin();          // Initialize UNIHIKER K10
  Wire.begin();         // Initialize I2C communication

  // Wait for Huskylens connection (retry every 100ms)
  while (!huskylens.begin(Wire)) {
    delay(100);
  }

  k10.initScreen(screen_dir);       // Init screen with set direction
  k10.creatCanvas();                // Create drawing canvas
  huskylens.switchAlgorithm(ALGORITHM_QRCODE_RECOGNITION);  // Set to QR code recognition mode
}

void loop() {
  huskylens.getResult(ALGORITHM_QRCODE_RECOGNITION);  // Get latest QR code recognition data

  if (huskylens.available(ALGORITHM_QRCODE_RECOGNITION)) {
    // Simplify index: 1-1 → 0 (more intuitive, same meaning)
    k10.canvas->canvasText(String("Center QR code ID: "), 1, 0x0000FF);
    k10.canvas->canvasText(String(RET_ITEM_NUM(huskylens.getCachedCenterResult(ALGORITHM_QRCODE_RECOGNITION), Result, ID)), 2, 0x0000FF);
    k10.canvas->canvasText(String("Total QR codes: ") + String(huskylens.getCachedResultNum(ALGORITHM_QRCODE_RECOGNITION)), 3, 0x0000FF);
    k10.canvas->canvasText(String("First QR code ID: ") + String(RET_ITEM_NUM(huskylens.getCachedResultByIndex(ALGORITHM_QRCODE_RECOGNITION, 0), Result, ID)), 5, 0x0000FF);
  }

  k10.canvas->updateCanvas();  // Refresh screen
  delay(50);                   // 50ms delay for stable data reading
}
After uploading the program, wait for the upload to complete. Point the HUSKYLENS 2 camera at the QR code in the image to learn it. For detailed learning instructions, please refer to: QR Code Recognition Function - Learning QR Codes:HUSKYLENS 2
Point the HUSKYLENS 2 camera at the QR code and observe the result displayed on the UNIHIKER K10 screen. As shown in the figure, the output will include: Number of detected QR codes (regardless of whether they have been learned);Specified QR code ID; Unlearned QR codes will be set to 0.

17.2 Get Related Data of Specified QR Code in the Screen
After HuskyLens 2 recognizes a QR code, it can obtain the relevant data of the specified QR code in the screen. For example, determine whether a QR code with a specified ID is present in the screen, count the number of QR codes with the same ID in the screen. When multiple QR codes with the same ID appear in the screen, you can specify to obtain the parameters of one of the QR codes, including name, content, X/Y coordinates, width, and height.
The example program is as follows:
#include "unihiker_k10.h"
#include "DFRobot_HuskylensV2.h"
// Create objects (Huskylens: QR code recognition; UNIHIKER K10: screen)
HuskylensV2  huskylens;
UNIHIKER_K10 k10;
uint8_t      screen_dir = 2;  // Screen display direction


// Main program initialization
void setup() {
  k10.begin();          // Initialize UNIHIKER K10
  Wire.begin();         // Initialize I2C communication

  // Wait for Huskylens connection (retry every 100ms)
  while (!huskylens.begin(Wire)) {
    delay(100);
  }

  k10.initScreen(screen_dir);       // Init screen with set direction
  k10.creatCanvas();                // Create drawing canvas
  huskylens.switchAlgorithm(ALGORITHM_QRCODE_RECOGNITION);  // Set to QR code recognition mode
}

void loop() {
  huskylens.getResult(ALGORITHM_QRCODE_RECOGNITION);  // Get latest QR code recognition data

  if (huskylens.available(ALGORITHM_QRCODE_RECOGNITION)) {
    // Check if ID0 QR code exists and display its info
    if (huskylens.getCachedResultByID(ALGORITHM_QRCODE_RECOGNITION, 0) != NULL) {
      // Simplify index: 1-1→0 (1st QR code), 2-1→1 (2nd QR code)
      k10.canvas->canvasText(String("ID0 QR code count: "), 1, 0x0000FF);
      k10.canvas->canvasText(String(huskylens.getCachedResultNumByID(ALGORITHM_QRCODE_RECOGNITION, 0)), 2, 0x0000FF);
      k10.canvas->canvasText("1st ID0 QR code", 3, 0x0000FF);
      k10.canvas->canvasText(String("Content: ") + String(RET_ITEM_STR(huskylens.getCachedIndexResultByID(ALGORITHM_QRCODE_RECOGNITION, 0, 0), Result, content)), 4, 0x0000FF);
      k10.canvas->canvasText("2nd ID0 QR code", 6, 0x0000FF);
      k10.canvas->canvasText(String("Coords: ") + String(RET_ITEM_NUM(huskylens.getCachedIndexResultByID(ALGORITHM_QRCODE_RECOGNITION, 0, 1), Result, xCenter)) + String(",") + String(RET_ITEM_NUM(huskylens.getCachedIndexResultByID(ALGORITHM_QRCODE_RECOGNITION, 0, 1), Result, yCenter)), 7, 0x0000FF);
    }
  }

  k10.canvas->updateCanvas();  // Refresh screen
  delay(50);                   // 50ms delay for stable data reading
}
**Running result: ** As shown in the figure, there are two unlearned QR codes (ID 0) in the image. The first ID0 QR code is on the right, which has the content "DFROBOT". The second ID0 QR code is on the left, and its coordinates are (245, 251).

18. Barcode Recognition Blocks
18.1 Recognize Barcode and Output Related Data
The HUSKYLENS 2 can recognize barcodes in the image and, through programming, obtain the relevant detected barcode data from the image. The readable barcode data includes: the total number of detected barcodes, and data of a specified barcode, which includes barcode ID, content, width, height, and the X and Y coordinates of the barcode's center point.
The example program as follows.
#include "unihiker_k10.h"
#include "DFRobot_HuskylensV2.h"
// Create objects (Huskylens: barcode recognition; UNIHIKER K10: screen)
HuskylensV2  huskylens;
UNIHIKER_K10 k10;
uint8_t      screen_dir = 2;  // Screen display direction


// Main program initialization
void setup() {
  k10.begin();          // Initialize UNIHIKER K10
  Wire.begin();         // Initialize I2C communication

  // Wait for Huskylens connection (retry every 100ms)
  while (!huskylens.begin(Wire)) {
    delay(100);
  }

  k10.initScreen(screen_dir);       // Init screen with set direction
  k10.creatCanvas();                // Create drawing canvas
  huskylens.switchAlgorithm(ALGORITHM_BARCODE_RECOGNITION);  // Set to barcode recognition mode
}

void loop() {
  huskylens.getResult(ALGORITHM_BARCODE_RECOGNITION);  // Get latest barcode recognition data

  if (huskylens.available(ALGORITHM_BARCODE_RECOGNITION)) {
    // Simplify index: 1-1 → 0 (more intuitive, same meaning)
    k10.canvas->canvasText(String("Center barcode ID: ") + String(RET_ITEM_NUM(huskylens.getCachedCenterResult(ALGORITHM_BARCODE_RECOGNITION), Result, ID)), 1, 0x0000FF);
    k10.canvas->canvasText(String("Total barcodes: ") + String(huskylens.getCachedResultNum(ALGORITHM_BARCODE_RECOGNITION)), 3, 0x0000FF);
    k10.canvas->canvasText(String("First barcode ID: ") + String(RET_ITEM_NUM(huskylens.getCachedResultByIndex(ALGORITHM_BARCODE_RECOGNITION, 0), Result, ID)), 5, 0x0000FF);
  }

  k10.canvas->updateCanvas();  // Refresh screen
  delay(50);                   // 50ms delay for stable data reading
}
Upload the program, wait until it finishes uploading, then align the HuskyLens 2 camera with the barcode in the image to start learning. For detailed steps on learning barcodes, see the HUSKYLENS WIKI
Align the HuskyLens 2 camera with the barcode and observe the result displayed on the UNIHIKER K10 screen.
**Running result: ** As shown in the figure, it can output the number of detected barcodes (whether the barcode has been learned or not) and the specified barcode ID. For unlearned barcodes, the ID will be 0.

18.2 Acquiring Relevant Data of the Specified Barcode
After HuskyLens 2 recognizes a barcode, it can obtain relevant data about the specified barcode in the image. For example, check if a specified ID barcode is present in the image, count the number of barcodes with the same ID in the image, and when multiple barcodes with the same ID appear, specify to obtain the relevant parameters of one of the barcodes, including name, content, X/Y coordinates, width, and height.
The example program is provided below:
#include "unihiker_k10.h"
#include "DFRobot_HuskylensV2.h"
// Create objects (Huskylens: barcode recognition; UNIHIKER K10: screen)
HuskylensV2  huskylens;
UNIHIKER_K10 k10;
uint8_t      screen_dir = 2;  // Screen display direction


// Main program initialization
void setup() {
  k10.begin();          // Initialize UNIHIKER K10
  Wire.begin();         // Initialize I2C communication

  // Wait for Huskylens connection (retry every 100ms)
  while (!huskylens.begin(Wire)) {
    delay(100);
  }

  k10.initScreen(screen_dir);       // Init screen with set direction
  k10.creatCanvas();                // Create drawing canvas
  huskylens.switchAlgorithm(ALGORITHM_BARCODE_RECOGNITION);  // Set to barcode recognition mode
}

void loop() {
  huskylens.getResult(ALGORITHM_BARCODE_RECOGNITION);  // Get latest barcode recognition data

  if (huskylens.available(ALGORITHM_BARCODE_RECOGNITION)) {
    // Check if ID0 barcode exists and display its info
    if (huskylens.getCachedResultByID(ALGORITHM_BARCODE_RECOGNITION, 0) != NULL) {
      // Simplify index: 1-1→0 (1st barcode), 2-1→1 (2nd barcode)
      k10.canvas->canvasText(String("ID0 barcode count: ") , 1, 0x0000FF);
       k10.canvas->canvasText(String(huskylens.getCachedResultNumByID(ALGORITHM_BARCODE_RECOGNITION, 0)), 2, 0x0000FF);
      k10.canvas->canvasText("1st ID0 barcode", 3, 0x0000FF);
      k10.canvas->canvasText(String("Content: ") + String(RET_ITEM_STR(huskylens.getCachedIndexResultByID(ALGORITHM_BARCODE_RECOGNITION, 0, 0), Result, content)), 4, 0x0000FF);
      k10.canvas->canvasText("2nd ID0 barcode", 6, 0x0000FF);
      k10.canvas->canvasText(String("Coords: ") + String(RET_ITEM_NUM(huskylens.getCachedIndexResultByID(ALGORITHM_BARCODE_RECOGNITION, 0, 1), Result, xCenter)) + String(",") + String(RET_ITEM_NUM(huskylens.getCachedIndexResultByID(ALGORITHM_BARCODE_RECOGNITION, 0, 1), Result, yCenter)), 7, 0x0000FF);
    }
  }

  k10.canvas->updateCanvas();  // Refresh screen
  delay(50);                   // 50ms delay for stable data reading
}
**Running result: ** As shown in the image, there are two unlearned barcodes (ID 0). The first ID0 barcode (on the right) has content "world"; the second ID0 barcode (on the right) has coordinates (151, 224).
